我司最近搭建了内网服务器,以后再做项目时都要用git来进行版本控制了,我在这里把一些常用的操作写下来方便查阅。
安装Git
Windows:Git安装包/绿色版可以在官网自行下载,安装包与绿色版不同的是绿色版需要自己手动把GitBinaryPath/bin添加到系统的Path路径。
Linux(debian):sudo apt-get install git
初次设置
安装完之后启动git.exe(windows),Linux直接在终端输入:
1 | $ git config --global user.name "Your Name" |
生成SSH Key(邮件地址换成你自己的邮件地址):
1 | $ ssh-keygen -t rsa -C "youremail@example.com" |
然后一路Enter(或者你自己设置密码),执行完毕后会在C:\Users\${userName}\(linux则是在~/下)下创建一个.ssh目录,其中有id_rsa和id_rsa.pub两个文件。
id_rsa是私钥,不能泄露出去,id_rsa.pub是公钥,可以放心地告诉任何人。
然后在远程Git上(Github、GitLab)上将你的SSH Key添加到你的账户中。
因为GitHub需要识别出你推送的提交确实是你推送的,而不是别人冒充的,而Git支持SSH协议,所以,GitHub只要知道了你的公钥,就可以确认只有你自己才能推送。
当然,GitHub允许你添加多个Key。假定你有若干电脑,你一会儿在公司提交,一会儿在家里提交,只要把每台电脑的Key都添加到GitHub,就可以在每台电脑上往GitHub推送了。
创建本地仓库
启动Git Bash然后cd(或者使用Easy Context Menu将GitBash添加到系统右键菜单)到要创建本地仓库的目录执行以下命令:
1 | // 初始化一个目录 |
本地提交文件
1 | $ git add ${file_name} |
添加远程仓库
1 | // 添加一个远程仓库(${repo_name}可以自定义) |
删除远程仓库
1 | // 如果想要移除本地仓库关联的远程仓库,可以执行下面的命令 |
推送到远程仓库
1 | // ${branch}默认为master(主分支)也可以自己修改(不建议)。-f为忽略冲突强制提交。 |
推送到多个远程仓库
一步推送至两个或多个远程仓库有两种办法。
第一种是是用git的set-url --add命令:
1 | # 添加第一个远程仓库 |
第二种方法是直接编译.git/config文件,将多个远程仓库地址添加至同一个远程仓库的名字:
1 | $ nano .git/config |
新建分支
1 | // -b是base的意思,就是以当前分支为基础创建一个新分支 |
checkout有三种用途:切换分支、移除修改、从历史版本中签出,后面会写到。
1 | # 从远程的origin/level为基础创建本地分支 |
推送本地当前分支到远程分支
1 | // 若远程不存在${new_branch_name}分支则会自动创建 |
合并分支
1 | // 首先需要切换回需要合并到的分支,比如将dev分支合并到master分支 |
取消合并
如果本地与远程分支(或本地分支)有冲突可以取消合并,使本地分支回到合并之前的状态。
1 | $ git merge --abort |
解决冲突
在git中,如果是文本文件有冲突可以直接在pull时来diff区别,但是如果git管理的是二进制文件就不那么方便了。
如果想要取消本地的某次提交${123456}的更改可以使用回退到历史版本,然后使用:
1 | $ git reset --hard 123455 |
二进制文件的冲突
在Git里面文本文件的的合并可以直接看到,但是二进制的会很蛋疼。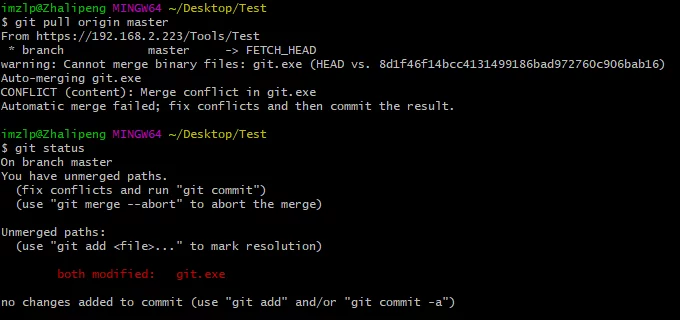
如果我们要保留远程分支的git.exe可以执行以下命令:
1 | # 保留远程版本的git.exe |
而保留本地分支的文件命令为:
1 | $ git checkout --ours git.exe |
然后再执行:
1 | $ git add git.exe |
此时本地就与远程合并了,并且合并时保持了远程的文件版本。
删除分支
1 | // 删除本地分支 |
撤销删除的分支
两种情况
- 已经退出 Terminal
git reflog 查看你上一次 commit SHA1值

1 | $ git branch ${branch_name} ${SHA1} |
就可以根据 你的SHA1值,创建一个分支,这个commit 你可以选择删除分支操作的 commit SHA1
- 没有退出Terminal
删除分支的时候会有SHA1值
1 | $ git branch -d dev |
然后利用这个SHA1值可以恢复删除的分支
1 | $ git branch ${branch_name} ffe7c46 |
版本回退
1 | // 查看所有提交的版本 |

1 | // 回退到某一版本 |

1 | // 回退某个文件到某一版本 |
撤销未提交的文件修改
只撤销本地修改
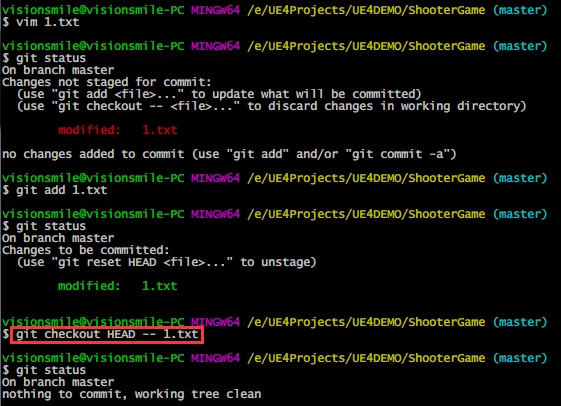
假如现在我们对分支内的一些文件进行了一些修改,且未进暂存区(git add)。
修改文件后,使用 status 命令查看一下文件状态

Git 提示我们,对于未 add 进暂存区的文件,可以使用 git checkout -- 快速撤销本地修改。
1 | // 快速撤销本地修改 |
同时撤销本地和暂存区修改
那么,对于已 add 进暂存区的文件,如何撤销本地修改?还是先使用 status 命令查看一下文件状态:

可以先取消暂存:
1 | $ git reset ${filename} |

再取消本地修改:
1 | // 快速撤销本地修改 |
一步到位的快速撤销修改
1 | $ git checkout HEAD -- ${filename} |
从历史版本中签出文件
有时候我们提交了新的版本,但是感觉某些文件的变动不太合适,想要将某几个文件回退到之前的版本,其余的保持新版本的状态,可以使用checkout命令。
1 | // 查看提交的历史版本 |
后续就可以像普通的文件一样使用add来提交了。
重命名本地分支
1 | git branch -m ${CurrentBranchName} ${NewCurrentBranchName} |
克隆远程仓库
1 | // clone仓库所有分支 |
切换到远程分支
远程仓库 git clone 下来后,执行 git branch,只能看到:
1 | * master |
并不会看到其他分支,即便远程仓库上有其他分支。
可以使用git branch -va首先列出本地/远程分支列表:
1 | $ git branch -va |

切换到远程origin/master分支:
1 | $ git checkout remotes/origin/master |
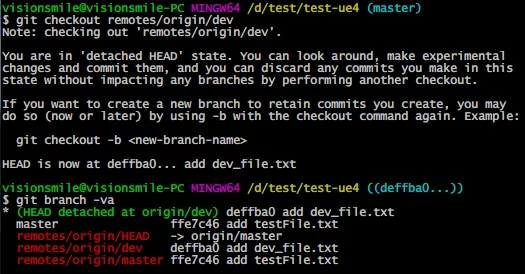
还需要进一步操作:
1 | $ git checkout -b ${remote_branch_to_local_branch_name} |
-b 的意思是base,以当前分支为base,新建一个名叫 dev 的分支,这里当然也可以使用其他的命名。此时再执行 git branch -va 就能看到:

就 OK 了~
然后在本地修改了dev分支之后可以直接推送到远程dev分支:
1 | $ git push origin dev |
从远程仓库clone特定分支
1 | $ git clone -b ${OriginRepoBranchName} ${OriginRepoAddr} |
举个栗子:
1 | git clone -b master git@github.com:imzlp/blog-source.git --depth=2 |
即从远程仓库拉取master分支,--depth指定的是拉取历史版本的深度。。
忽略不必要提交的文件
有时我们不想要把所有的东西都提交到仓库中(比如一些编译生成的二进制文件),可以使用.gitignore来排除不需要提交的文件。
在Windows下我们不能够直接创建这个文件,因为是.开头没有文件名,所以需要在GitBash下使用命令创建:
1 | $ touch .gitignore |
然后编辑.gitignore在里面添加自己需要排除的文件/目录即可。
1 | # 排除当前目录下的public文件夹 |
关于.gitignore的更多内容可以看这里——忽略特殊文件 - Git教程
比较不同版本的差异
1 | # 查看尚未暂存的文件更新了哪些部分 |
两个branch之间的diff
常见的diff用法是比较工作区,index,HEAD或者是diff两个提交。除了这些用法之外diff还可以比较2个分支,用法如下:
1 | $ git diff topic master (1) |
用法1,直接跟两个使用空格分隔的分支名会直接将两个分支上最新的提交做diff,相当于diff了两个commit。
用法2,用两个点号分隔的分支名,作用同用法1(装酷利器)
用法3,用三个点号分隔的分支名会输出自topic与master分别开发以来,master分支上的change。
需要注意的是这里的..和…不能与git rev-list中的..和…混淆。
错误处理
bad signature
如果使用git终端时出现以下错误:
1 | $ git status |
这是由于索引损坏造成的,可以通过下面的方式来处理:
1 | rm -f .git/index |
更多详情请看stack overflow上的讨论:How to resolve “Error: bad index – Fatal: index file corrupt” when using Git
关闭Git的SSL验证
1 | $ git config --global http.sslVerify false |
私钥权限过于开放报错
在使用Git时有时会遇到这样的提示(通常是机器间共享私钥的时候)。
1 | @@@@@@@@@@@@@@@@@@@@@@@@@@@@@@@@@@@@@@@@@@@@@@@@@@@@@@@@@@@ |
这是提示你的Git私钥读写权限过于开放会有安全问题(我这里是644),解决方案就是把私钥(id_rsa)的读写权限改为600。Linux的读写权限可以看工具、环境的知识收录:Linux文件权限修改。
1 | sudo chmod 600 ~/.ssh/id_rsa |
Windows下的解决办法:
对文件.ssh/id_rsa点右键属性-安全/高级,禁用继承,将文件所有者更改为你自己的账户,然后添加你自己的账户和SYSTEM具有读取和执行,保存即可。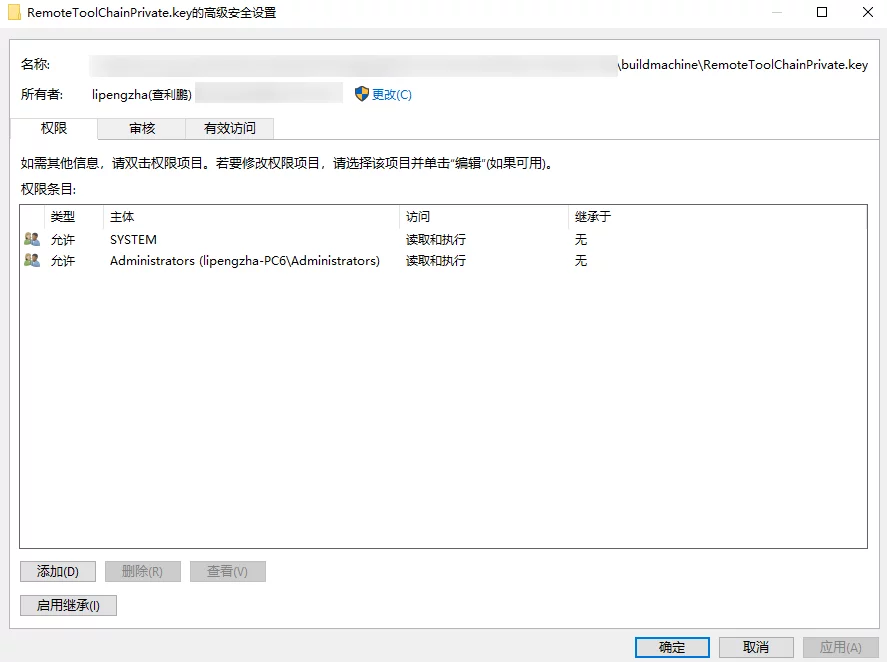
或者使用WSL来用
chmod设置权限。
参考文章: Windows SSH: Permissions for ‘private-key’ are too open
Git更新远程分支列表
1 | $ git remote update origin --prune |
submodule
如果再一个git仓库中又用到其他git仓库的,就可以使用git module来处理这个包含关系。
如果直接在git仓库A中把另一个仓库B clone下载作为A的子目录,在git add时会有下列类似的提示:
1 | hint: You've added another git repository inside your current repository. |
目的就是告诉你你包含了另一个git的仓库。
正确的处理办法是,先把之前clone的B删除,然后使用git submodule来clone B:
1 | $ git submodule add git@github.com:ufna/VaRest.git Plugins/VaRest |
会把B clone下来,然后进到B的目录里面,将版本记录改为你想要的commit,然后再add/commit即可。
1 | $ git status |
然后再push到远程仓库即可,在远程仓库中,A项目中的B目录就不是直接上传的文件,而是连接到真正的B的源仓库。
初始更新子模块
1 | $ git submodule update --init --recursive |
后续更新子模块
1 | $ git submodule foreach git fetch |
删除子模块
删除一个以添加的子模块需要有以下几个步骤:
- 删除子模块的目录
- 删除
.gitmodules中的关于该子模块的信息 - 删除
.git/config中关于该子模块的信息 - 删除
.git/modules下该子模块的目录
执行完上面几步操作之后就可以了,但是如果有报错问题可以删掉缓存:
1 | $ git rm --cached 子模块名称 |
更新所有的submodule
1 | git submodule foreach git pull origin master |
git gc
如果拉取时出现下面这样的提示:
1 | Auto packing the repository for optimum performance. You may also |
因为Git往磁盘保存对象时默认使用的格式叫松散对象(loose object)格式。Git时不时地将这些对象打包至一个叫 packfile的二进制文件以节省空间并提高效率。当仓库中有太多的松散对象则就会提示你运行git gc。
所以出现上面的提示时,直接在终端运行:
1 | $ git gc |
等执行完毕就可以了。
从远程拉取分支
1 | # 查看远程分支 |
方法一:
1 | # 拉取远程分支并创建本地分支 |
方法二:
1 | $ git fetch origin ${RemoteBranchName}:${LocalBranchName} |
fatal: The remote end hung up unexpectedly
将postBuffer改大一点就可以(以字节为单位):
1 | $ git config http.postBuffer 524288000 |
Git开启大小写敏感
Windows上的Git默认是大小写不敏感的,可以通过修改配置实现:
1 | $ git config core.ignorecase false |
Git设置代理
1 | git config --global http.proxy 'socks5://127.0.0.1:1080' |
取消git代理:
1 | git config --global --unset http.proxy |
创建本地空仓库
1 | $ git --bare init |
这个命令是创建一个空仓库,可以在其他的项目中将该仓库添加为远程仓库。
Early EOF Error
1 | user@USER ~ |
解决办法:关闭core.comparession:
1 | git config --global core.compression 0 |
找不到仓库
如果拉取时提示:
1 | $ git.exe pull--progress-v--no-rebase "origin" |
在确认服务器连通正常,并且SSH Key无问题之后,可以使用下列方法解决。
这个问题的原因是之前这台电脑上使用过其他的git账号,并且在电脑中保存了密码,当请求远程仓库时会默认使用保存过密码的账号,如果请求服务器的账号对仓库没有访问权限则会产生这个报错。
那么解决的办法就是在控制面板中删掉多余的凭据:
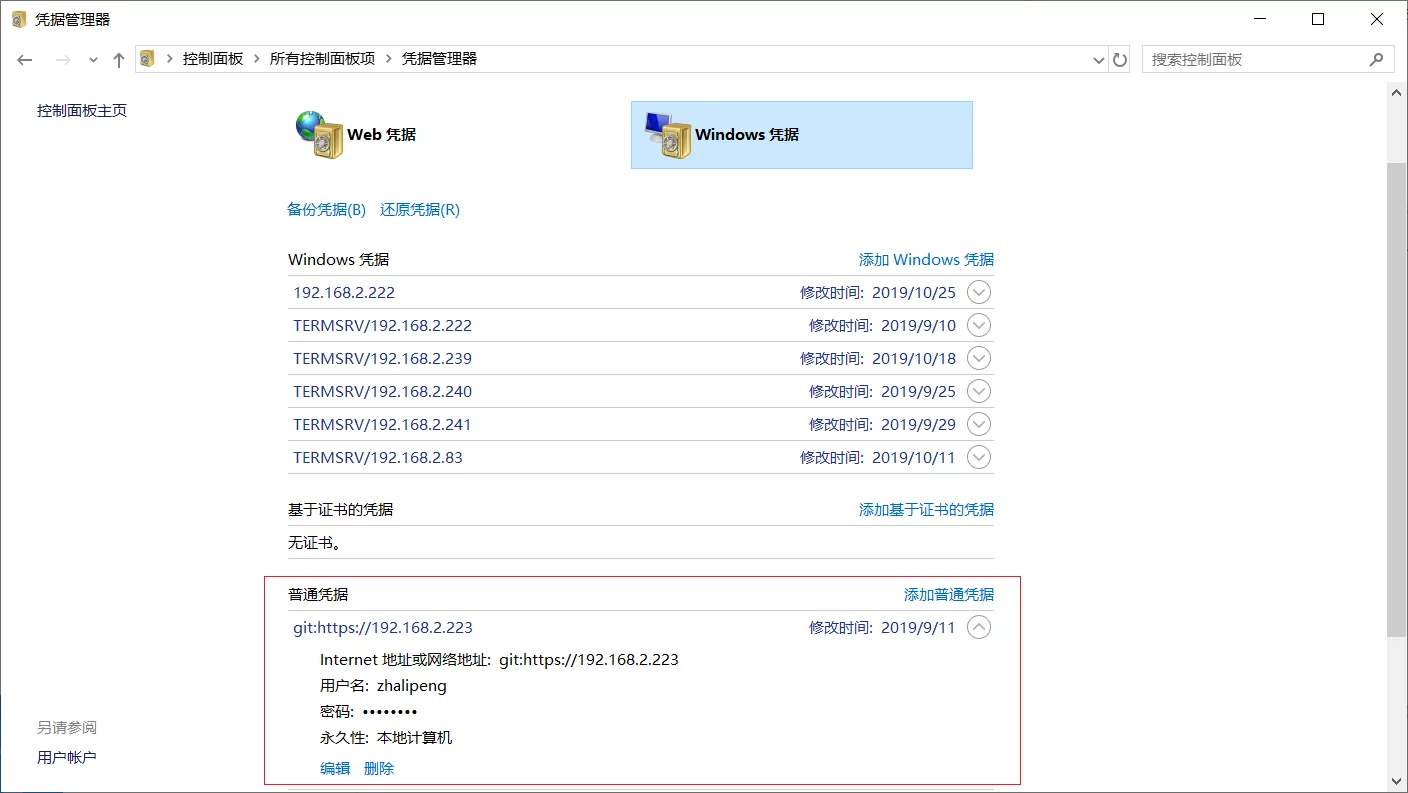
之后重新Clone或者拉取会提示输入git账号和密码。
Export Diiff files
有时候需要知道两个版本之间更新了哪些文件信息,可以使用git diff命令,但是也不想知道具体更改的细节,只是需要之后某些文件被改动了,可以使用下面的方式:
1 | $ git diff COMMIT_HASH_1...COMMENT_HASH_2 --name-only > diff.txt |
就会列出所有变动的文件名了,关键点就在于--name-only参数。
PS:
COMMIT_HASH_1...COMMENT_HASH_2这个必须是老版本在前,新版本在后。
列出commit列表
不同于直接git log,我只想要简单地列出每一个提交的记录而不关心提交者、时间、等等。
可以使用git的占位符来:Git Basics - Viewing the Commit History
1 | $ git log --pretty=format:"%h \"%s\"" |
--pretty=format:支持的更多的选项:
| Option | Description of Output |
|---|---|
%H |
Commit hash |
%h |
Abbreviated commit hash |
%T |
Tree hash |
%t |
Abbreviated tree hash |
%P |
Parent hashes |
%p |
Abbreviated parent hashes |
%an |
Author name |
%ae |
Author email |
%ad |
Author date (format respects the –date=option) |
%ar |
Author date, relative |
%cn |
Committer name |
%ce |
Committer email |
%cd |
Committer date |
%cr |
Committer date, relative |
%s |
Subject |
rebase
如果只是使用merge来合并分支,那么会从目标分支合并过来所有的commit信息和提交历史,有时候我们想要以一个功能的版本来作为一个commit,而不是每次修改一点点就作为一次commit,这样git的history会有很多无意义的commit,怎么解决这个办法呢?那就是使用rebase。
首先说一下rebase的流程:
- 在分支A的基础上创建分支B:
git checkout -b B - 然后在分支B上尽情修改和提交
- 当在分支B上的功能做的差不多了,想要同步会分支A时就可以使用rebase来折叠commit
具体操作为:
在分支B上找到从分支A切过来的基础版本commit的hash信息,然后使用下列命令:
1 | # 指定rebase到的基础版本 |
此时会弹出vim来编辑界面,里面列出了所有B分支从基础版本到HEAD的commit,默认都是pick的,但是因为需要折叠commit,所以我们需要把多个commit合并,需要使用git提供的squash命令:
- pick:保留该commit(缩写:p)
- reword:保留该commit,但我需要修改该commit的注释(缩写:r)
- edit:保留该commit, 但我要停下来修改该提交(不仅仅修改注释)(缩写:e)
- squash:将该commit和前一个commit合并(缩写:s)
- fixup:将该commit和前一个commit合并,但我不要保留该提交的注释信息(缩写:f)
- exec:执行shell命令(缩写:x)
- drop:我要丢弃该commit(缩写:d)
只保留一个pick,其他的都替换为squash即可。然后会弹出commit的编辑界面,可以把不想要的commit信息使用#注释掉,然后保存退出即可,rebase就完成了。
- 最后一步是切回A分支,执行merge操作:
git merge B,merge完之后在A分支就只会看到一次commit.
清理LFS缓存
当使用一段时间的LFS加速之后缓存异常巨大,可以使用以下命令清理:
1 | git lfs prune |
error:cannot lock ref
1 | error: cannot lock ref 'refs/remotes/origin/SN/feature/Terrain_CDLod': is at 076e430ca921e6a02b6c2a431609090e635f8ea8 but expected 48b8b9ebd04ab04a7053d3aca304beca46da16f6 |
解决办法:
1 | $ git update-ref -d refs/remotes/origin/SN/feature/Terrain_CDLod |
Git查看待提交文件列表
git diff
AMCR获取的是:Add/Modify/Copy/Rename等四种操作的文件:
1 | git diff --cached --name-only --relative --diff-filter=AMCR |
使用-cached会检测出当前git add之后与最近的commit的差异。
1 | $ git diff --cached --name-only --relative --diff-filter=AMCRX |
具体参数也可见git的参数:–diff-filter.
git status
使用git diff只能进行版本间的比对,或者git add之后的文件,但不能获取到未追踪的文件。
1 | git status -s |
会显示短列表:
1 | M Assets/Scene/BaseMaterials/4X4_MRA.uasset |
前两个字符标识文件状态,后跟一个空格,??表示文件未被追踪。更多状态码可查看git-status。
撤销commit
1 | git reset --soft ^HEAD |
删除github上的Tag
1 | git push origin --delete tagname |
git提交时指定账户密码
1 | git remote set-url origin https://username:password@github.com/username/repo_name.git |
注意LFS的也要修改,可以编辑.git/config文件。
SSH使用key登录失败
可以修改Mac的SSH配置(/etc/ssh/sshd_config):
1 | RSAAuthentication yes |
然后重载配置:
1 | $ sudo launchctl unload /System/Library/LaunchDaemons/ssh.plist |
error: cannot lock ref
1 | error: cannot lock ref 'refs/remotes/origin/SN/feature/avinchen/Develop': is at 651a8bcf620db8e6bbc6c874e0949ff6c09bb37f but expected f0f49ccce3abfe552e2301eca5711741a390af6b |
解决办法:
1 | $ git update-ref -d refs/remotes/origin/SN/feature/avinchen/Develop |
或者强制全拉:
1 | $ git pull -p |
拉取lfs文件
1 | git lfs fetch |
拉取pull request到本地
1 | git fetch origin pull/58/head:ue5 |
含义是把远程的第58号pr拉到本地的ue5分支。
历史文件支持LFS
启用lfs后,可以将历史提交中的文件也被LFS追踪。
1 | # 使用当前的gitattributes配置 |
删除变更文件
删除所有变动的文件:
1 | git clean -xdf |
注意:这会删除所有未被追踪的文件(包含gitignore中忽略的文件),如果不想要删除gitignore中的文件,去掉上面命令中的x;
no hostkey alg
连接SSH Sevrer时如果提示这个,是因为ssh版本导致的,远程的SSHD版本过高,而本地的SSH的版本太低。
1 | OpenSSH_5.1p1, OpenSSL 0.9.8i 15 Sep 2008 |
UE在4.27引擎里更新了客户端的SSH版本:Replace Windows ssh and rsync from DeltaCopy with new version from cw…
如果是4.27之前的引擎版本,升级到MacOS13+,远程构建时会有这个问题。
detected dubious ownership in repository at
1 | $ git remote set-url origin https://git.woa.com/xxxx/UnrealEngine.git |
如果切换了新账户之后,对于使用先前的账户拉取的仓库,会有上面的错误提示。
解决方法,把所有的路径都添加到safe directory里:
1 | git config --global --add safe.directory "*" |
注意:该命令要在新账户中执行。
Warning: the ECDSA host key
当您在提交到 GitHub 时,遇到这个警告:Warning: the ECDSA host key for 'github.com' differs from the key for the IP address '192.30.255.112',这意味着您的 SSH 客户端已经认证过另一个与目标 IP 地址匹配的主机。
要解决此问题,请按以下步骤操作:
1. 删除已知主机文件中的旧密钥:
使用文本编辑器打开 ~/.ssh/known_hosts 文件(Windows 用户请在 %UserProfile%\.ssh\known_hosts 路径找到该文件)并找到对应条目(参照IP地址和主机名),然后删除对应文本行。
例如,在 known_hosts 文件中找到如下条目:
1 | github.com,192.30.255.112 ssh-rsa AAAAB3NzaC1yc2EAAAABIwAAAQEAq2A7hX ... |
删除该行。
2. 确认 GitHub 的 SSH 主机指纹:
从 GitHub 官方文档 中确认当前有效的传输层安全(TLS)公钥指纹和 SSH 公钥指纹。
3. 通过 SSH 重新连接并添加新的主机密钥:
在终端或者命令提示符中,执行以下命令:
1 | ssh -T -oStrictHostKeyChecking=accept-new git@github.com |
这将会自动添加新的 github.com 主机密钥。
如果提示 “Hi 用户名! You’ve successfully authenticated, but GitHub does not provide shell access.”,那么说明 SSH 认证成功,问题已解决。
现在,您应该可以正常提交代码到 GitHub,警告信息不再出现。
pull/push每次都提示输入密码
可以执行以下命令:
1 | git config --global credential.helper store |
获取当前仓库最新commit信息
如果只是获取当前最新的commit id,可以使用以下命令:
1 | $ git rev-parse HEAD |
如果想要看到分支和commit信息,可以用下面命令:
1 | $ git log -1 --pretty=oneline |
-1参数是只列出最新的一条commit。
如果加入--decorate,则能看到分支信息(也取决于git版本,新版本默认就有分支信息了):
1 | $ git log -1 --pretty=oneline --decorate |
SSH使用key登录失败
如果SSH连接时提示以下错误:
1 | lipengzha@192.168.31.55: Permission denied (publickey,password,keyboard-interactive). |
可以修改Server端SSH配置(/etc/ssh/sshd_config):
1 | RSAAuthentication yes |
然后重启SSHD服务即可。
查看某行代码的最后修改人
查看某个文件的n~m行的代码最后提交人:
1 | git blame filename -L n,m |
会输出:
1 | e74836f557b (lipengzha 2024-01-10 09:43:02 +0800 541) TArray<FString> FoundShaderLibs = UFlibShaderCodeLibraryHelper::FindCookedShaderLibByPlatform(PlatformName,SavePath,false); |
1 | git blame -L 541,541 --incremental --minimal Plugins\\HotPatcher\\HotPatcher\\Source\\HotPatcherCore\\Private\\CreatePatch\\PatcherProxy.cpp |
输出:
1 | e74836f557bc5ddf01de3f5f8d3b797107d9a767 541 541 1 |
清除所有历史记录
要清除 Git 仓库中的所有历史记录,只保留最新的一次提交,可以按照以下步骤进行操作:
创建一个新的分支:
首先,确保你在一个干净的工作目录中(没有未提交的更改),然后创建一个新的分支。1
git checkout --orphan latest_branch
这个命令创建了一个没有历史记录的新分支。
添加所有文件:
添加所有文件到新的分支中。1
git add -A
提交更改:
提交所有文件。1
git commit -am "Initial commit with latest state"
删除旧的分支:
切换回主分支并删除旧的分支。1
git branch -D main
重命名新分支为主分支:
将新的分支重命名为主分支。1
git branch -m main
强制推送到远程仓库:
最后,强制推送更改到远程仓库。注意:这将覆盖远程仓库中的所有历史记录。1
git push -f origin main
这将会清除所有的历史记录,只保留最新的一次提交。这个操作是不可逆的,所有的历史记录都会被永久删除,所以在执行这个操作之前,请确保你真的不需要这些历史记录。
Win与Linux换行符差异
Windows 使用回车换行符(CRLF,\r\n),而 Linux 使用换行符(LF,\n)。如果你在 Windows 上创建或修改文件,然后在 Linux 上查看,可能会因为换行符的不同而导致 Git 认为文件有变更。
解决方法:可以在 Git 中配置换行符的处理方式。使用以下命令可以设置 Git 自动转换换行符:
1 | git config --global core.autocrlf true # Windows |
- 使用
.gitattributes文件来指定特定文件的换行符处理方式,例如:
1 | `* text=auto |
注意,我设置了之后发现变动文件无法实时显示在工作区中。可以在
C:\User\[USER_NAME]\.gitconfig中删除这个配置。
批量转换行尾符
写了一个python脚本来实现:git_eol_normalize.py
1 | python3 git_eol_normalize.py --repo_Dir REPO_ROOT_DIR --eol LF |
可以根据需要修改g_text_exts里的文本格式列表。
拉取TAG到本地分支
- 从远程获取tags(
git fetch --tags) - 查看tag列表(
git tag) - 拉取远程tag到本地分支(
git checkout -b LOCAL_BRANCH ORIGIN_TAG_NAME)
打包提交记录
有时希望在两台机器间同步一些提交记录,但是又没有一个公共仓库可以访问。
这种情况下可以使用git bundle打包指定的提交记录:
1 | # 打包最新的一次记录 |
另外的机器拿到bundle文件后,可以用文件执行git pull:
1 | git pull create_last_commit.bundle |
就能在另外的机器上恢复提交记录了。
subtree
有时我们希望把一个仓库的代码放到另一个仓库中,但不是使用submodule的方式,这种情况下,就可以使用subtree。
首先你已经有了一个主仓库,然后想要把另一个仓库放入主仓库的一个目录下:如主仓库MainProj,想要放入HotPatcher到Plugins目录下。
需要的操作:
- 在主仓库中,为子仓库添加一个remote(
git remote add lib-hotpatcher git@github.com:hxhb/HotPatcherUE.git) - 通过
git subtree add添加子仓库到子目录(git subtree add --prefix=Plugins/HotPatcher lib-hotpatcher master --squash)
上面的命令会把lib-hotpatcher这个remote的仓库的master分支拉到Plugins/HotPatcher目录下,并创建两个提交记录:
1 | git subtree add --prefix=libs/my-library library-remote main --squash |
参数解析:
--prefix=libs/my-library: 指定要将代码放入的子目录路径。如果目录不存在,Git 会自动创建。library-remote: 上一步添加的远程仓库的别名。main: 你想要拉取的 library-project 仓库的分支名(可能是 main 或 master)。--squash: (可选但强烈推荐) 这个参数会将子仓库的所有历史记录压缩成一个单独的 commit。这样做可以保持你的主仓库历史记录的整洁,否则子仓库成百上千的 commit 都会被合并进来。
后续如何从子仓库拉取更新,可以执行下面的代码:
1 | git subtree pull --prefix=libs/my-library library-remote main --squash |
如何将主仓库中对子目录的修改推送回子仓库 (Push)?
这是一个高级用法。如果你在 main-project 中修改了 libs/my-library 目录下的代码,并希望将这些更改贡献回 library-project,可以这样做:
1 | git subtree push --prefix=libs/my-library library-remote main |
UPDATE
CheatSheet

参考文章
Git远程操作详解
创建与合并分支
Git撤销分支删除操作
git checkout 命令撤销修改
git diff之diff两个分支

