2024-03-01 14:10
markdown中插入并列的图片:
1 | <p align="left"> |
2023.04.17 16:55
禁用博客Sidebar里author元素的右键事件:
1 | <div class="site-author motion-element" itemprop="author" itemscope itemtype="[http://schema.org/Person](http://schema.org/Person)" oncontextmenu="return false" οndragstart="return false"> |
通过添加oncontextmenu="return false" οndragstart="return false实现。
2023.04.07 11:22
发现了一个我博客的盗版镜像站,并且会把我域名的imzlp.com都转换为它的域名,太无耻了。
做了一些控制,访问所有页面都会检测是否为我的域名,否则就会强制跳转。
1 | <script type="text/javascript"> |
2022.10.17 19:01
使用Obsidian作为博客和本地md管理工具,非常爽。
博客和私有笔记同时使用Obsidian进行管理,并使用oss进行同步服务,可以非常完美地实现跨端体验,IOS上体验也很好。
2022.08.26 11:23
给博客集成了一个Markdown编辑器:MD Editor。
2022.04.02 18:39
- 创建了hexo-showcase-card,用来实现展示柜的功能。
- 给每个文章添加了一个
subtitle的项,可以用来指定子标题或者其他语言的标题。方便被搜索引擎收录。
2021.11.12 23:14
为开源项目页面接入githubcalendar:
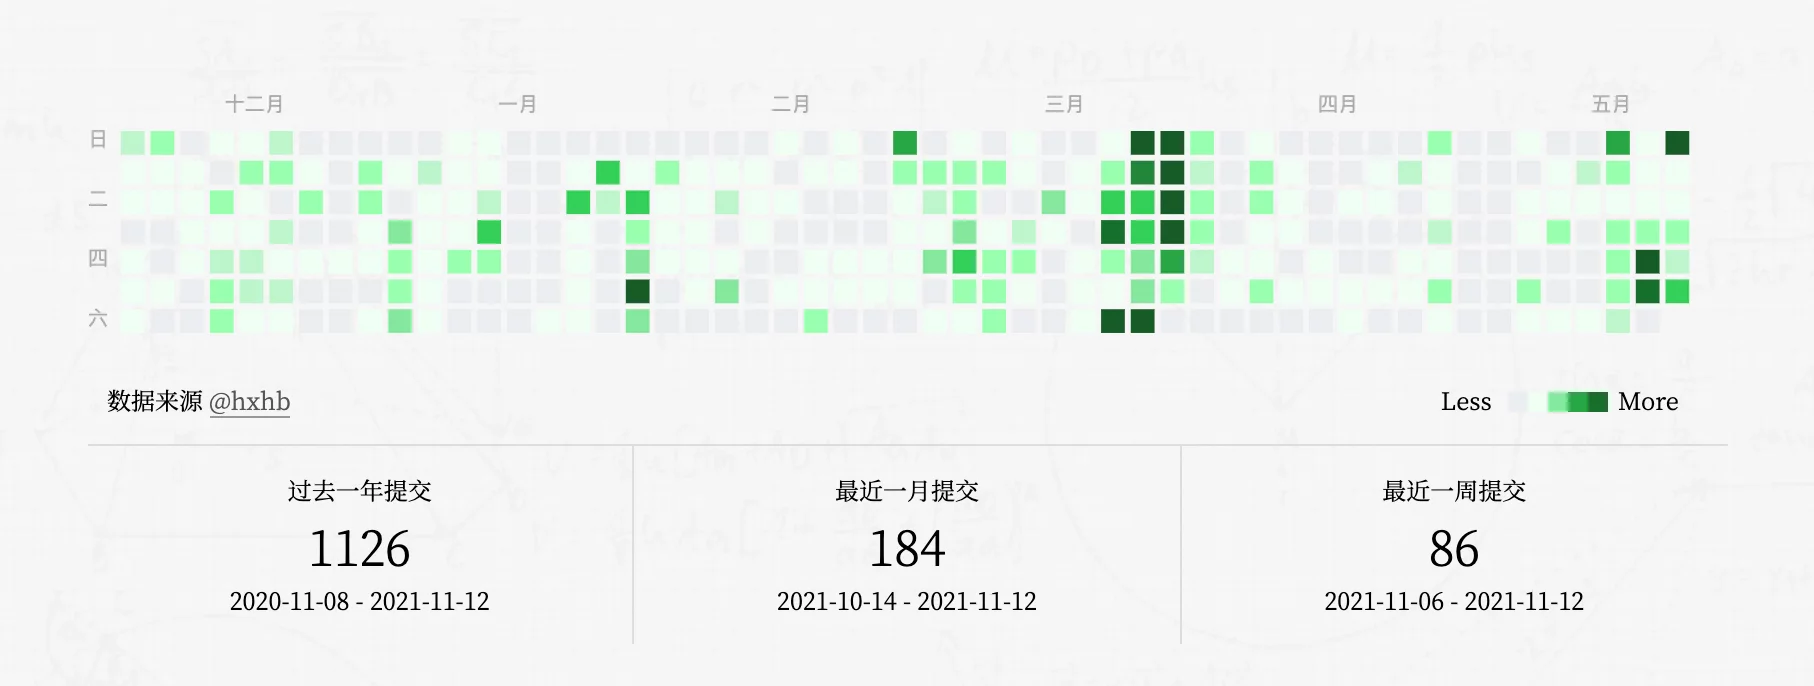
1 | $ npm install hexo-githubcalendar --save |
配置文件:
1 | githubcalendar: |
2021.10.08 18:33
支持长代码折叠,变动代码:182a7d8。
2021.05.08 10:30
Typora配置自动上传cos图片。
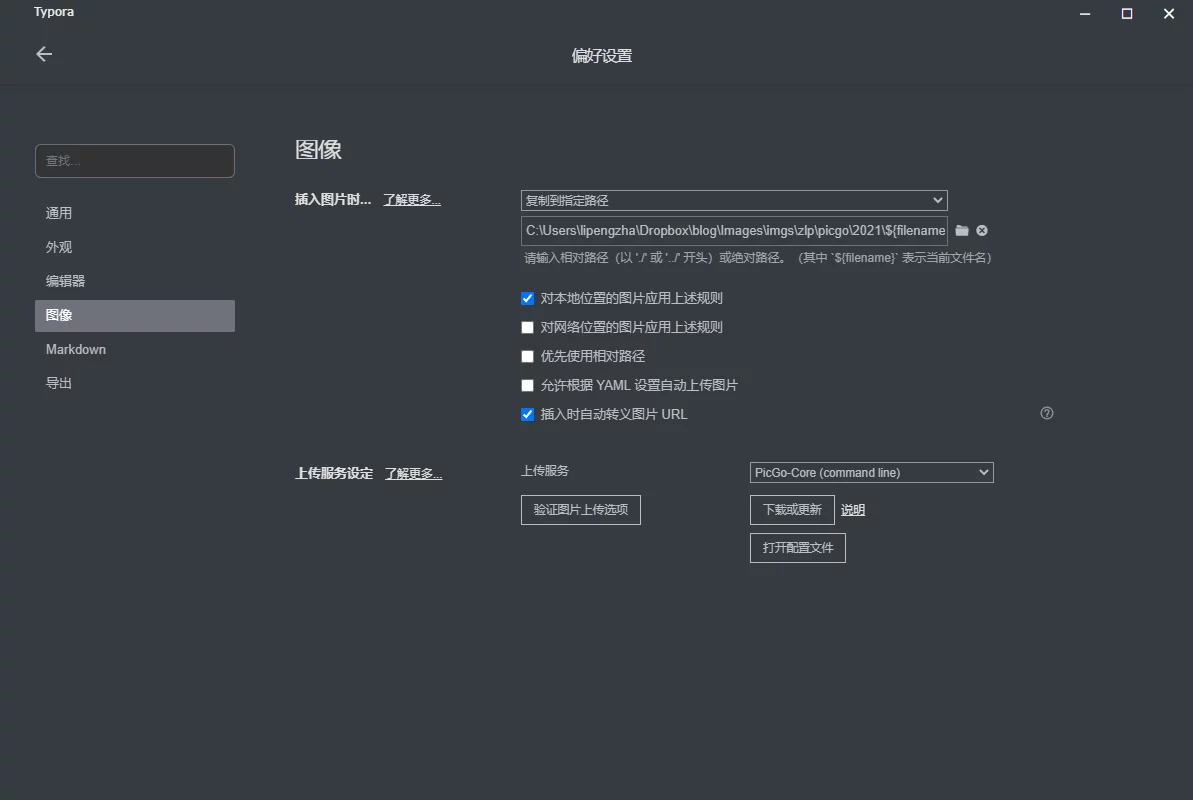
配置文件如下:
1 | { |
2021.04.30 10:11
Hexo-Next主题中实现页内标签代码:
1 | {% tabs menu-items %} |
效果如下:
2021.04.24 18:38
完成了对博客域名的ICP以及公安部备案,可以在网站底部看到相关信息
2021.03.23 10:29
近期完成了博客的域名转发、OSS/CDN部署,两周的使用来看比较稳定。目前博客的流量开启国内CDN加速的情况,在阿里云的费用倒也不贵。把imzlp.me域名又续费了一年,这一年时间逐步把这个域名相关的链接替换掉。
目前通过CloudFlare部署了301转发,如果使用*.imzlp.me/*访问会自动转发到*.imzlp.com/*,从而不会影响之前收藏了我博客文章的用户。
2021.03.17 10:22
在阿里云上部署了博客的国内CDN加速,抛弃了腾讯云,腾讯云的设置操作、生效时间,操作的便捷度各个方面都比不上阿里云,腾讯云干不过阿里云是有道理的。
2021.03.11 09:55
域名备案完成,准备在腾讯云COS上部署博客的CDN加速。腾讯云COS的国内节点在Github Action上的上传速度比香港节点的差得多。
2021.03.02 15:51
已经把Hexo自动部署到国内cdn的流程打通了,只差备案域名就可以为我的博客开启国内的CDN加速了。
2021.03.01 30:34
移除了imzlp.me与zhalipeng.com的提交支持,但是保留了页面跳转,这两个域名都会直接重定向到imzlp.com站点,域名zhalipeng.com准备以后做成我的信息的导览站点。
2021.03.01 15:09
为了方便国内备案并使用CDN加速,博客的主域名从imzlp.me更换为imzlp.com,目前是在Cloudflare里做了页面转发,me域名访问页面时会直接跳转到com,目前不会对已有链接造成影响,旧域名会续期一年半的时间,之后会完全切换为com域名,之前部署的各种独立页面域名也已切换。
2021.01.16 13:19
同时部署blog到cn.imzlp.me,使用国内的coding-pages分流,可以加快国内的访问速度。
coding的pages服务还是不如Github的好用,移除了coding pages的部署支持,准备使用.com域名+备案使用国内CDN加速方案。
2020.12.10 19:16
添加了hexo-github-card插件,可以在hexo中添加github的卡片。
user-card:
1 | {% githubCard user:hxhb %} |
repo-card:
1 | {% githubCard user:hxhb repo:HotPatcher %} |
2020.10.09 18:42
添加hexo-tag-steamgame,支持在博客中插入Steam的游戏。
1 | {% steamgame appid %} |
效果:
2020.10.01 17:42
Hexo的新版本有个问题,默认使用的文章更新时间是md文件的修改时间,在使用ci部署时,因为只拉取了深度1的提交,会导致所有的文章更新时间都是最近的提交,解决这个的办法是clone完整的仓库,clone完成之后使用下面的脚本进行文件修改时间的修正:
1 | git ls-files -z | while read -d '' path; do touch -d "$(git log -1 --format="@%ct" "$path")" "$path"; done |
2020.09.30 13:34
在使用Gist来管理笔记时,因为gist不允许空内容,不然无法保存,所以想到可以使用HTML的空字符来占位,使用 即可, 也可以。
2020.09.29 17:05
使用NeXT主题的Pisces模式,换个博客风格~
新版本的NeXT设计上还是很灵活的,我在之前版本中需要改动到主题代码才能实现的操作,现在都可以放在source/_data下了,只有极少的修改主题内的文件(languages和images以及添加外部的js等),比较方便后续升级。
2020.09.29 13:14
把Hexo和NeXT主题都升级到了最新的版本,也增加了在不支持webp的环境中自动使用png,升级之后生成速度快了很多,感觉主题也顺滑了一些。
2020.09.23 14:44
给博客添加Gist的编辑支持,在非post页面里都添加了gist的链接,可以直接通过修改Gist中的内容实现修改博客内容的目的,而不用每次修改一点东西都要重新生成一遍,也方便快速预览。唯一的缺点就是没法使用Cloudflare的CDN加速,在国内无法访问gist的网络会导致内容显示不出来。目前的做法是把经常修改的页面添加GIST的笔记显示,定期整理到Hexo的md中,这样不用新加一条笔记就要重新生成一遍了。
在Gist的markdown编辑器中,可以添加注释,并且不会渲染出来,使用HTML的注释语法:
1 | <!-- Content --> |
使用注释可以隐藏一些东西不在Blog中渲染出来,而且创建Gist时可以选择Secret,就不会在gist列表里显示了。
而且还可以在gist上插入Emoji的表情,语法如下:Emoji:stuck_out_tongue_winking_eye:
另外,我还修改了Gist在Next的CSS属性,使Gist的markdown可以和博客无缝地展示到一起,如果我不说,你能看出来这条记录和其他的记录有什么区别吗?
修改的CSS内容如下:
1 | // gist |
把它们追加到source/css/_custom/custom.styl文件中即可。
2020.05.16 08:44
添加了hexo-github,可以在hexo的博客中方便地展示github仓库。
用法为:
1 | {% github hxhb HotPatcher f660157 %} |
2020.05.08 08:09
把部署博客的CI从travis-ci换到了Github Action,最重要的是支持私有仓库,而且感觉可玩性也比travis-ci要强。
我的博客的workflow的配置为(部署流程是从之前的travis-ci里拷贝过来的):
1 | # .github/workflows/deploy.yml |
2020.04.22 10:50
把博客内的所有图片都替换为了webp,图片大小减小很多。我写的一个小程序用来从png和jpg生成webp,转换质量为85:replace_images.7z,代码在:replace_image.cpp
2020.02.08 10:36
为博客增加了GoogleTranslate,支持翻译博客到英语、日语、俄语(可以随便扩充)。
效果见Siadebar上的“选择语言”按钮。实现这个效果增加的代码为:
在Themes/next/layout/_macro/sidebar.swig中id为sidebar的代码之前添加下列代码:
1 | {% if theme.GoogleTranslate.Enable %} |
里面使用了很多控制变量,从theme的_config.yml中读取,所以需要把下列代码添加到主题的_config.yml中:
1 | GoogleTranslate: |
里面的参数可以根据自己的需求指定。
还需要往themes/next/source/css/_custom/custom.yml中添加一个样式:
1 | // google translate |
还添加了文章置顶的功能,实现方法如下。
首先,替换hexo-generator-index为hexo-generator-index-pin-top:
1 | $ npm uninstall hexo-generator-index |
然后修改Hexo根目录的_config.yml文件中的index_generator项为:
1 | index_generator: |
然后需要在想要置顶的文章中添加toplabal,将其指定为true即可。
另外,还需要添加文章置顶标识,修改themes/next/layout/_macro/post.swig文件,在<div class="post-meta">下添加如下代码:
1 | {% if post.top %} |
里面用到了两个配置项,需要在主题的_config.yml中读取,所以把下列代码填入_config.yml中:
1 | TopPost: |
其中一个是指定置顶标识的图标,一个是文字的颜色值。
2020.01.28 22:16
在文章末尾的版权栏增加了每篇文章在知乎专栏的地址。
2019.10.14 22:49
hexo-next-theme的toc不是默认展开的,当想要找一个二三级目录的时候不太方便,改了一下支持默认展开TOC。
只需要修改两处:
- 在主题的
_config.yml中toc下添加expand_all选项
1 | toc: |
- 设置
toc.expand_all控制默认展开目录
1 | # themes/next/source/css/_common/components/sidebar/sidebar-toc.styl |
也可以从github的提交记录上查看。
2019.09.28 20:23
我的博客使用了两个域名:imzlp.com和zhalipengcom部署的内容是一样的,都是在hexo的一次生成中提交的,但是发现我imzlp.com的可以及时更新,zhalipeng.com的却好像没有提交一样,不过我看了提交记录,文件是都是新的,但是就是访问还是老的内容,很奇怪。今天我研究了一下,发现是github的一个小bug,我在部署的时候是hexo生成之后通过hexo d部署到imzlp.com的,而zhalipeng.com则是从.deploy_git中checkout -b出来一个分支然后修改CNAME文件之后提交的,就是这次提交没有触发github pages的deploy,导致页面内容没有更新。
解决办法是:我从hexo d之后的.deploy_git中先checkout -b出一个gh-pages分支,并添加zhalipeng.com的remote仓库地址,push到github,然后再修改CNAME文件,然后再commit一次之后push,就会触发github pages的deploy了,完美解决。
2019.07.30 22:35
我把imzlp.com部署了cloudflare的CDN加速,速度应该会比直连github pages快那么一点点。
2019.09.28我把另一个域名zhalipeng.com也部署了cloudflare的CDN。
2019.01.12 16:31
使用MikeCoder/hexo-blog-encrypt来加密博客文章。
2018.06.13 07:47
把TechDocuments/LinuxCommands/Software Search/IT Books Search以及Pdf Viewer都申请了Github Pages的HTTPS服务,突然发现我用了很多Github的免费服务,很惭愧…
2018.06.09 09:13
之前我的zhalipeng.com这个域名在Github Pages申请HTTPS老是失败,今天弄了一下成功了。
2018.05.02 10:58
Github Pages支持custom domain的HTTPS了(Custom domains on GitHub Pages gain support for HTTPS),同样是使用Let’s Encrypt的证书,Github真的是十分良心,以后再也不用VPS反向代理博客了!
注意:因为使用HTTPS需要A记录申请证书,在DNS解析那里需要改一下。具体说明在这里:Troubleshooting custom domains
2018.03.14 13:58
新增两个插件,使Hexo博客支持流程图hexo-filter-flowchart和序列图hexo-filter-sequence。
流程图:
1 | st=>start: Start|past:>http://www.google.com[blank] |
序列图:
1 | Alice->Bob: Hello Bob, how are you? |
2018.02.04 18:20
来杭州这一段时间,许多事情繁忙博客疏于管理了,前段时间Travis-ci和HTTPS相继挂掉,今天才有时间把他们都弄好。
2017.09.11 19:53
新增加读书页面,并彻底把所有外链资源转为由Github管理。
2017.09.03 21:13
博客的图片和其他资源多了之后,七牛管理起来很不方便,趁着今天周末的空隙把博客内的图片全都从七牛转移到了Github Pages里面,使用hexo-asset-image。
2017.07.19 14:32
使用Gitment把博客的评论也放在了imzlp/blog-source的issues里,这下再也不怕评论服务商关闭服务了。
可以在这里看作者的使用说明。
2017.07.18 14:12
把博客的源文件与博客的页面文件在github上分离了(本来是在imzlp/blog-source的master与gh-pages分支)。
更改之后imzlp/blog-source没有了master分支,只有gh-pages作为静态页面生成后的上传分支。
博客的源文件放在了私有仓库里,使用travis.com来持续集成部署。
2017.05.31 09:18
注:目前(2017.09.11~)我博客的部署方案是通过VPS来反向代理HTTPS到Github Pages的,以下方法未用。
迁移我的博客(Hexo)跑在了VPS上,使用NGINX,配置如下:
1 | server { |
设置DNS解析之后,在VPS上执行hexo s -g,然后就可以通过域名在外部访问了,而且我使用Dropbox从本地和VPS同步博客的文章,在本地修改好之后会自动同步到VPS上,hexo也会自动检测并应用修改,实际上使用起来和动态博客差不多了。
如果想要指定多个域名,就在配置文件里把上面的配置拷贝一份,只把server_name里改掉即可。
2017.05.23 22:29
添加了本站的内容汇总页面:imzlp.com/links,方便直接访问。
2017.05.19 23:58
Github Pages国内访问太慢了,我使用nginx在我的VPS上做了反向代理。
2017.05.15 23:34
新建问题集页面,以后若有一些问题的疑问或者思考会放到里面。
2017.05.12 12:39
部署在coding pages上的站点都会被插入跳转广告了,我把国内分流的coding pages页面关闭了,全部转到github pages上。
2017.04.21 09:44
写了几个月的tweets,感觉太多东西堆放到一块也确实是挺乱的,于是我将博客程序变更以及内容组织的更新放到这里来。
2017.04.09 23:26
简单更新了一下我之前写的管理Hexo博客的小程序,增加新建草稿支持。
2017.04.02 02:50
把博客中引用的图片外链转成了Google的webp格式,压缩率提升不少,质量也还不错。
Google的介绍:A new image format for the Web.
另外,顺道把之前文章二维码生成的方式换了,之前是通过一个网站的服务生成的图片,但是生成的图片文件太大了,500+k加载起来很慢,所以我换成了qrcode.js来生成文章的二维码,效果很不错,可以在这里看我修改的代码,以及修改的css样式。
也把Hexo更新到了3.3.0,更新了一些插件,使用了hexo-all-minifiler来优化内置的图片、css以及html文件,应该能提高一些加载速度吧。
2017.03.23 11:52
把评论转到disqus了,但是国内貌似被墙掉了(被墙掉很不方便,换到了网易云跟帖)。
2017.03.24 22:14
捣鼓了一下博客,在每篇文章末尾自动生成当前文章的二维码,增加的代码看这里。并且适配了自适应(在移动端访问时隐藏该二维码),写了一段CSS,具体代码看这里。
可以直接在主题的_config.yml中设置是否开启文章二维码或者自定义的版权信息,增加的代码看这里。
2017.02.10 23:11
使用coliru在Hexo内实现了一个简单的onlineIDE,可以直接在网页中执行C/C++代码。
默认的编译参数为clang++ -std=c++11 -O -Wall -pedantic -pthread.
使用方法为,将C/C++代码放入下面的块中(就像markdown的代码块那样):
1 | <pre><code data-lang="c++"> |
最好保持前后均有空行。
2017.02.10 22:06
这两天业余时间整理了一下我的博客,修改了博客的管理方式、增加了文章底部的版权信息和更新历史。(增加了拷贝原文链接和作者,代码看这里)
基本思路就是按照关联 GitHub, 让 Hexo 支持查看文章更新历史这篇文章来做的,不过不过由于是不同的主题,我也根据我自己的习惯修改了一些东西。
在主题(NEXT)中增加的代码看这里,这需要你的md文章文件是以固定的格式命名的,详情见下。
我之前文章的md文件名是以文章名命名的,但是由于我往post样式中增加了会自动生成的版权信息,也增加了文章的编辑历史(链接到github上的md文件),所以不能再按照之前的方式命名md文件(有些符号作为文件名会链接不到),我重新更改了md文件的管理方式:现在是以文章创建时间和文章id作为md的文件名(YYYY-MM-DD-ID.md),而且我还写了个小程序(自动计算abbrlinkID)来自动创建md模板并添加到我本地的文章列表中,现在我博客都不需要打开任何目录也不需要执行任何命令就可以完成文章的创建、编辑、发布,还是挺爽的,效果看这里。
2017.01.25 10:48
安装hexo-pdf插件可以在hexo的博客中插入pdf,用法如下:
1 | {% pdf pdfFileLink %} |
效果预览:C++11标准中的兼容特性
2016.12.07 13:03
cloudflare的CDN在国内访问实在是太慢,经常连不上。所以暂时还是先换回到HTTP,有时间用VPS做博客的反代再上HTTPS吧。
2016.11.14 13:30
本站启用HTTPS了耶!!在cloudflare上搞的,小绿锁挺好看:),其实就是cdn..使用的是cloudflare的美国节点,这样速度会略慢了点而且也不能使用coding-pages分流国内流量了。
另外,多说的头像是不支持https的,我使用duoshuo-https替换了多说官方的js实现了全局HTTPS,在此致谢。