本篇文章的主要内容是介绍UE在Mac上的开发环境部署、配置iOS远程出包、UPL在iOS上的应用(介入ipa出包过程)、工具和开发技巧、以及分析相关的引擎代码等内容,记录了一些在项目中遇到的坑,主要从我之前的笔记 中整理而来,后续Mac和iOS相关的内容也都会更新到这篇文章里。
远程构建iOS UE可以在Windows可以直接出Android和Win的包(Android需要配置JDK/SDK/NDK/Gradle等环境)。打包iOS则需要一台Mac,如果是每次打包iOS都要在Mac上进行操作,其实就是与Win上完全相同的操作,但是流程上不能复用就显得很繁琐,尤其是在修改了引擎的情况下,需要先更新引擎代码并编译,然后再更新项目、执行打包。好在UE提供了远程构建iOS,可以把Win/Android/iOS三端的包在相同的构建流程里出完。
前置需求:
内网搭载MacOS的电脑一台(白黑都可)
申请p12证书和mobileprovision
PC和Mac需要在网络内可以相互访问(在相同网段)
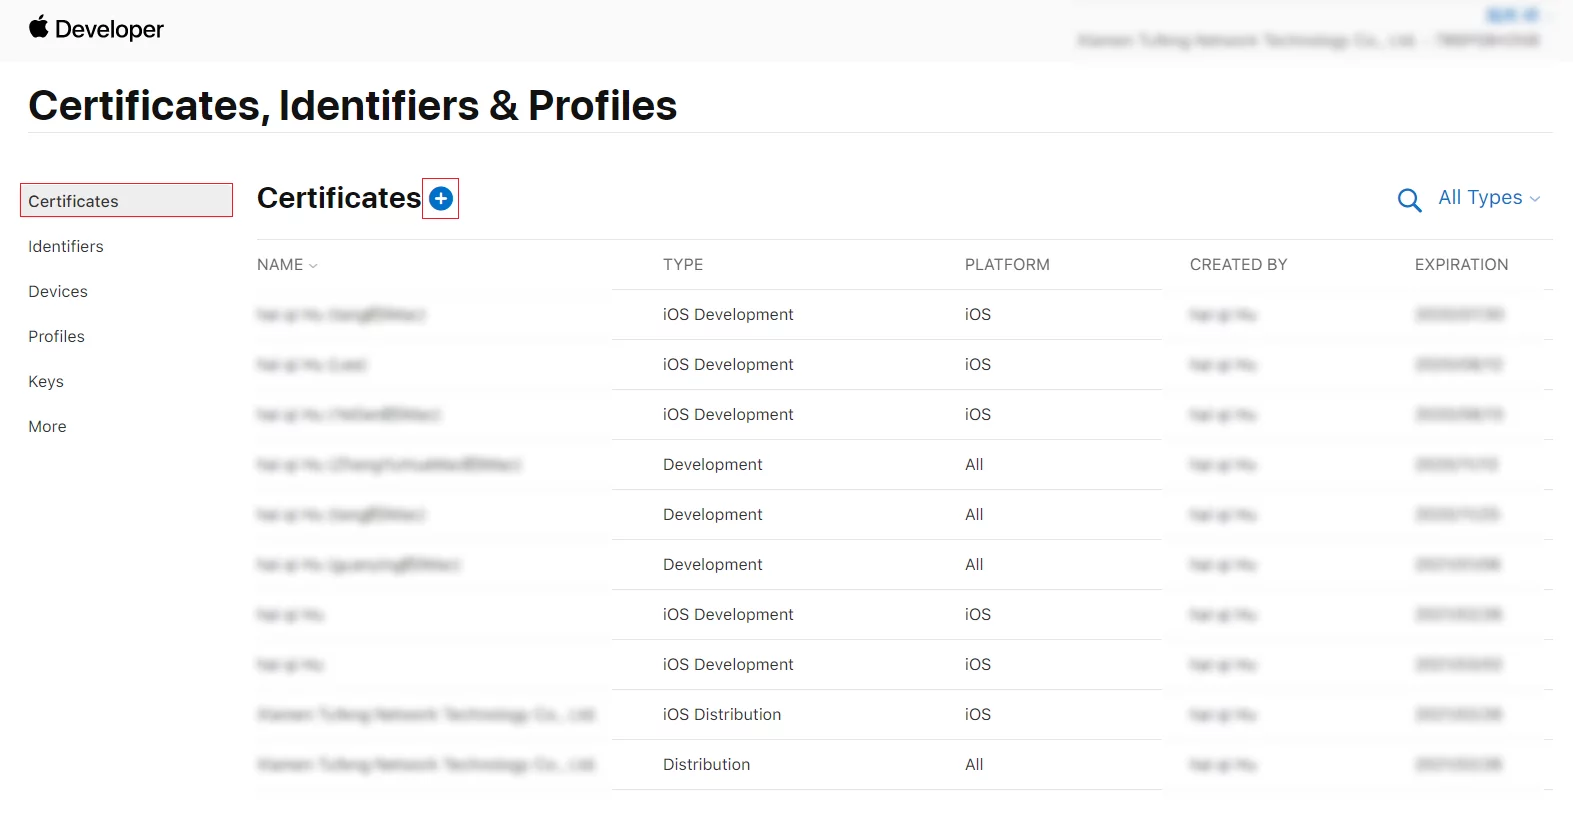
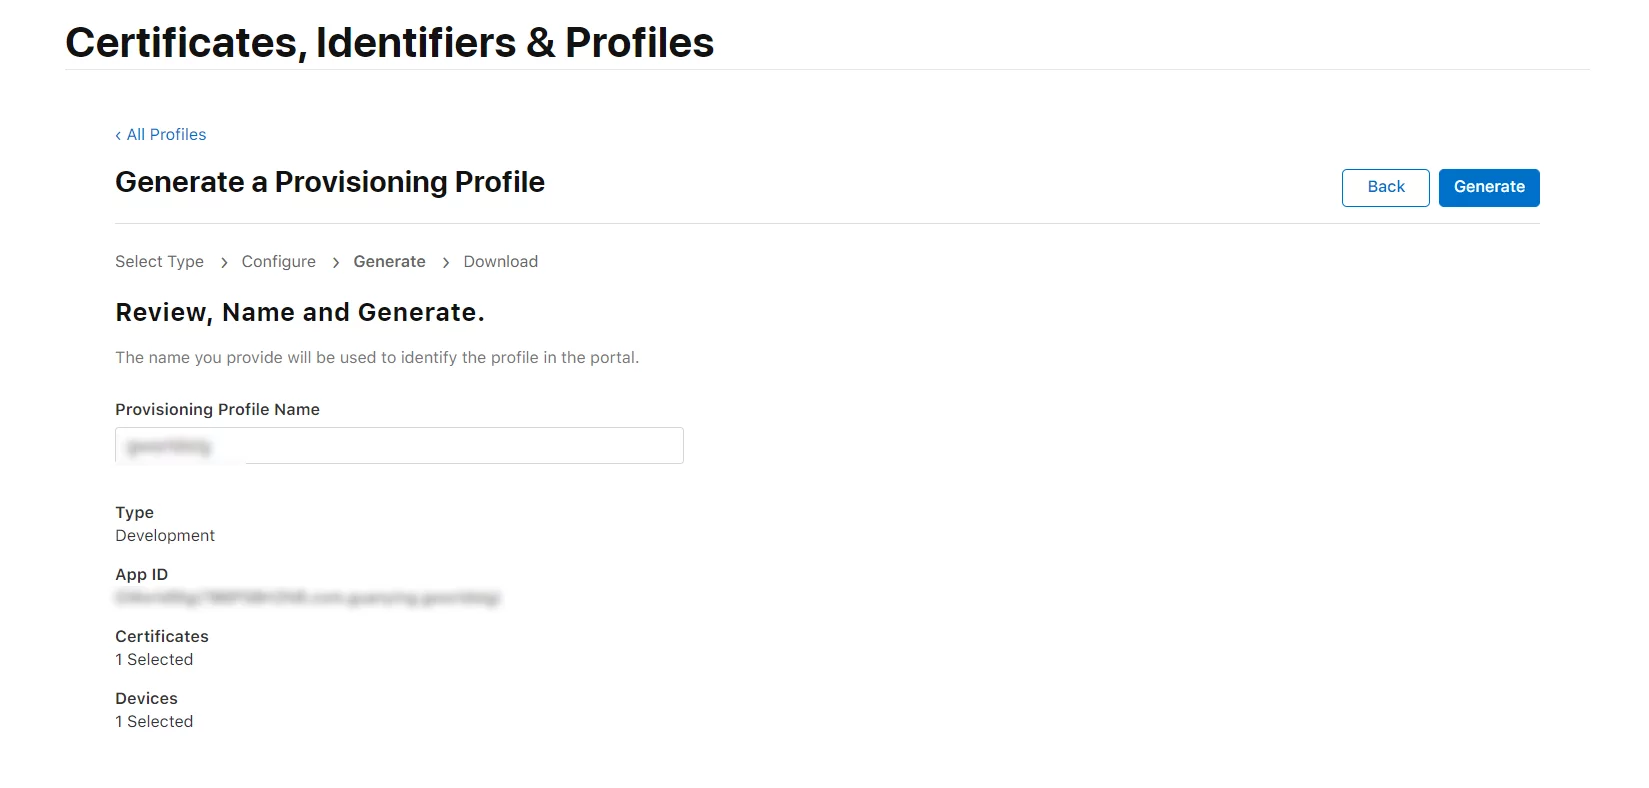
IOS证书申请 打包iOS之前需要申请iOS的开发者账号来创建证书,可以在developer.apple.com 申请。需要得到p12证书和mobileprovision,然后在UE的项目设置中导入它们。需要注意创建的证书是Developer还是Distribution证书,在出包的时候要匹配,否则会打包失败。
申请证书的流程网上有很多文章,我这里是简单记录了下我申请证书的流程,步骤不是最详细的,仅供参考。
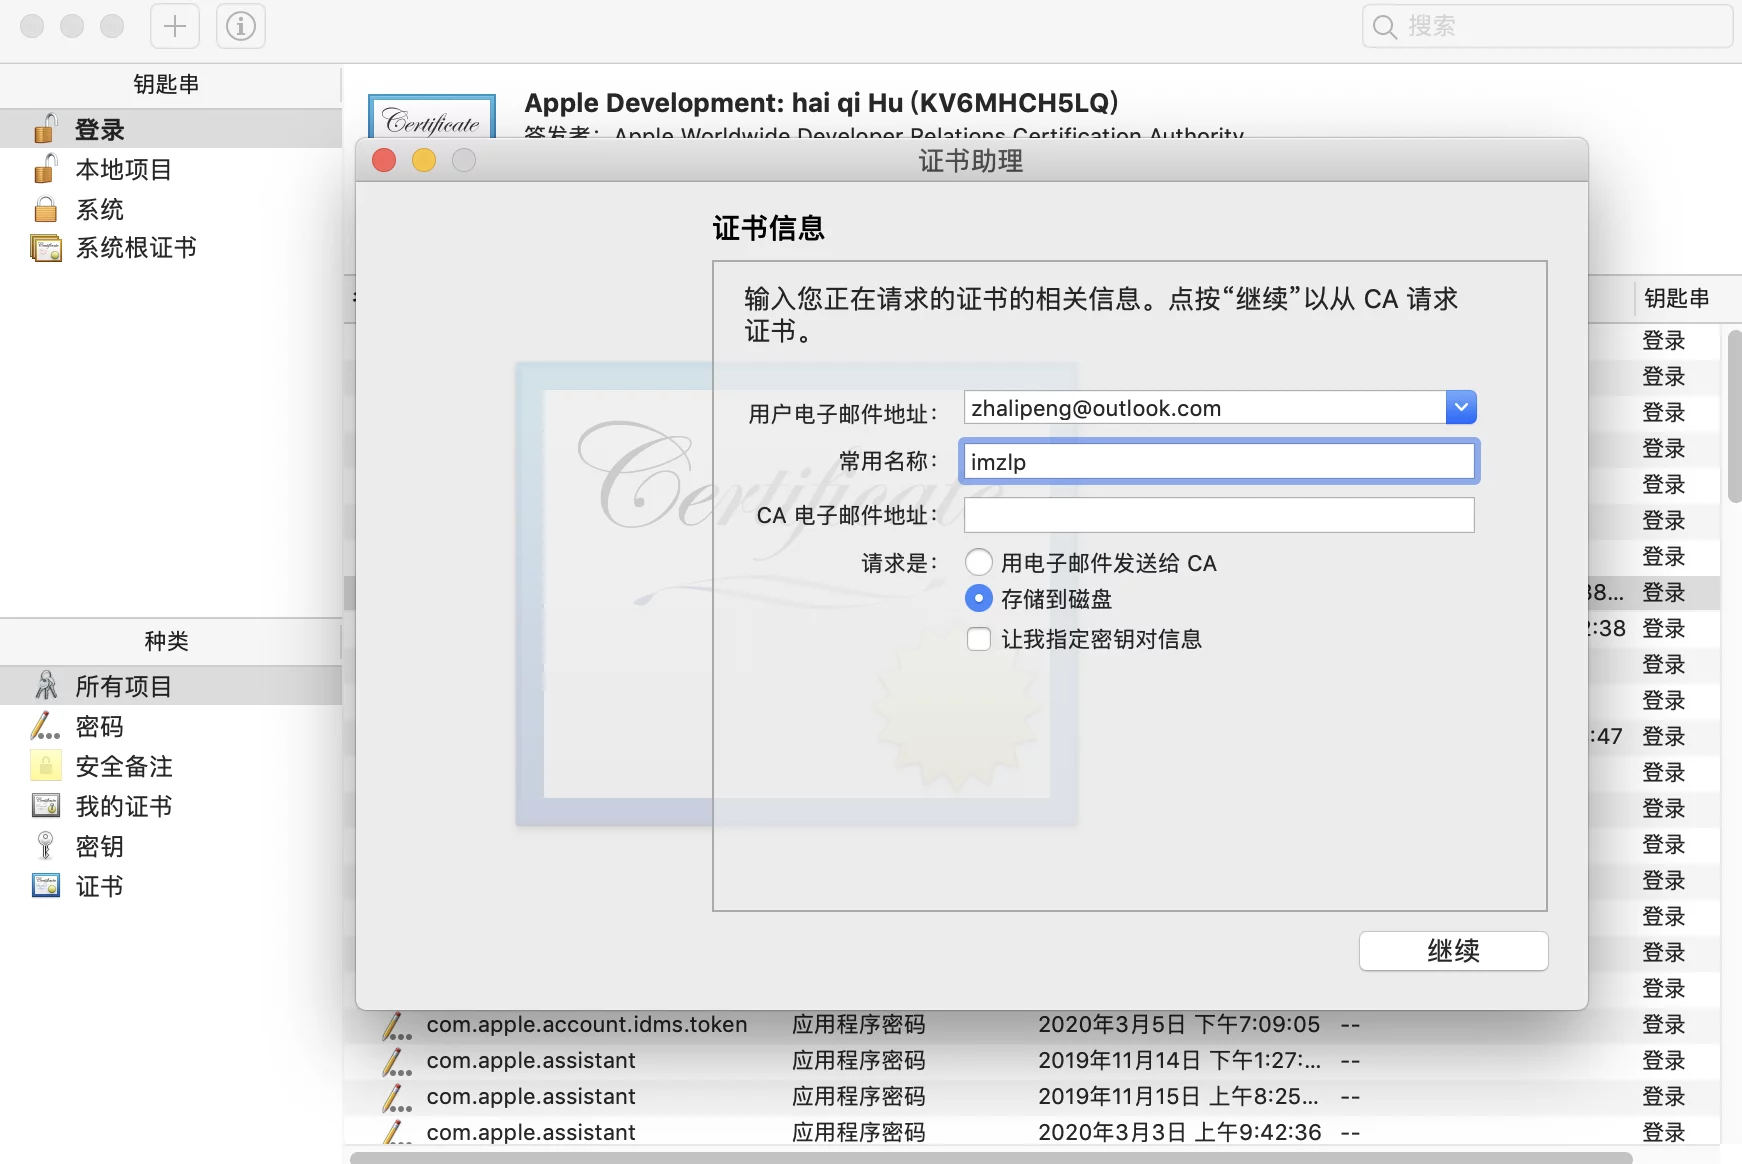
首先在Mac上导出一个证书:钥匙串访问-证书助理-从证书颁发机构请求证书:CertificateSigningRequest.certSigningRequest的文件。Apple Developer ,进入Account-Certificates:
进去之后创建Apple Development或者iOS App Development,创建过程中需要把上面生成的CertificateSigningRequest.certSigningRequest文件上传。
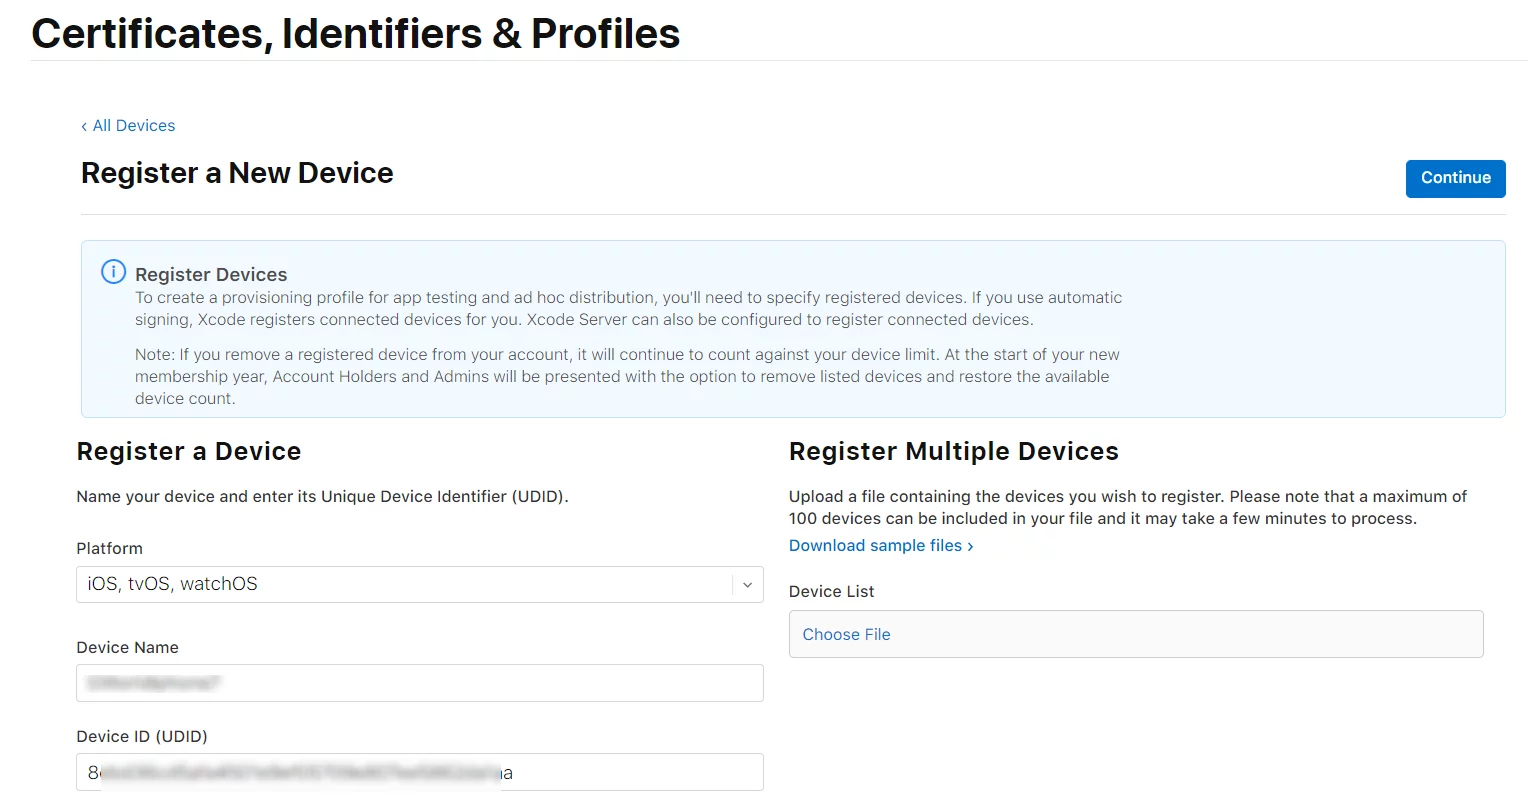
添加设备:
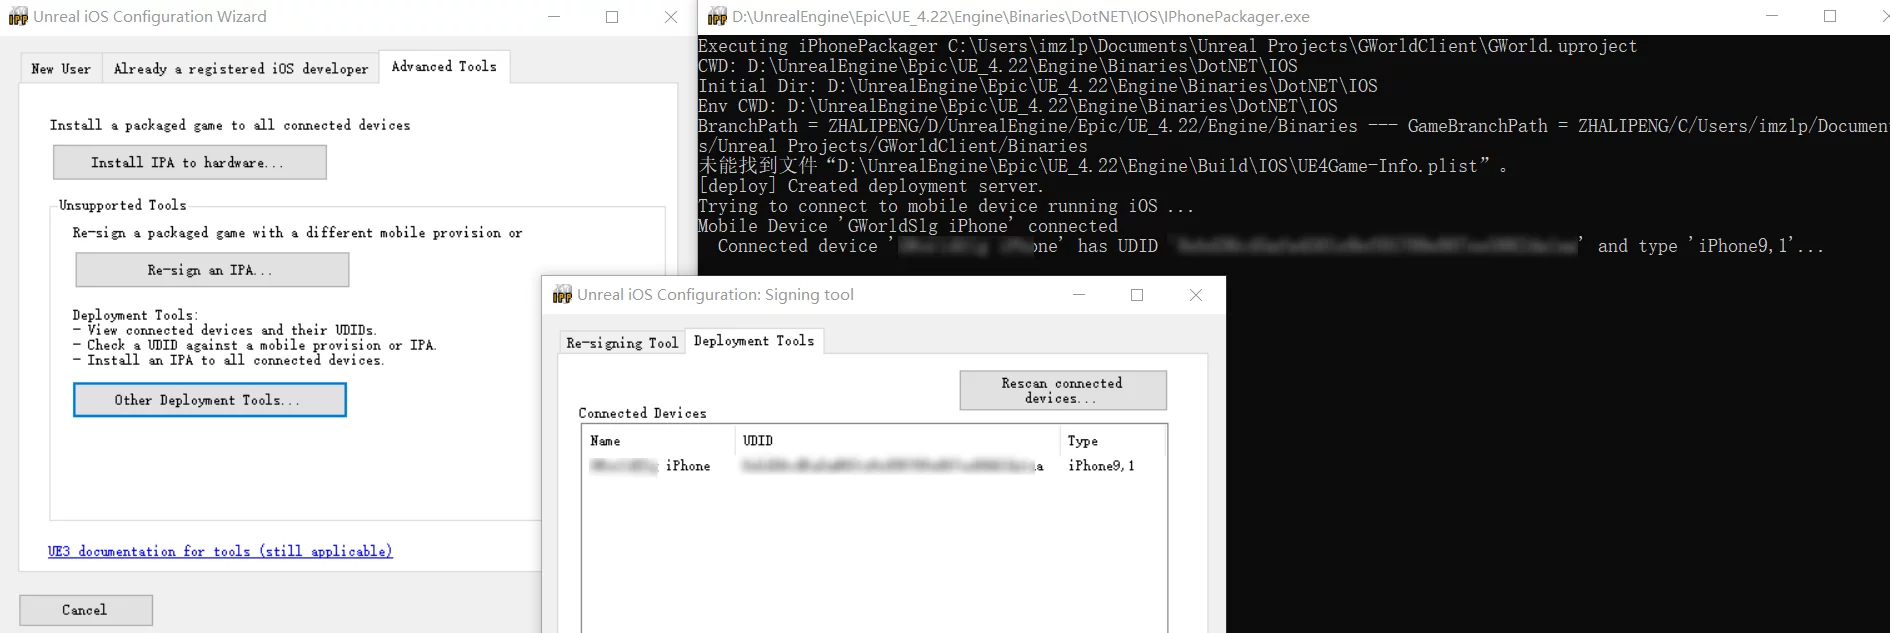
可以使用UE的IPhonePackager.exe来查看ios设备的uuid:
生成Provision:
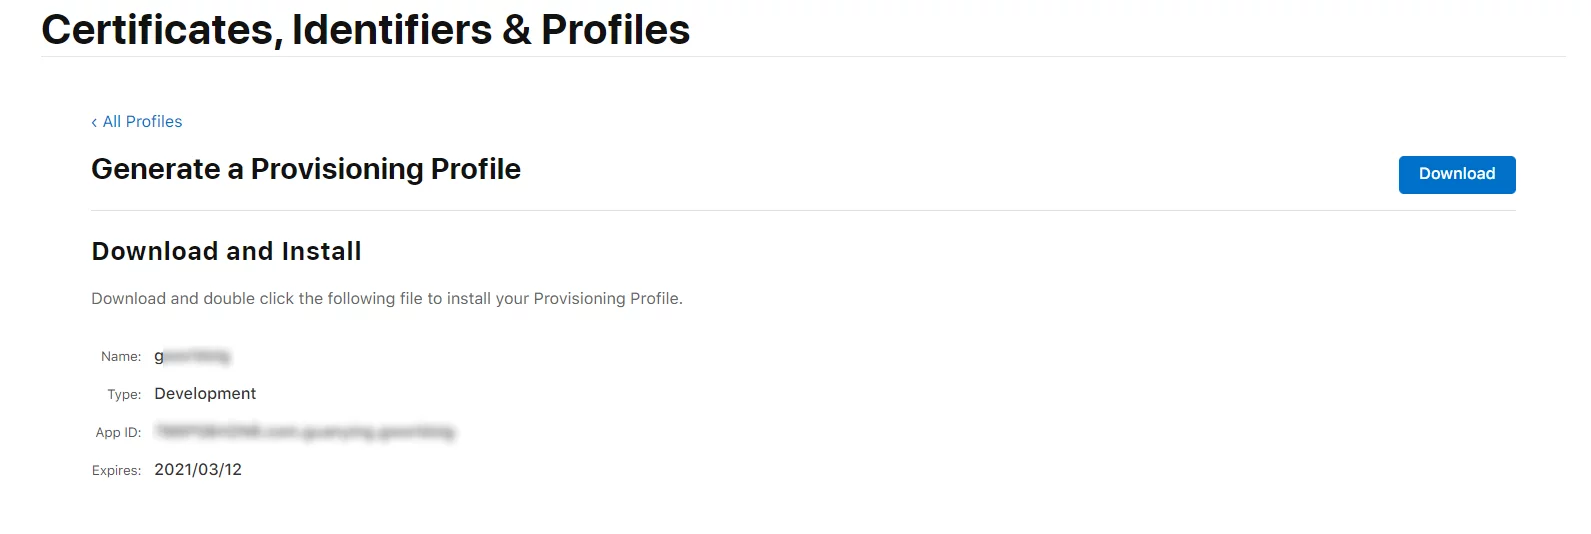
生成之后要下载provision文件:
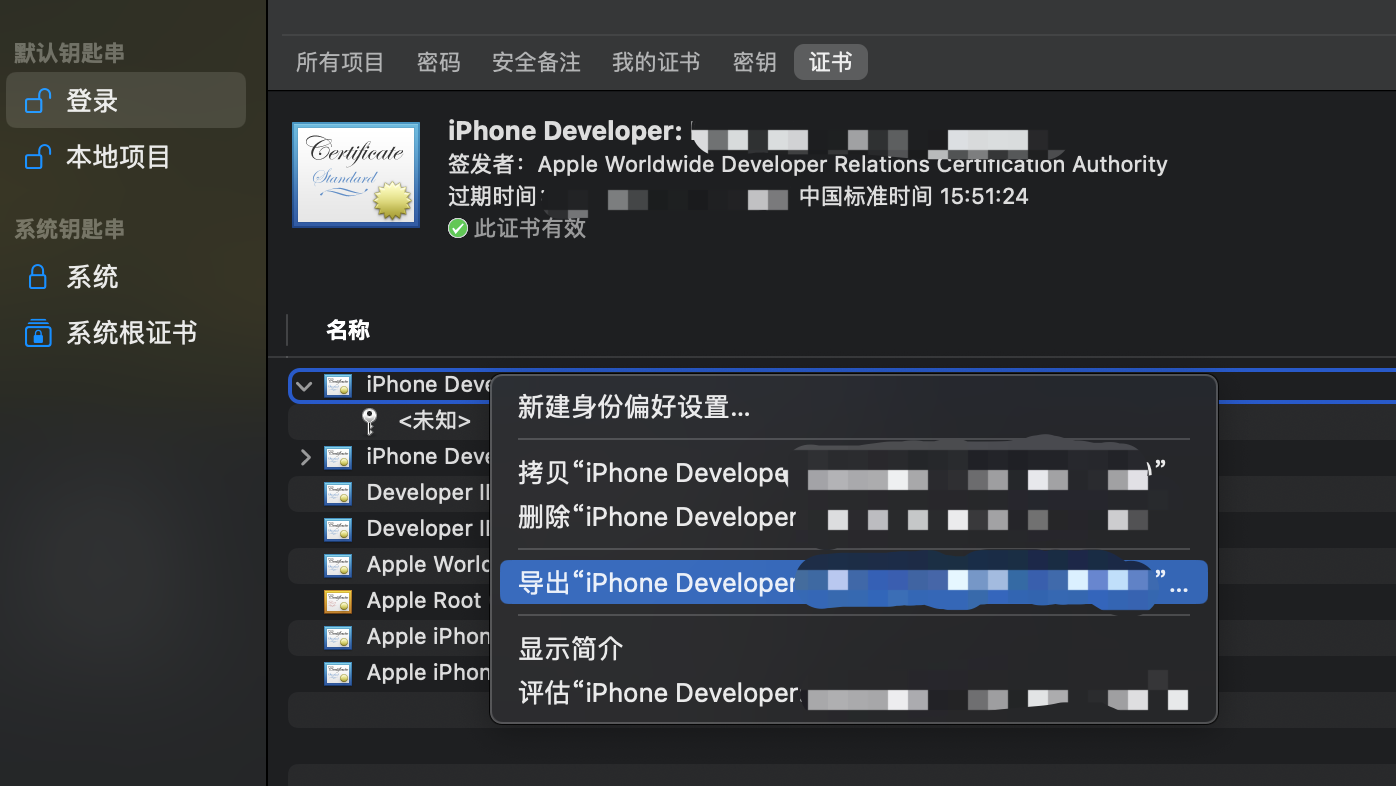
在Apple Developer上只能下载cer证书,但是引擎需要p12,需要把cer证书导入到Mac的钥匙串中,再导出为p12的证书:
注意:一定要选在“证书”分类下,不然p12选项是灰的。
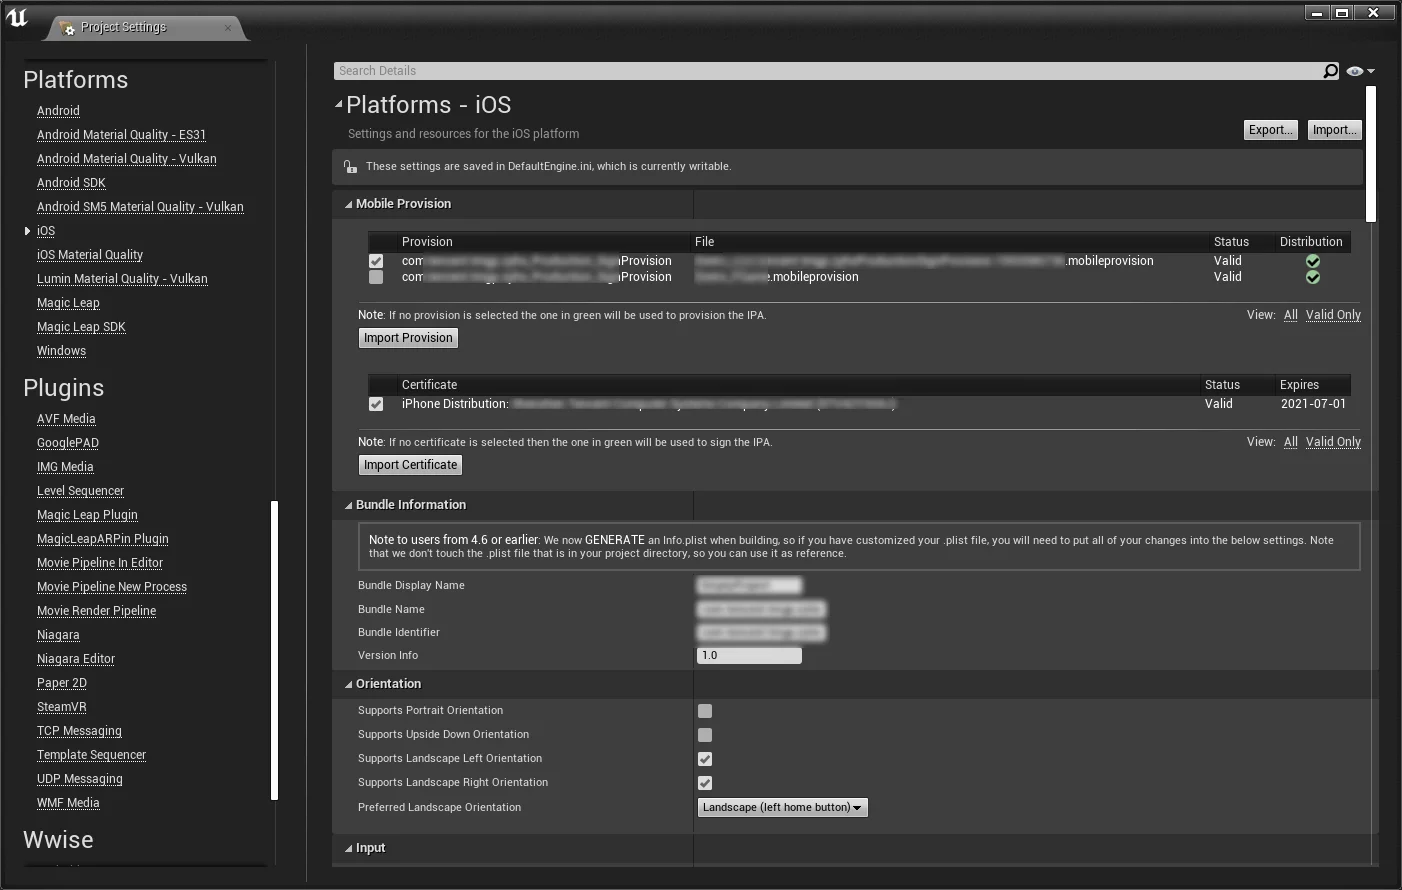
配置远程构建 UE打包iOS需要在项目设置中导入证书和provision,以及把BundleName和Bundle Identifier设置为在Apple开发者网站上设置的Bundle ID,格式为com.xxxxx.yyyyyy。
p12证书和mobileprovision导入之后如图:
导入证书之后就可以开始远程打包的配置了。
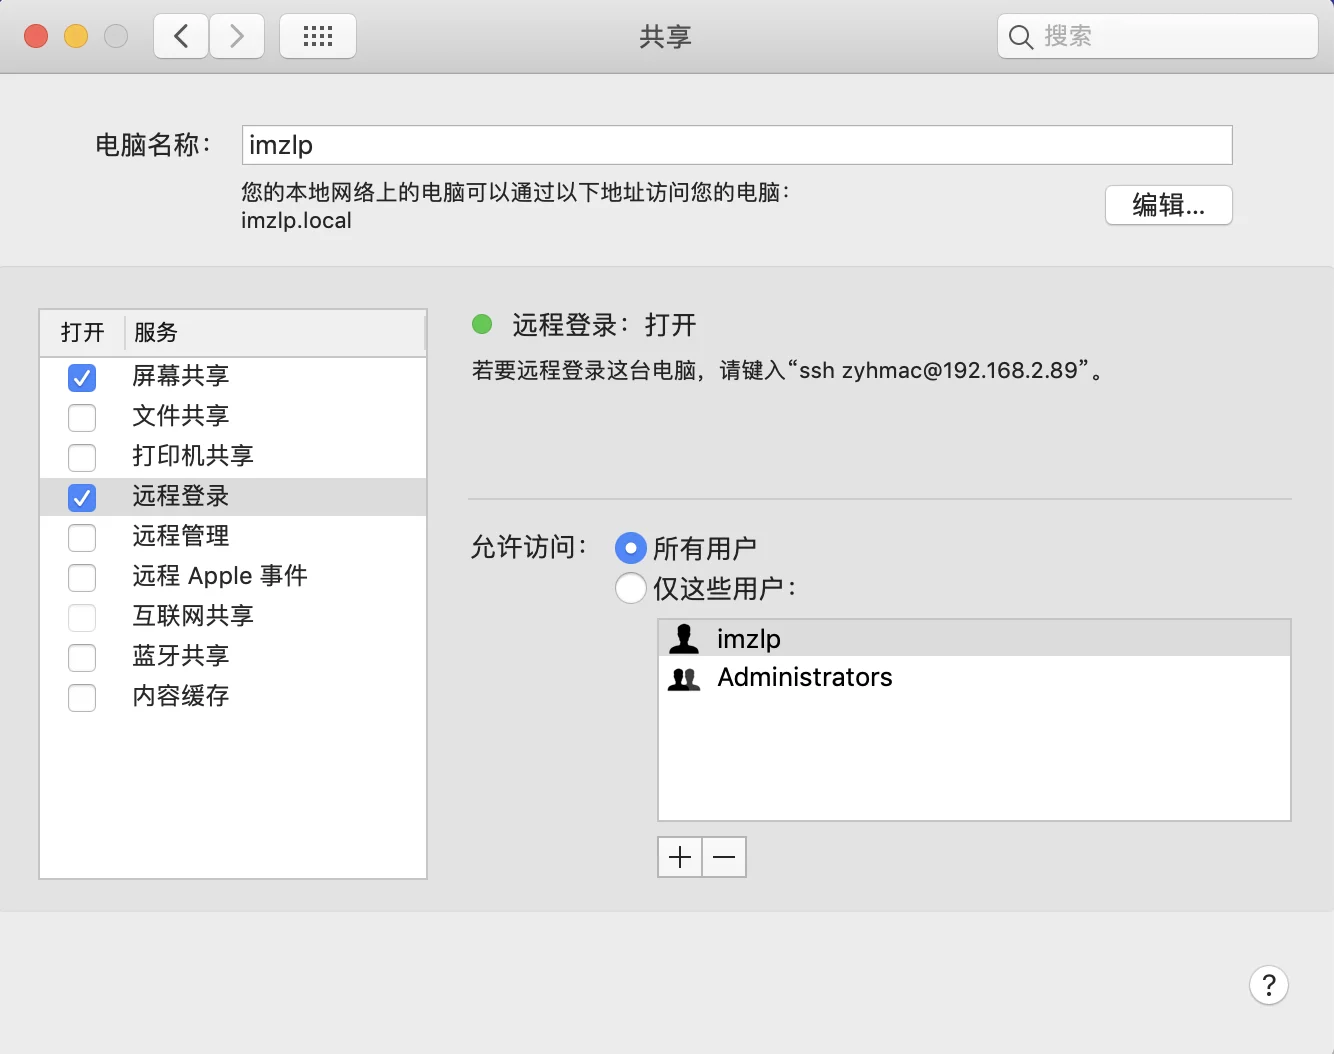
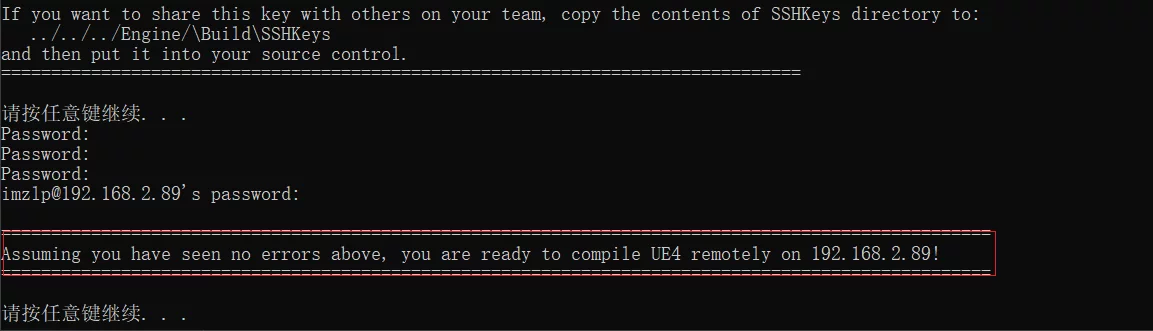
首先在MAC的系统偏好设置-共享中启用远程登录:
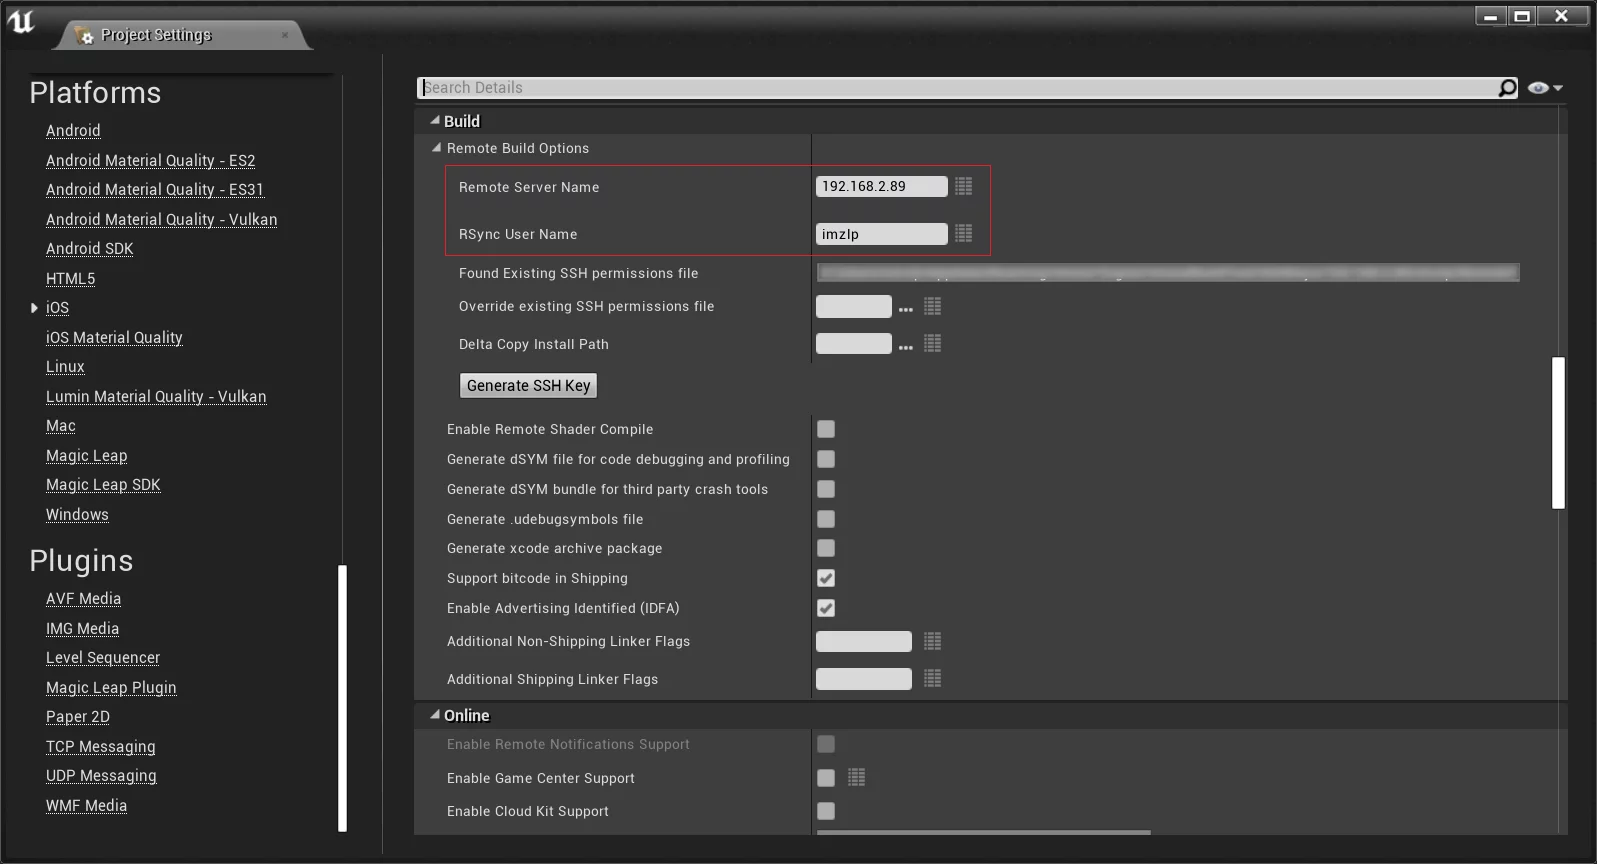
然后在Windows上对项目添导入mobileproversion和设置BundleName和Bundle Identifier。IOS-Build下的Remote Build Options:xx.xx.xx.xx:2222这种形式,以冒号分隔)和用户名。
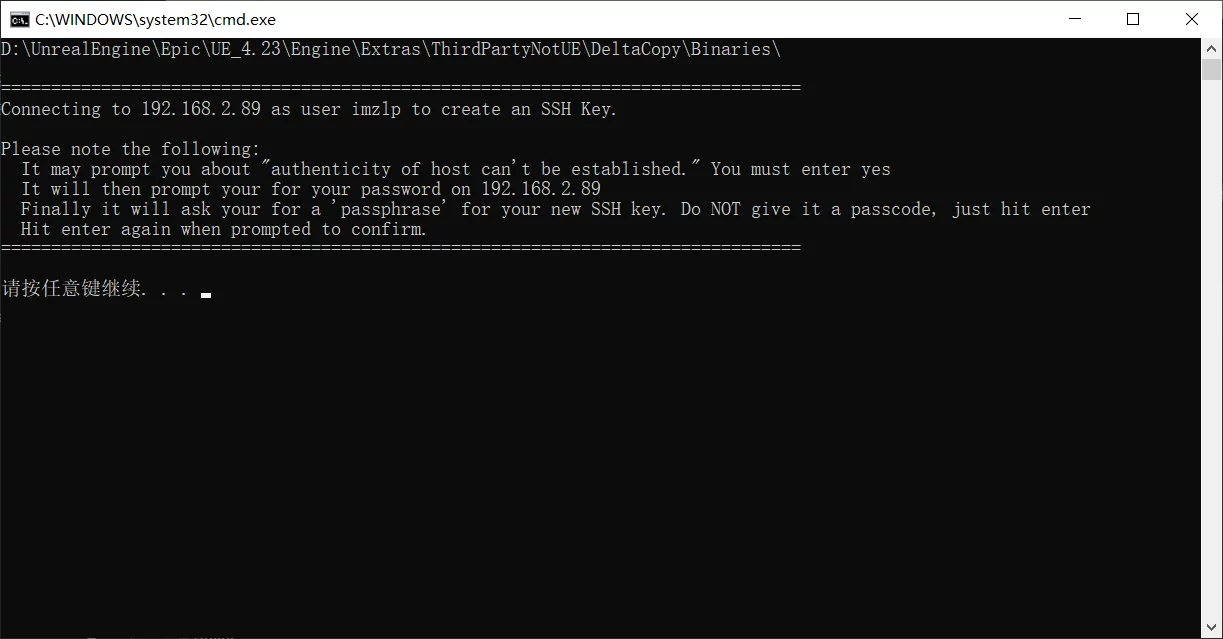
然后点击Generated SSH Key会弹出一个窗口:MAC电脑的密码,输入之后会提示:
1 Enter passphrase (empty for no passphrase):
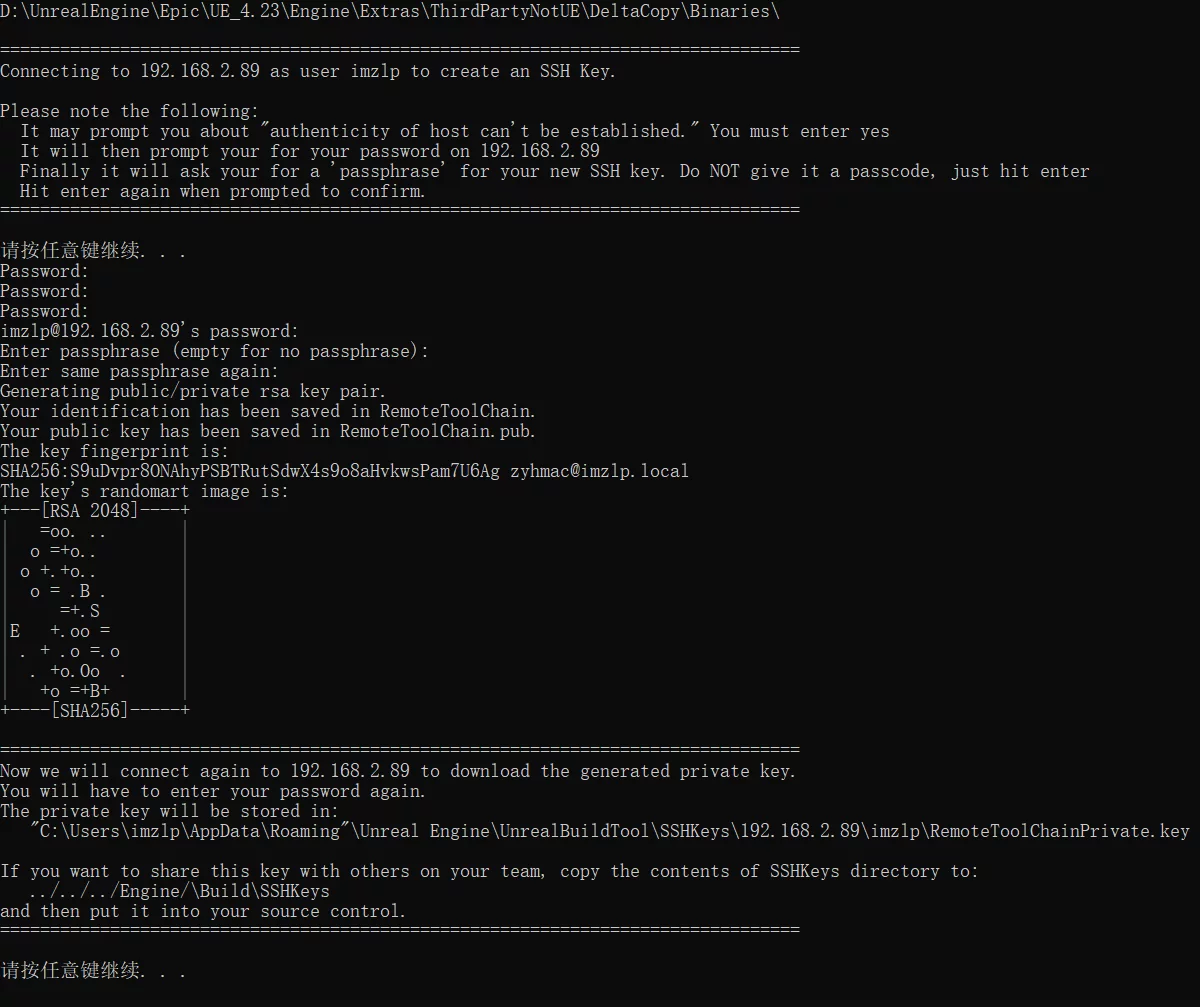
这是让你输入生成的ssh Key的密码,默认情况下可以不输,直接Enter就好。Enter会提示你ssh key生成成功:
生成的SSH Key的存放路径为:
1 C:\Users\imzlp\AppData\Roaming/Unreal Engine/UnrealBuildTool/SSHKeys/192.168.2.89/imzlp/RemoteToolChainPrivate.key
如果要将其共享给组内的其他成员,则把这个RemoteToolChainPrivate.key共享,然后让他们把IOS-Build-RemoteBuildOptions下的Override existing SSH Permissions file设置为RemoteToolChainPrivate.key的路径即可。
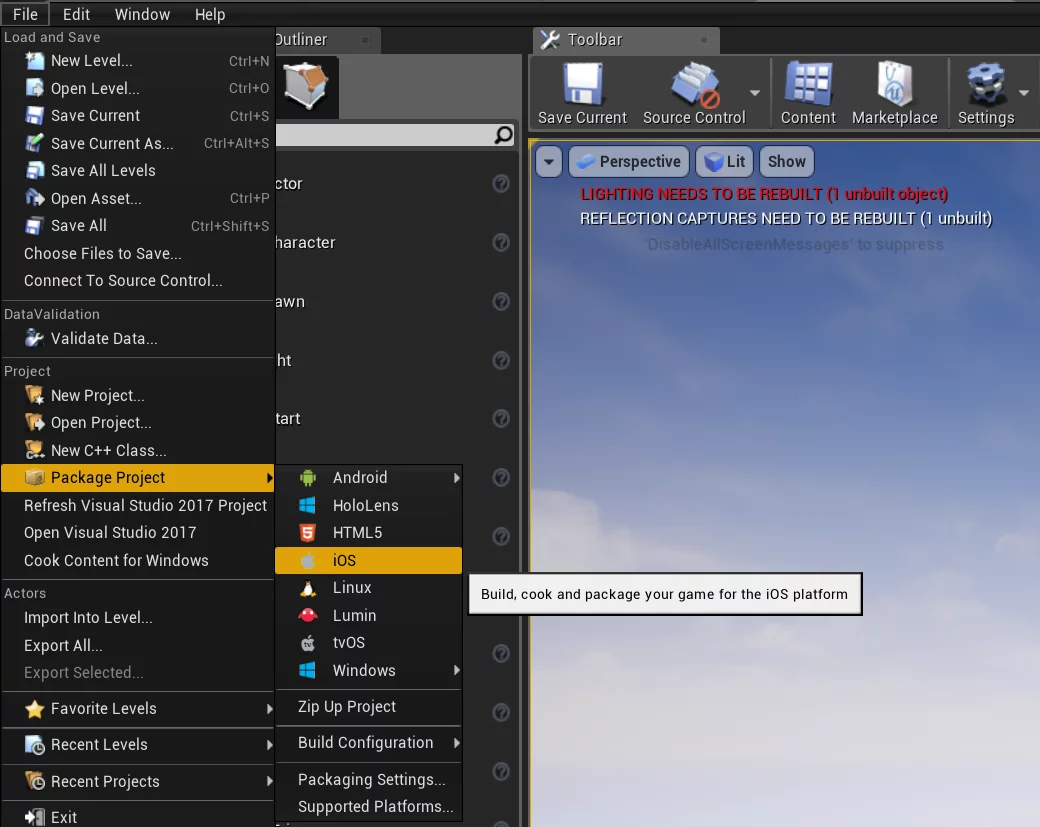
之后就可以像打包Windows或者在Win上打包IOS一样了:
远程到Mac打包分了几个阶段:
把本机的引擎和工程代码上传至Mac
在Mac上执行编译
编译完毕之后在Mac上生成ipa包(但不包含Cook资源)
把生成的ipa包拉回本地,解包,Cook美术资源,再合并为ipa
其中第一步,把本机引擎和工程的代码上传至Mac是通过rsync来实现的,引擎中的Engine\Build\Rsync目录下包含了远程构建时需要上传至目标机器的过滤器。<ProjectDir>/Build/Rsync/RsyncProject.txt创建该文件,添加自己想要上传至Mac的文件过滤器,可以解决执行远程打包时有些文件被遗漏掉的问题。UnrealBuildTool/ToolChain/RemoteMac.cs#L927
SSH使用key登录失败 如果SSH连接时提示以下错误:
1 lipengzha@192.168.31.55: Permission denied (publickey,password,keyboard-interactive).
可以修改Mac的SSH配置(/etc/ssh/sshd_config):
1
2
RSAAuthentication yes PubkeyAuthentication yes
然后重载配置:
1
2
sudo launchctl unload /System/Library/LaunchDaemons/ssh.plist sudo launchctl load -w /System/Library/LaunchDaemons/ssh.plist
iOS打包证书配置报错问题 在UE的项目设置中添加Provision和Certificate,Bundle Identifier要和证书能对应上,但是在设置完之后选择打包还是会提示以下错误:
1
2
Provision not found. A provision is required for deploying your app to the device. Signing key not found. The app could not be digitally signed, because the signing key is not configured.
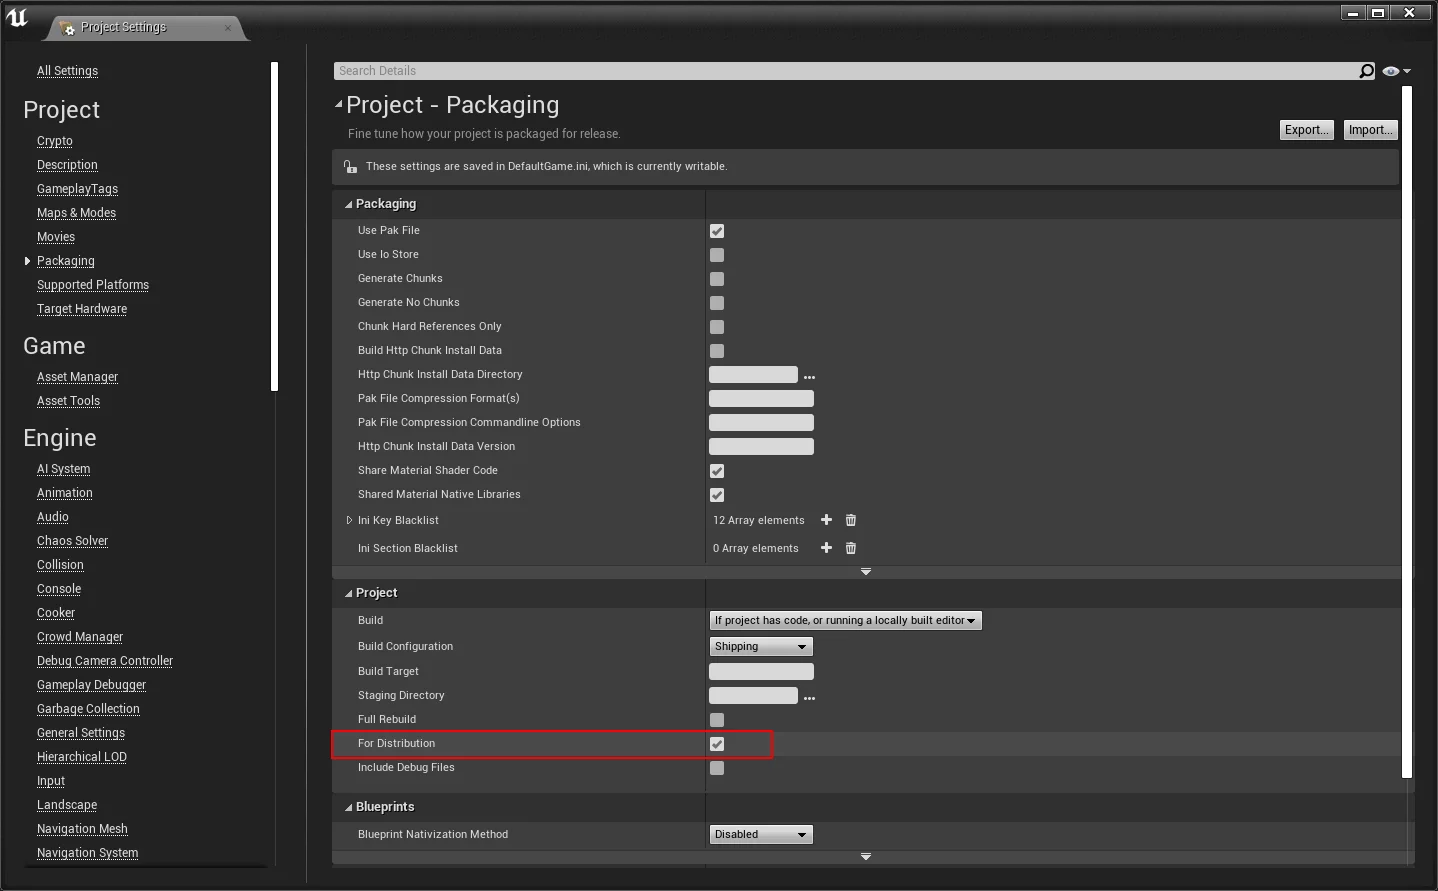
配置完证书和Provision之后出现这种情况需要检查下证书是开发(Development)**还是 发行(Distribution),默认情况下项目设置中是不勾选 发行(Distribution)的,如果导入的证书是发行证书则 只能打包Shipping并且 需要勾上发行(Distribution)**。
如果使用发行证书不勾选**发行(For Distribution)**则打包时会有以下错误:
1
2
3
Check dependencies Code Signing Error: Provisioning profile "com.tencent.tmgp.zyhx_Production_SignProvision" doesn't match the entitlements file's value for the get-task-allow entitlement. Code Signing Error: Code signing is required for product type 'Application' in SDK 'iOS 13.6'
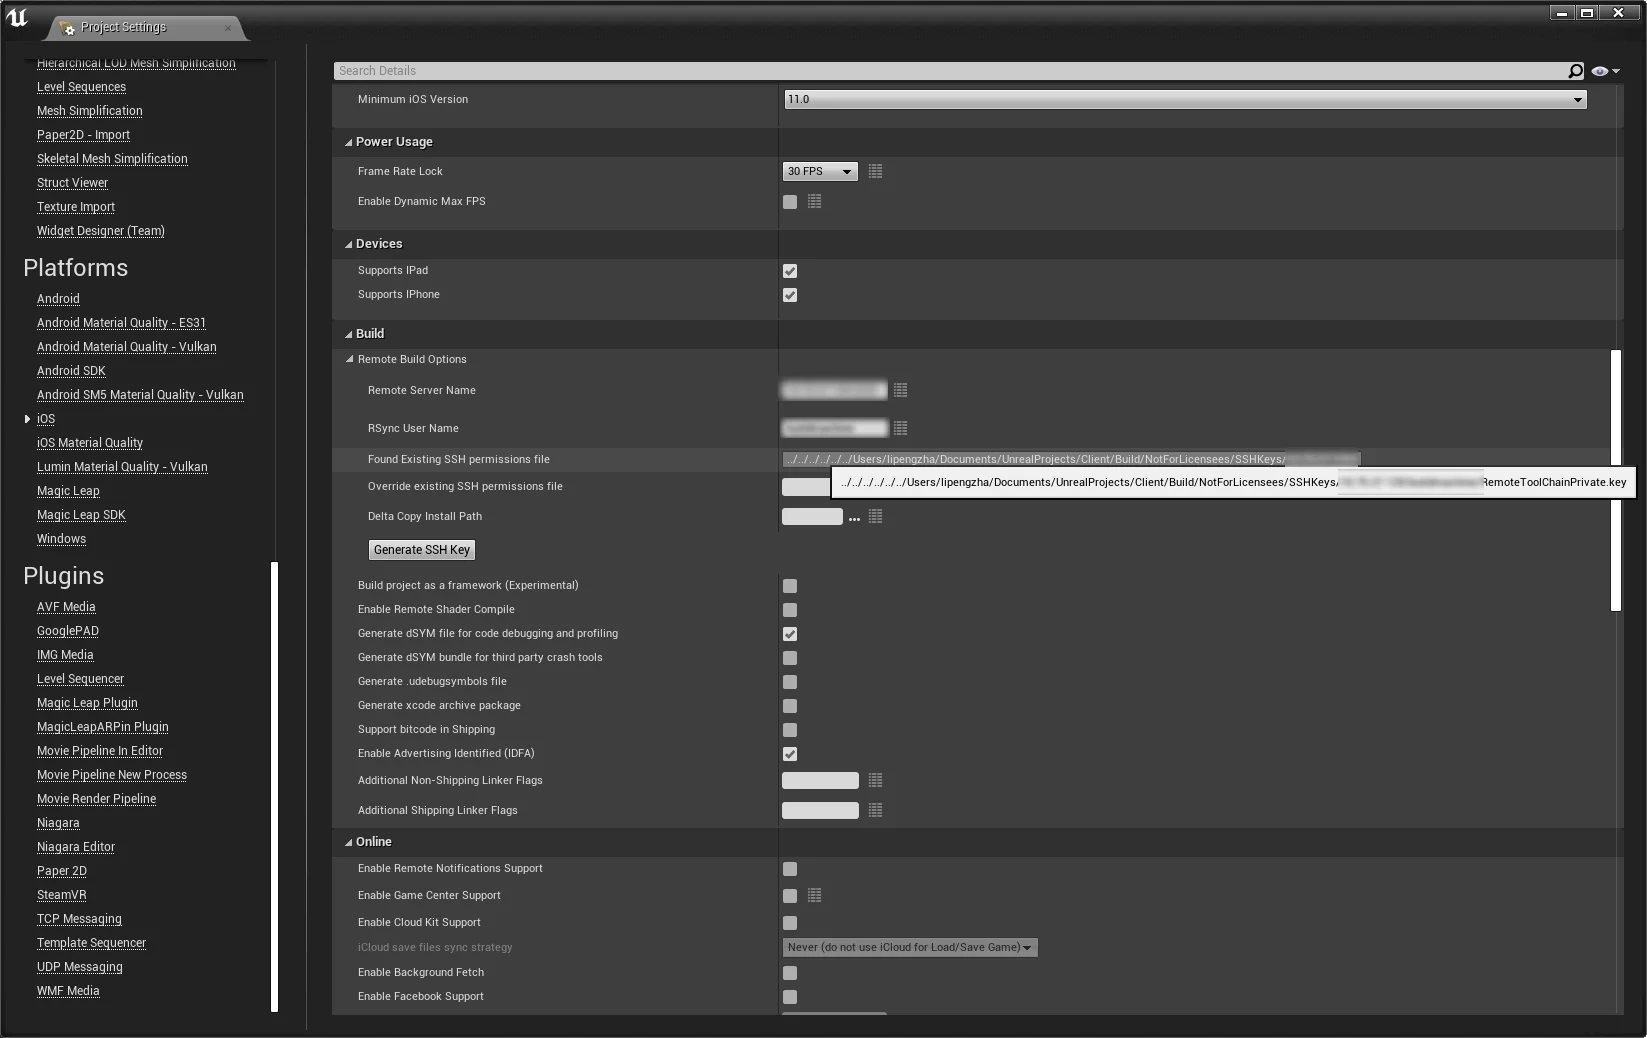
SSHKey路径查找的bug 前面提到了在Project Settings-Platforms-iOS中可以在Override Existing SSH Permissions file中指定SSHKey,如果不指定会默认使用引擎查找路径,默认情况下会从以下路径中查找:
1
2
3
4
5
6
7
8
9
10
const FString DefaultKeyFilename = TEXT ("RemoteToolChainPrivate.key" );const FString RelativeFilePathLocation = FPaths::Combine (TEXT ("SSHKeys" ), *RemoteServerName, *RSyncUsername, *DefaultKeyFilename);TArray<FString> PossibleKeyLocations; PossibleKeyLocations.Add (FPaths::Combine (*FPaths::ProjectDir (), TEXT ("Build" ), TEXT ("NotForLicensees" ), *RelativeFilePathLocation)); PossibleKeyLocations.Add (FPaths::Combine (*FPaths::ProjectDir (), TEXT ("Build" ), TEXT ("NoRedist" ), *RelativeFilePathLocation)); PossibleKeyLocations.Add (FPaths::Combine (*FPaths::ProjectDir (), TEXT ("Build" ), *RelativeFilePathLocation)); PossibleKeyLocations.Add (FPaths::Combine (*FPaths::EngineDir (), TEXT ("Build" ), TEXT ("NotForLicensees" ), *RelativeFilePathLocation)); PossibleKeyLocations.Add (FPaths::Combine (*FPaths::EngineDir (), TEXT ("Build" ), TEXT ("NoRedist" ), *RelativeFilePathLocation)); PossibleKeyLocations.Add (FPaths::Combine (*FPaths::EngineDir (), TEXT ("Build" ), *RelativeFilePathLocation)); PossibleKeyLocations.Add (FPaths::Combine (*Path, TEXT ("Unreal Engine" ), TEXT ("UnrealBuildTool" ), *RelativeFilePathLocation));
但是在RemoveServerName包含端口的情况下,希望使用引擎查找路径时,UE的实现有Bug。
1
2
3
4
5
6
7
8
9
10
11
12
13
14
15
16
17
18
19
20
21
22
23
24
25
26
27
28
29
30
31
32
33
34
35
36
void UIOSRuntimeSettings::PostInitProperties () Super::PostInitProperties (); if (!RemoteServerName.IsEmpty () && !RSyncUsername.IsEmpty ()) { SSHPrivateKeyLocation = TEXT ("" ); const FString DefaultKeyFilename = TEXT ("RemoteToolChainPrivate.key" ); const FString RelativeFilePathLocation = FPaths::Combine (TEXT ("SSHKeys" ), *RemoteServerName, *RSyncUsername, *DefaultKeyFilename); FString Path = FPlatformMisc::GetEnvironmentVariable (TEXT ("APPDATA" )); TArray<FString> PossibleKeyLocations; PossibleKeyLocations.Add (FPaths::Combine (*FPaths::ProjectDir (), TEXT ("Build" ), TEXT ("NotForLicensees" ), *RelativeFilePathLocation)); PossibleKeyLocations.Add (FPaths::Combine (*FPaths::ProjectDir (), TEXT ("Build" ), TEXT ("NoRedist" ), *RelativeFilePathLocation)); PossibleKeyLocations.Add (FPaths::Combine (*FPaths::ProjectDir (), TEXT ("Build" ), *RelativeFilePathLocation)); PossibleKeyLocations.Add (FPaths::Combine (*FPaths::EngineDir (), TEXT ("Build" ), TEXT ("NotForLicensees" ), *RelativeFilePathLocation)); PossibleKeyLocations.Add (FPaths::Combine (*FPaths::EngineDir (), TEXT ("Build" ), TEXT ("NoRedist" ), *RelativeFilePathLocation)); PossibleKeyLocations.Add (FPaths::Combine (*FPaths::EngineDir (), TEXT ("Build" ), *RelativeFilePathLocation)); PossibleKeyLocations.Add (FPaths::Combine (*Path, TEXT ("Unreal Engine" ), TEXT ("UnrealBuildTool" ), *RelativeFilePathLocation)); for (const FString& NextLocation : PossibleKeyLocations) { if (IFileManager::Get ().FileSize (*NextLocation) > 0 ) { SSHPrivateKeyLocation = NextLocation; break ; } } } }
这个代码在Windows上有bug,因为当RemoteServerName具有指定端口时,在Windows上就会找不到SSHKey,因为Windows上路径中不能包含冒号,所以在查找Key路径的时候会有问题,这个问题需要修改引擎才能解决。
1
2
3
4
5
6
7
8
9
SSHPrivateKeyLocation = TEXT ("" ); FString RealRemoteServerName = RemoteServerName; if (RemoteServerName.Contains (TEXT (":" ))){ FString RemoteServerPort; RemoteServerName.Split (TEXT (":" ),&RealRemoteServerName,&RemoteServerPort); } const FString DefaultKeyFilename = TEXT ("RemoteToolChainPrivate.key" );const FString RelativeFilePathLocation = FPaths::Combine (TEXT ("SSHKeys" ), *RealRemoteServerName, *RSyncUsername, *DefaultKeyFilename);
重新编译引擎即可。
远程编译Shader的Key查找bug
注意:在4.26及之后的引擎版本支持在Windows上编译metal的Shader了,详情见文档:
在Project Settings-Platforms-IOS中开启Enable Remote Shader Compile后,如果填入的构建机地址具有指定端口,在查找SSHkey时会有问题:
1 2 3 4 5 6 7 8 9 10 11 12 13 14 15 16 17 18 19 20 21 22 23 24 25 26 27 28 29 bool IsRemoteBuildingConfigured (const FShaderCompilerEnvironment* InEnvironment) GRemoteBuildServerSSHKey = "" ; if (InEnvironment != nullptr && InEnvironment->RemoteServerData.Contains (TEXT ("SSHPrivateKeyOverridePath" ))) { GRemoteBuildServerSSHKey = InEnvironment->RemoteServerData[TEXT ("SSHPrivateKeyOverridePath" )]; } if (GRemoteBuildServerSSHKey.Len () == 0 ) { GConfig->GetString (TEXT ("/Script/IOSRuntimeSettings.IOSRuntimeSettings" ), TEXT ("SSHPrivateKeyOverridePath" ), GRemoteBuildServerSSHKey, GEngineIni); GConfig->GetString (TEXT ("/Script/IOSRuntimeSettings.IOSRuntimeSettings" ), TEXT ("SSHPrivateKeyOverridePath" ), GRemoteBuildServerSSHKey, GEngineIni); if (GRemoteBuildServerSSHKey.Len () == 0 ) { if (!FParse::Value (FCommandLine::Get (), TEXT ("serverkey" ), GRemoteBuildServerSSHKey) && GRemoteBuildServerSSHKey.Len () == 0 ) { if (GRemoteBuildServerSSHKey.Len () == 0 ) { FString Path = FPlatformMisc::GetEnvironmentVariable (TEXT ("APPDATA" )); GRemoteBuildServerSSHKey = FString::Printf (TEXT ("%s\\Unreal Engine\\UnrealBuildTool\\SSHKeys\\%s\\%s\\RemoteToolChainPrivate.key" ), *Path, *GRemoteBuildServerHost, *GRemoteBuildServerUser); } } } } }
可以看到这里查找的Key路径时直接通过GRemoteBuildServerHost拼接的,但是如果在配置中指定了端口,那么GRemoteBuildServerHost的值为这种格式xxx.xx.xx.xx:1234,但是Win上目录名不能带:,就会导致Key查找失败。
还有在同文件的ExecRemoteProcess函数中,没有针对具有指定端口的情况做处理:
1
2
3
4
5
6
7
8
9
10
11
12
13
14
bool ExecRemoteProcess (const TCHAR* Command, const TCHAR* Params, int32* OutReturnCode, FString* OutStdOut, FString* OutStdErr) #if PLATFORM_MAC && !UNIXLIKE_TO_MAC_REMOTE_BUILDING return FPlatformProcess::ExecProcess (Command, Params, OutReturnCode, OutStdOut, OutStdErr); #else if (GRemoteBuildServerHost.IsEmpty ()) { return false ; } FString CmdLine = FString (TEXT ("-i \"" )) + GRemoteBuildServerSSHKey + TEXT ("\" \"" ) + GRemoteBuildServerUser + '@' + GRemoteBuildServerHost + TEXT ("\" " ) + Command + TEXT (" " ) + (Params != nullptr ? Params : TEXT ("" )); return ExecProcess (*GSSHPath, *CmdLine, OutReturnCode, OutStdOut, OutStdErr); #endif }
需要做一些处理:
1
2
3
4
5
6
7
8
9
10
11
12
13
14
15
16
17
18
19
20
21
22
23
bool ExecRemoteProcess (const TCHAR* Command, const TCHAR* Params, int32* OutReturnCode, FString* OutStdOut, FString* OutStdErr) #if PLATFORM_MAC && !UNIXLIKE_TO_MAC_REMOTE_BUILDING return FPlatformProcess::ExecProcess (Command, Params, OutReturnCode, OutStdOut, OutStdErr); #else if (GRemoteBuildServerHost.IsEmpty ()) { return false ; } FString RemoteBuildServerIP = GRemoteBuildServerHost; FString RemoteBuildServerPort = TEXT ("22" ); if (GRemoteBuildServerHost.Contains (TEXT (":" ))) { GRemoteBuildServerHost.Split (TEXT (":" ),&RemoteBuildServerIP,&RemoteBuildServerPort); } FString CmdLine = FString (TEXT ("-i \"" )) + GRemoteBuildServerSSHKey + TEXT ("\" \"" ) + GRemoteBuildServerUser + '@' + RemoteBuildServerIP + TEXT ("\" " ) TEXT ("-p " ) + RemoteBuildServerPort +TEXT (" " )+ Command + TEXT (" " ) + (Params != nullptr ? Params : TEXT ("" )); return ExecProcess (*GSSHPath, *CmdLine, OutReturnCode, OutStdOut, OutStdErr); #endif }
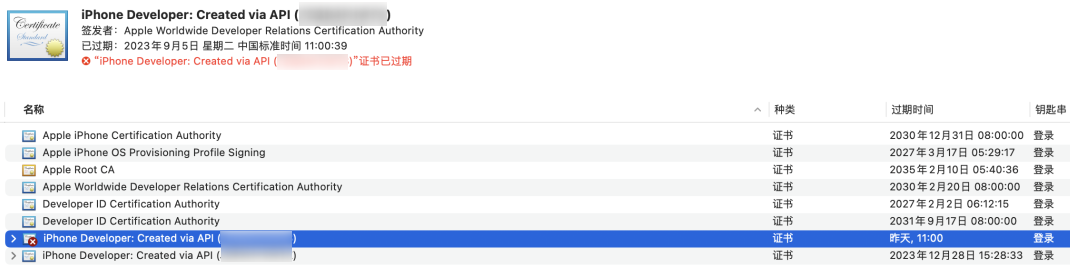
签名错误 开发者签名到期 如果在打包时输出下列日志,则是因为IOS证书过期了导致的:
1
2
3
/Users/buildmachine/UE4/Builds/lipengzha-PCb/C/BuildAgent/workspace/FGameEngine/Client/Intermediate/ProjectFilesIOS/FGame.xcodeproj: error: No certificate for team '6H9S4KQ3C9' matching 'iPhone Developer: Created via API (7ZQD4FUW73)' found: Select a different signing certificate for CODE_SIGN_IDENTITY, a team that matches your selected certificate, or switch to automatic provisioning. (in target 'FGame' from project 'FGame') warning: Run script build phase 'Sign Manual Frameworks' will be run during every build because it does not specify any outputs. To address this warning, either add output dependencies to the script phase, or configure it to run in every build by unchecking "Based on dependency analysis" in the script phase. (in target 'FGame' from project 'FGame') ** BUILD FAILED **
只需要更新证书就好。
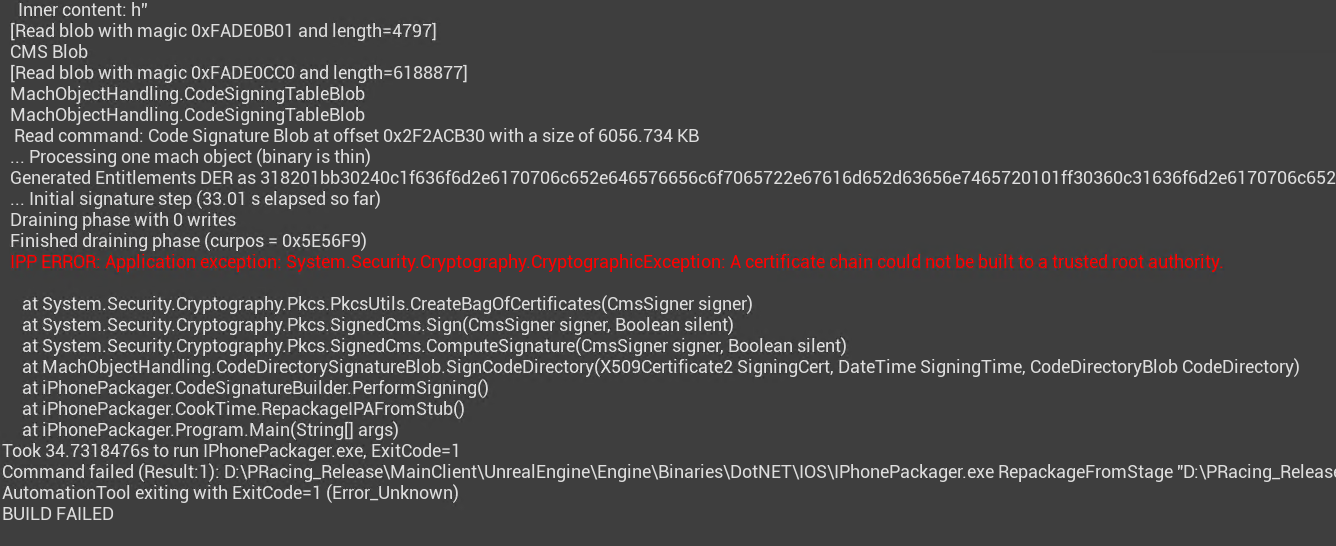
苹果中级证书到期 如果在Windows上打包时提示下面错误:
1
2
IPP ERROR: Application exception: System.Security.Cryptography.CryptographicException A certificate chain could not be built to a trusted root authority.
同样也是苹果中级证书过期了导致的,更新即可。详见:BuildGraph:构建支持多平台打包的二进制引擎
注意事项 在Windows上远程构建IOS,有几个约束:
IPA内单个文件大小不能超过2G,如Pak文件
IPA总大小不能超过4G
不然会有下面这种错误:
1
2
3
4
5
6
7
8
9
IPP ERROR: Application exception: Ionic.Zip.ZipException: Compressed or Uncompressed size, or offset exceeds the maximum value. Consider setting the UseZip64WhenSaving property on the ZipFile instance. Ionic.Zip.ZipEntry.SetZip64Flags() Ionic.Zip.ZipEntry.PostProcessOutput(Stream s) Ionic.Zip.ZipEntry._WriteEntryData(Stream s) Ionic.Zip.ZipEntry.Write(Stream s) Ionic.Zip.ZipFile.Save() iPhonePackager.FileOperations.ZipFileSystem.Close() iPhonePackager.CookTime.RepackageIPAFromStub() iPhonePackager.Program.Main(String[] args)
Mac开发环境 MacOS安装UE UE要求MacOS的分区格式为不区分大小写 (不然EpicLauncher也无法安装),而且安装引擎的要求是系统版本大于10.13.5,否则会出现引擎崩溃和一些不支持的情况(尝试忽略错误无法安装成功)。
1
2
3
4
5
6
7
8
9
10
11
12
13
14
An error occurred while trying to generate project files. Running Mono... Setting up Mono /Users/Shared/UnrealEngine/4.22 /Engine /Users/Shared/UnrealEngine/4.22 /Engine/Binaries/Mac Discovering modules, targets and source code for project... Compiling with non-standard Xcode (xcode-select) : /Library/Developer/CommandLineTools/ Triggered an exception while looking for SDK directory in Xcode.app System.IO.DirectoryNotFoundException: Directory '/Library/Developer/CommandLineTools/Platforms/MacOSX.platform/Developer/SDKs' not found. at System.IO.Directory.ValidateDirectoryListing (System.String path, System.String searchPattern, System.Boolean& stop) [0x00000 ] in <filename unknown>:0 at System.IO.Directory.GetFileSystemEntries (System.String path, System.String searchPattern, FileAttributes mask, FileAttributes attrs) [0x00000 ] in <filename unknown>:0 at System.IO.Directory.GetDirectories (System.String path, System.String searchPattern) [0x00000 ] in <filename unknown>:0 at System.IO.Directory.GetDirectories (System.String path) [0x00000 ] in <filename unknown>:0 at UnrealBuildTool.AppleToolChain.SelectSDK (System.String BaseSDKDir, System.String OSPrefix, System.String& PlatformSDKVersion, Boolean bVerbose) [0x00000 ] in <filename unknown>:0 ERROR: Invalid SDK MacOSX.sdk, not found in /Library/Developer/CommandLineTools/Platforms/MacOSX.platform/Developer/SDKs
则安装Xcode Command Line Tools ,然后执行以下命令即可:
1 $ sudo ln -s /Applications/Xcode.app/Contents/Developer/Platforms /Library/Developer/CommandLineTools/
Mac修改SSHD默认端口 有些内网有端口限制,低于xxxx的端口默认不开放,所以在22端口被限制的情况下如何进行远程构建?修改SSH的默认端口!
编辑/etc/services文件中的ssh的端口:
把SSH的端口改为其他的:
1
2
ssh 22/udp # SSH Remote Login Protocol ssh 22/tcp # SSH Remote Login Protocol
修改为:
1
2
ssh 2222/udp # SSH Remote Login Protocol ssh 2222/tcp # SSH Remote Login Protocol
保存退出。
1
2
sudo launchctl unload /System/Library/LaunchDaemons/ssh.plist sudo launchctl load -w /System/Library/LaunchDaemons/ssh.plist
然后测试端口是否可以连接:
为xcode开启多线程编译 首先看一下Mac的硬件配置:
找到machdep.cpu.core_count字段,其中的数值就是Mac的核心数。
然后可以给xcode开启多线程,数量数为核心数*2,如我的是8核,就可以开启16线程:
1 defaults write com.apple.Xcode PBXNumberOfParallelBuildSubtasks 16
Mac系统内置的Framework 有时候需要在UE的模块中引入系统的Framework,那么Mac默认包含哪些Framework呢?可以通过以下方式查看。10.15.2,可以通过sw_vers查看:
1
2
3
4
buildmachine@LIPENGZHA-MC0 ~ % sw_vers ProductName: Mac OS X ProductVersion: 10.15.2 BuildVersion: 19C57
系统内置的Framework在以下目录中:
1 /System/Library/Frameworks
在10.15.2版本中包含以下framework:
1
2
3
4
5
6
7
8
9
10
11
12
13
14
15
16
17
18
19
20
21
22
23
24
25
26
27
28
29
30
31
32
33
34
35
36
37
38
39
40
41
42
43
44
45
46
47
48
49
50
AGL.framework ColorSync.framework CoreVideo.framework GameKit.framework LinkPresentation.framework OpenGL.framework SoundAnalysis.framework AVFoundation.framework Combine.framework CoreWLAN.framework GameplayKit.framework LocalAuthentication.framework PCSC.framework Speech.framework AVKit.framework Contacts.framework CryptoKit.framework HIDDriverKit.framework MapKit.framework PDFKit.framework SpriteKit.framework Accelerate.framework ContactsUI.framework CryptoTokenKit.framework Hypervisor.framework MediaAccessibility.framework PencilKit.framework StoreKit.framework Accounts.framework CoreAudio.framework DVDPlayback.framework ICADevices.framework MediaLibrary.framework Photos.framework SwiftUI.framework AdSupport.framework CoreAudioKit.framework DeviceCheck.framework IMServicePlugIn.framework MediaPlayer.framework PhotosUI.framework SyncServices.framework AddressBook.framework CoreAudioTypes.framework DirectoryService.framework IOBluetooth.framework MediaToolbox.framework PreferencePanes.framework System.framework AppKit.framework CoreBluetooth.framework DiscRecording.framework IOBluetoothUI.framework Message.framework PushKit.framework SystemConfiguration.framework AppleScriptKit.framework CoreData.framework DiscRecordingUI.framework IOKit.framework Metal.framework Python.framework SystemExtensions.framework AppleScriptObjC.framework CoreDisplay.framework DiskArbitration.framework IOSurface.framework MetalKit.framework QTKit.framework TWAIN.framework ApplicationServices.framework CoreFoundation.framework DriverKit.framework IOUSBHost.framework MetalPerformanceShaders.framework Quartz.framework Tcl.framework AudioToolbox.framework CoreGraphics.framework EventKit.framework IdentityLookup.framework MetricKit.framework QuartzCore.framework Tk.framework AudioUnit.framework CoreHaptics.framework ExceptionHandling.framework ImageCaptureCore.framework ModelIO.framework QuickLook.framework USBDriverKit.framework AudioVideoBridging.framework CoreImage.framework ExecutionPolicy.framework ImageIO.framework MultipeerConnectivity.framework QuickLookThumbnailing.framework UserNotifications.framework AuthenticationServices.framework CoreLocation.framework ExternalAccessory.framework InputMethodKit.framework NaturalLanguage.framework RealityKit.framework VideoDecodeAcceleration.framework Automator.framework CoreMIDI.framework FWAUserLib.framework InstallerPlugins.framework NetFS.framework Ruby.framework VideoSubscriberAccount.framework BackgroundTasks.framework CoreMIDIServer.framework FileProvider.framework InstantMessage.framework Network.framework SafariServices.framework VideoToolbox.framework BusinessChat.framework CoreML.framework FileProviderUI.framework Intents.framework NetworkExtension.framework SceneKit.framework Vision.framework CFNetwork.framework CoreMedia.framework FinderSync.framework JavaFrameEmbedding.framework NetworkingDriverKit.framework ScreenSaver.framework WebKit.framework CalendarStore.framework CoreMediaIO.framework ForceFeedback.framework JavaScriptCore.framework NotificationCenter.framework ScriptingBridge.framework iTunesLibrary.framework CallKit.framework CoreMotion.framework Foundation.framework JavaVM.framework OSAKit.framework Security.framework vecLib.framework Carbon.framework CoreServices.framework GLKit.framework Kerberos.framework OSLog.framework SecurityFoundation.framework vmnet.framework CloudKit.framework CoreSpotlight.framework GLUT.framework Kernel.framework OpenAL.framework SecurityInterface.framework Cocoa.framework CoreTelephony.framework GSS.framework LDAP.framework OpenCL.framework ServiceManagement.framework Collaboration.framework CoreText.framework GameController.framework LatentSemanticMapping.framework OpenDirectory.framework Social.framework
Xcode’s metal shader compiler was not found, verify Xcode has been installed on this Mac and that it has been selected in Xcode > Preferences > Locations > Command-line Tools.
相关问题:
离线安装XCode和Command Line Tools for Xcode可以从苹果的开发者网站下载:More Downloads for Apple Developers
在安装完Command Line Tools之后,如果cook时还是提示这个错误,则需要执行下列命令(当然要首先确保/Library/Developer/CommandLineTools路径存在,一般Command Line Tools的默认安装路径是这个):
1 $ sudo xcode-select -s /Library/Developer/CommandLineTools
当设置CommandLineTools之后打包时可能会提示:
1 ERROR: Invalid SDK MacOSX.sdk, not found in /Library/Developer/CommandLineTools/Platforms/MacOSX.platform/Developer/SDKs
这是因为通过xcode-select设置为CommandLineTools之后,打包时找不到Xcode里的库了。CommandLineTools的目录下创建一个Xcode中的Platforms目录的软连接:
1 sudo ln -s /Applications/Xcode.app/Contents/Developer/Platforms /Library/Developer/CommandLineTools/Platforms
1
2
UATHelper: Packaging (iOS): xcrun: error: unable to find utility "actool", not a developer tool or in PATH PackagingResults: Error: unable to find utility "actool", not a developer tool or in PATH
这是因为把CommandLinTool设置为默认的命令行工具之后,CommandLinTool/use/bin下并没有actool等工具。/Applications/Xcode.app/Contents/Developer/usr/bin通过软连接方式链接到/Library/Developer/CommandLineTools/usr:
1 2 3 4 $ mv /Library/Developer/CommandLineTools/usr/bin /Library/Developer/CommandLineTools/usr/Command_bin $ sudo ln -s /Applications/Xcode.app/Contents/Developer/usr/bin /Library/Developer/CommandLineTools/usr/bin
解除MacOS安装软件的限制
1 sudo spctl --master-disable
MacOS读写NTFS 装上macOS之后发现,macOS可以读取ntfs的文件,但是不可以写入,这十分蛋疼。
首先,在终端下执行diskutil list查看磁盘信息:
1
2
3
4
5
6
7
8
9
10
11
12
13
14
15
16
17
18
19
20
21
22
23
24
25
26
27
28
visionsmile$ diskutil list /dev/disk0 (internal, physical): 0: GUID_partition_scheme *240.1 GB disk0 1: EFI 312.5 MB disk0s1 2: Microsoft Reserved 134.2 MB disk0s2 3: Microsoft Basic Data Windows 164.3 GB disk0s3 4: Apple_APFS Container disk1 75.3 GB disk0s4 /dev/disk1 (synthesized): 0: APFS Container Scheme - +75.3 GB disk1 Physical Store disk0s4 1: APFS Volume OSX 34.2 GB disk1s1 2: APFS Volume Preboot 21.1 MB disk1s2 3: APFS Volume Recovery 509.8 MB disk1s3 4: APFS Volume VM 2.1 GB disk1s4 /dev/disk2 (external, physical): 0: GUID_partition_scheme *4.0 TB disk2 1: Microsoft Reserved 134.2 MB disk2s1 2: Microsoft Basic Data Document 4.0 TB disk2s2 /dev/disk3 (internal, physical): 0: FDisk_partition_scheme *1.0 TB disk3 1: Windows_NTFS Documents2 1.0 TB disk3s1
需要记录的是ntfs磁盘的NAME信息,我这里有三个ntfs分区windows/Documents/Documents2.
然后继续执行命令,更新fatab文件:
输入下列内容,并把LABEL=之后的内容替换为上面记录的分区的名字:
1
2
3
LABEL=Windows none ntfs rw,auto,nobrowse LABEL=Documents none ntfs rw,auto,nobrowse LABEL=Documents2 none ntfs rw,auto,nobrowse
重启之后即可。
UE4项目在Mac上遇到的问题 Cook错误 Cook时出现错误,报错信息:
1 CookResults: Error: Package Native Shader Library failed for MacNoEditor.
这是因为Project Settings-Packing-Shared Material Native Library,关掉之后就可以了。
PS:我在UE的issus里看到了类似的bug提交,但是标记在4.18时就修复了:UE-49105 ,不知道为什么还有这个问题。
UPL在iOS中的应用 Unreal Plugin Language 是UE提供的以XML语法为基础的语言,用来可以控制构建Apk以及ipa的过程,如实现修改AndroidManifest.xml或者info.plist等。
分析plist的生成流程 在UEDeployIOS.cs 的GeneratePList函数中通过传入进来的UPLScripts来构造出UPL对象:
1
2
3
4
5
6
7
8
9
10
11
12
13
14
15
16
17
18
19
20
21
22
23
24
25
26
27
28
29
30
31
32
33
34
public virtual bool GeneratePList (FileReference ProjectFile, UnrealTargetConfiguration Config, string ProjectDirectory, bool bIsUE4Game, string GameName, bool bIsClient, string ProjectName, string InEngineDir, string AppDirectory, List<string > UPLScripts, VersionNumber SdkVersion, string BundleID, bool bBuildAsFramework, out bool bSupportsPortrait, out bool bSupportsLandscape, out bool bSkipIcons ){ GameName = GameName.Split("-" .ToCharArray())[0 ]; List<string > ProjectArches = new List<string >(); ProjectArches.Add("None" ); string BundlePath; if (bIsUE4Game) { BundlePath = Path.Combine(UnrealBuildTool.EngineDirectory.ToString(), "Intermediate" , "IOS-Deploy" , "UE4Game" , Config.ToString(), "Payload" , "UE4Game.app" ); } else { BundlePath = AppDirectory; } string RelativeEnginePath = UnrealBuildTool.EngineDirectory.MakeRelativeTo(DirectoryReference.GetCurrentDirectory()); UnrealPluginLanguage UPL = new UnrealPluginLanguage(ProjectFile, UPLScripts, ProjectArches, "" , "" , UnrealTargetPlatform.IOS); UPL.Init(ProjectArches, true , RelativeEnginePath, BundlePath, ProjectDirectory, Config.ToString(), false ); return GenerateIOSPList(ProjectFile, Config, ProjectDirectory, bIsUE4Game, GameName, bIsClient, ProjectName, InEngineDir, AppDirectory, SdkVersion, UPL, BundleID, bBuildAsFramework, out bSupportsPortrait, out bSupportsLandscape, out bSkipIcons); }
在最后调用的GeneratedIOSList 中,构造出默认的pliat内容、从Additional Plist Data中读取的内容、以及调用UPL来处理plist的内容,UPL的过程是最后处理的。
而且需要注意的是,在GeneratedPList函数中,通过GeneratedIOSList 获取所有模块中添加的UPL.xml文件,然后把这些xml文件合并成一个,注意合并的顺序是AdditionalProperties的顺序,最后添加的UPL会放在最后执行,在一个项目中如果有多个使用UPL的操作要注意顺序问题。
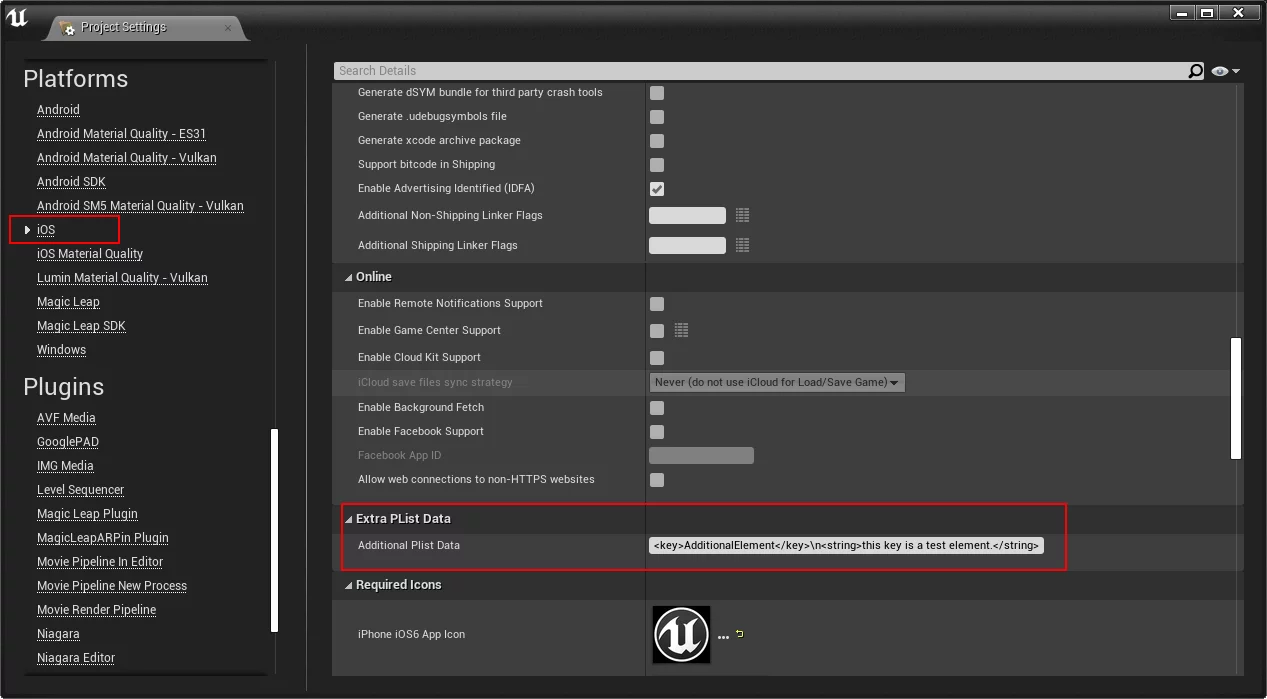
介入ipa生成过程:操作plist ios的ipa包中都会有plist文件,可以用来配置app的一些属性,apple的开发者文档里对每个支持的key有详细的描述:iOS Keys
UE 4.25.1 默认打包会产生下面这样一个plist文件:info.plist ,在一些特殊的需求中,需要往这个plist中添加元素或者修改以及删除。
在UE的项目设置中,可以给plist添加元素,在Project Settings-Platform-iOS-Additional Plist data中可以填入一个字符串,它会被插入到plist文件中:
1 <key > AdditionalElementAAA</key > \n<string > this key is a test element.</string >
中间的\n是格式化代码,用于另起一行。
如果想要修改或者删除plist的元素,需要通过UPL来写逻辑(当然也可以使用UPL来添加元素,建议使用这种做法)。
1
2
3
4
5
6
7
8
9
10
11
12
13
<?xml version="1.0" encoding="utf-8" ?> <root > <init > <log text ="UPL Exalpme adding element to plist..." /> </init > <trace enable ="true" /> <iosPListUpdates > <addElements tag ="dict" once ="true" > <key > AdditionalElementAAA</key > <string > this key is a test element.</string > </addElements > </iosPListUpdates > </root >
上面是用来添加元素的,上面的内容和直接写到Additional Plist data是一样的。
遍历plist中的key:
1
2
3
4
5
6
7
8
9
10
11
12
13
14
15
16
17
18
19
20
21
<?xml version="1.0" encoding="utf-8" ?> <root > <init > <log text ="UPL Exalpme..." /> </init > <trace enable ="true" /> <iosPListUpdates > <loopElements tag ="dict" > <loopElements tag ="$" > <setStringFromTag result ="TagName" tag ="$" /> <setBoolIsEqual result ="bIsKey" arg1 ="$S(TagName)" arg2 ="key" /> <if condition ="bIsKey" > <true > <log text ="$S(TagName):$S(TagValue)" /> </true > </if > </loopElements > </loopElements > </iosPListUpdates > </root >
注意:当前元素以tag = "$"方式引用。
编译时就会有以下log:
1
2
3
4
5
6
7
8
9
10
11
12
13
14
15
16
17
18
19
20
21
22
23
24
25
26
27
28
29
30
31
32
33
34
35
36
37
38
39
40
UPL: /Users/buildmachine/UE4/Builds/lipengzha-PC1/C/BuildAgent/workspace/PackageFGameClient/FGame/Plugins/UPLExample/Source/UPLExample/ThirdParty/IOS/IOS_UPL.xml UPL Init: None UPLExalpme adding element to plist... key : CFBundleURLTypes key : CFBundleDevelopmentRegion key : CFBundleDisplayName key : CFBundleExecutable key : CFBundleIdentifier key : CFBundleInfoDictionaryVersion key : CFBundleName key : CFBundlePackageType key : CFBundleSignature key : CFBundleVersion key : CFBundleShortVersionString key : LSRequiresIPhoneOS key : UIStatusBarHidden key : UIFileSharingEnabled key : UIRequiresFullScreen key : UIViewControllerBasedStatusBarAppearance key : UIInterfaceOrientation key : UISupportedInterfaceOrientations key : UIRequiredDeviceCapabilities key : CFBundleIcons key : CFBundleIcons~ipad key : UILaunchStoryboardName key : CFBundleSupportedPlatforms key : MinimumOSVersion key : ITSAppUsesNonExemptEncryption key : NSLocationAlwaysAndWhenInUseUsageDescription key : NSLocationWhenInUseUsageDescription key : CFBundleURLName key : CFBundleURLSchemes key : CFBundlePrimaryIcon key : CFBundleIconFiles key : CFBundleIconName key : UIPrerenderedIcon key : CFBundlePrimaryIcon key : CFBundleIconFiles key : CFBundleIconName key : UIPrerenderedIcon
对于新增比较简单,但是对于删除和修改就比较麻烦了,需要遍历一遍所有的节点,然后根据匹配来删掉当前的元素(注意plist的是键值对的,一个<key></key>下面还对应着一个value元素,这两个都要删掉,不然会打包不过):
1 2 <key > BuildMachineOSBuild</key > <string > 19C57</string >
我写了个方便删除plist中元素的流程,可以方便删除多组元素:
1
2
3
4
5
6
7
8
9
10
11
12
13
14
15
16
17
18
19
20
21
22
23
24
25
26
27
28
29
30
31
32
33
34
35
36
37
38
39
40
41
42
43
44
45
46
47
48
49
50
51
52
53
54
55
56
57
58
59
60
61
62
63
64
65
66
67
68
69
70
71
72
73
74
<?xml version="1.0" encoding="utf-8" ?> <root > <init > <log text ="UPLExalpme adding element to plist..." /> </init > <trace enable ="true" /> <iosPListUpdates > <addElements tag ="dict" once ="true" > <key > AdditionalElementA</key > <string > this key is a AdditionalElementA element.</string > <key > AdditionalElementB</key > <string > this key is a AdditionalElementB element.</string > </addElements > <setString result ="NeedDeleteKey_1" value ="AdditionalElementA" /> <setString result ="NeedDeleteKey_2" value ="AdditionalElementB" /> <setInt result ="loopSumNum" value ="2" /> <setInt result ="loopCount" value ="1" /> <setBoolIsLessEqual result ="loopRun" arg1 ="$I(loopCount)" arg2 ="$I(loopSumNum)" /> <while condition ="loopRun" > <log text ="count:$I(loopCount) SearchKey:$S(NeedDeleteKey_$I(loopCount))" /> <setBool result ="bIsDeleteElement" value ="false" /> <loopElements tag ="dict" > <loopElements tag ="$" > <if condition ="bIsDeleteElement" > <true > <setBool result ="bIsDeleteElement" value ="false" /> <log text ="bIsDeleteElement is true!!!" /> <setStringFromTag result ="TagName" tag ="$" /> <setStringFromTagText result ="TagValue" tag ="$" /> <log text ="Delete element value,tagname:$S(TagName) value:$S(TagValue)" /> <removeElement tag ="$" once ="true" /> </true > </if > <setStringFromTag result ="TagName" tag ="$" /> <setBoolIsEqual result ="bIsKey" arg1 ="$S(TagName)" arg2 ="key" /> <if condition ="bIsKey" > <true > <setStringFromTagText result ="TagValue" tag ="$" /> <log text ="tagname:$S(TagName) tagvalue:$S(TagValue)" /> <setBoolIsEqual result ="bIs_NeedDeleteKey_$I(loopCount)" arg1 ="$S(TagValue)" arg2 ="$S(NeedDeleteKey_$I(loopCount))" /> <if condition ="bIs_NeedDeleteKey_$I(loopCount)" > <true > <log text ="Match key $S(NeedDeleteKey_$I(loopCount))." /> <log text ="Delete element key,tagname:$S(TagName) value:$S(TagValue)." /> <removeElement tag ="$" once ="true" /> <setBool result ="bIsDeleteElement" value ="true" /> </true > </if > </true > </if > </loopElements > </loopElements > <setIntAdd result ="loopCount" arg1 ="$I(loopCount)" arg2 ="1" /> <setBoolIsLessEqual result ="loopRun" arg1 ="$I(loopCount)" arg2 ="$I(loopSumNum)" /> <if condition ="loopRun" > <true > <log text ="add loopCount to $I(loopCount)" /> </true > <false > <log text ="the loop is finished!" /> </false > </if > </while > </iosPListUpdates > </root >
脚本最开始Add了两个元素对,后面则是删除的代码,使用时需要关注的是下面三行:
1 2 3 <setString result ="NeedDeleteKey_1" value ="AdditionalElementA" /> <setString result ="NeedDeleteKey_2" value ="AdditionalElementB" /> <setInt result ="loopSumNum" value ="2" />
头两行是要删除的元素的变量,值是要删除的key的字符串,注意命名规则都是以NeedDeleteKey_开头,要遵守这个命名规则。loopSumNum的变量,用于记录有多少个需要删除的元素对,这里我测试删除两个,它的值就是2。
当打包构建的时候,这个脚本执行起来就会有下面的输出:
1
2
3
4
5
6
7
8
9
10
11
12
13
14
15
16
17
18
19
20
21
22
23
24
25
26
27
28
29
30
31
32
33
34
35
36
37
38
39
40
41
42
43
44
45
46
47
48
49
50
51
52
53
54
55
56
57
58
59
60
61
62
63
64
65
66
67
68
69
70
71
72
73
74
75
76
77
78
79
80
81
82
83
84
85
86
87
88
89
90
91
92
93
UPL: /Users/buildmachine/UE4/Builds/lipengzha-PC1/C/BuildAgent/workspace/PackageFGameClient/FGame/Plugins/UPLExample/Source/UPLExample/ThirdParty/IOS/IOS_UPL.xml UPL Init: None UPLExalpme adding element to plist... count:1 SearchKey:AdditionalElementA tagname:key tagvalue:CFBundleURLTypes tagname:key tagvalue:CFBundleDevelopmentRegion tagname:key tagvalue:CFBundleDisplayName tagname:key tagvalue:CFBundleExecutable tagname:key tagvalue:CFBundleIdentifier tagname:key tagvalue:CFBundleInfoDictionaryVersion tagname:key tagvalue:CFBundleName tagname:key tagvalue:CFBundlePackageType tagname:key tagvalue:CFBundleSignature tagname:key tagvalue:CFBundleVersion tagname:key tagvalue:CFBundleShortVersionString tagname:key tagvalue:LSRequiresIPhoneOS tagname:key tagvalue:UIStatusBarHidden tagname:key tagvalue:UIFileSharingEnabled tagname:key tagvalue:UIRequiresFullScreen tagname:key tagvalue:UIViewControllerBasedStatusBarAppearance tagname:key tagvalue:UIInterfaceOrientation tagname:key tagvalue:UISupportedInterfaceOrientations tagname:key tagvalue:UIRequiredDeviceCapabilities tagname:key tagvalue:CFBundleIcons tagname:key tagvalue:CFBundleIcons~ipad tagname:key tagvalue:UILaunchStoryboardName tagname:key tagvalue:CFBundleSupportedPlatforms tagname:key tagvalue:MinimumOSVersion tagname:key tagvalue:ITSAppUsesNonExemptEncryption tagname:key tagvalue:NSLocationAlwaysAndWhenInUseUsageDescription tagname:key tagvalue:NSLocationWhenInUseUsageDescription tagname:key tagvalue:AdditionalElementA Match key AdditionalElementA. Delete element key,tagname:key value:AdditionalElementA. bIsDeleteElement is true!!! Delete element value,tagname:string value:this key is a AdditionalElementA element. tagname:key tagvalue:AdditionalElementB tagname:key tagvalue:CFBundleURLName tagname:key tagvalue:CFBundleURLSchemes tagname:key tagvalue:CFBundlePrimaryIcon tagname:key tagvalue:CFBundleIconFiles tagname:key tagvalue:CFBundleIconName tagname:key tagvalue:UIPrerenderedIcon tagname:key tagvalue:CFBundlePrimaryIcon tagname:key tagvalue:CFBundleIconFiles tagname:key tagvalue:CFBundleIconName tagname:key tagvalue:UIPrerenderedIcon add loopCount to 2 count:2 SearchKey:AdditionalElementB tagname:key tagvalue:CFBundleURLTypes tagname:key tagvalue:CFBundleDevelopmentRegion tagname:key tagvalue:CFBundleDisplayName tagname:key tagvalue:CFBundleExecutable tagname:key tagvalue:CFBundleIdentifier tagname:key tagvalue:CFBundleInfoDictionaryVersion tagname:key tagvalue:CFBundleName tagname:key tagvalue:CFBundlePackageType tagname:key tagvalue:CFBundleSignature tagname:key tagvalue:CFBundleVersion tagname:key tagvalue:CFBundleShortVersionString tagname:key tagvalue:LSRequiresIPhoneOS tagname:key tagvalue:UIStatusBarHidden tagname:key tagvalue:UIFileSharingEnabled tagname:key tagvalue:UIRequiresFullScreen tagname:key tagvalue:UIViewControllerBasedStatusBarAppearance tagname:key tagvalue:UIInterfaceOrientation tagname:key tagvalue:UISupportedInterfaceOrientations tagname:key tagvalue:UIRequiredDeviceCapabilities tagname:key tagvalue:CFBundleIcons tagname:key tagvalue:CFBundleIcons~ipad tagname:key tagvalue:UILaunchStoryboardName tagname:key tagvalue:CFBundleSupportedPlatforms tagname:key tagvalue:MinimumOSVersion tagname:key tagvalue:ITSAppUsesNonExemptEncryption tagname:key tagvalue:NSLocationAlwaysAndWhenInUseUsageDescription tagname:key tagvalue:NSLocationWhenInUseUsageDescription tagname:key tagvalue:AdditionalElementAAA tagname:key tagvalue:AdditionalElementB Match key AdditionalElementB. Delete element key,tagname:key value:AdditionalElementB. bIsDeleteElement is true!!! Delete element value,tagname:string value:this key is a AdditionalElementB element. tagname:key tagvalue:CFBundleURLName tagname:key tagvalue:CFBundleURLSchemes tagname:key tagvalue:CFBundlePrimaryIcon tagname:key tagvalue:CFBundleIconFiles tagname:key tagvalue:CFBundleIconName tagname:key tagvalue:UIPrerenderedIcon tagname:key tagvalue:CFBundlePrimaryIcon tagname:key tagvalue:CFBundleIconFiles tagname:key tagvalue:CFBundleIconName tagname:key tagvalue:UIPrerenderedIcon the loop is finished!
其实只要可以删除,就可以在删除之后自己通过addElements来再把已删除的元素添加一遍了,从而实现要修改的目的。
为IOS添加Framawork IOS上的Framework有点类似于静态链接库的意思,相当于把.a+.h+资源打包到一块的集合体。更具体的区别描述请看:iOS库 .a与.framework区别
在UE中以集成IOS上操作Keycahin的SSKeychain为例,在Module的build.cs中使用PublicAdditionalFrameworks来添加:
1
2
3
4
5
6
7
PublicAdditionalFrameworks.Add( new Framework( "SSKeychain" , "ThirdParty/IOS/SSKeychain.embeddedframework.zip" , "SSKeychain.framework/SSKeychain.bundle" ) );
构造Framework的第一个参数是名字,第二个是framework的路径(相对于Module),第三个则是解压之后的Framework的bundle路径(如果framework没有bundle则可以忽略这个参数,而且就算有bundle,但是不写这第三个参数貌似也没什么问题)。
这个可以打开SSKeychain.embeddedframework.zip文件看:
1
2
3
4
5
6
7
8
9
10
11
12
13
14
15
16
17
18
19
20
21
22
SSKeychain.embeddedframework └─SSKeychain.framework │ Info.plist │ SSKeychain │ ├─Headers │ SSKeychain.h │ SSKeychainQuery.h │ ├─Modules │ module .modulemap │ ├─SSKeychain.bundle │ └─en.lproj │ SSKeychain.strings │ └─_CodeSignature CodeDirectory CodeRequirements CodeRequirements-1 CodeResources CodeSignature
相对于.framework的路径,这个路径一定要填正确,不然是不能用的,因为打包时会把这个zip解压出来,然后拷贝到包体中,路径指定错了就无法拷贝了。
1 [2020.05 .14 -11.04 .48 :324 ][988 ]UATHelper: Packaging (iOS): [2 /183 ] sh Unzipping : /Users/zyhmac/UE4/Builds/ZHALIPENG/C/Users/imzlp/Documents/UnrealProjectSSD/MicroEnd_423/Plugins/PlatformUtils/Source/PlatformUtils/ThirdParty/IOS/SSKeychain.embeddedframework.zip -> /Users/zyhmac/UE4/Builds/ZHALIPENG/D/UnrealEngine/Epic/UE_4.23 /Engine/Intermediate/UnzippedFrameworks/SSKeychain/SSKeychain.embeddedframework
注意:不要在两个不同的模块里同时引入一个相同的第三方framework文件,不然会有以下错误(如我在插件A中引入了SSKeychain.embeddedframework.zip然后在相同工程的另一个插件B中也引入了它)。
1 Unable to merge actions producing SSKeychain.embeddedframework.extracted: prerequisites are different.
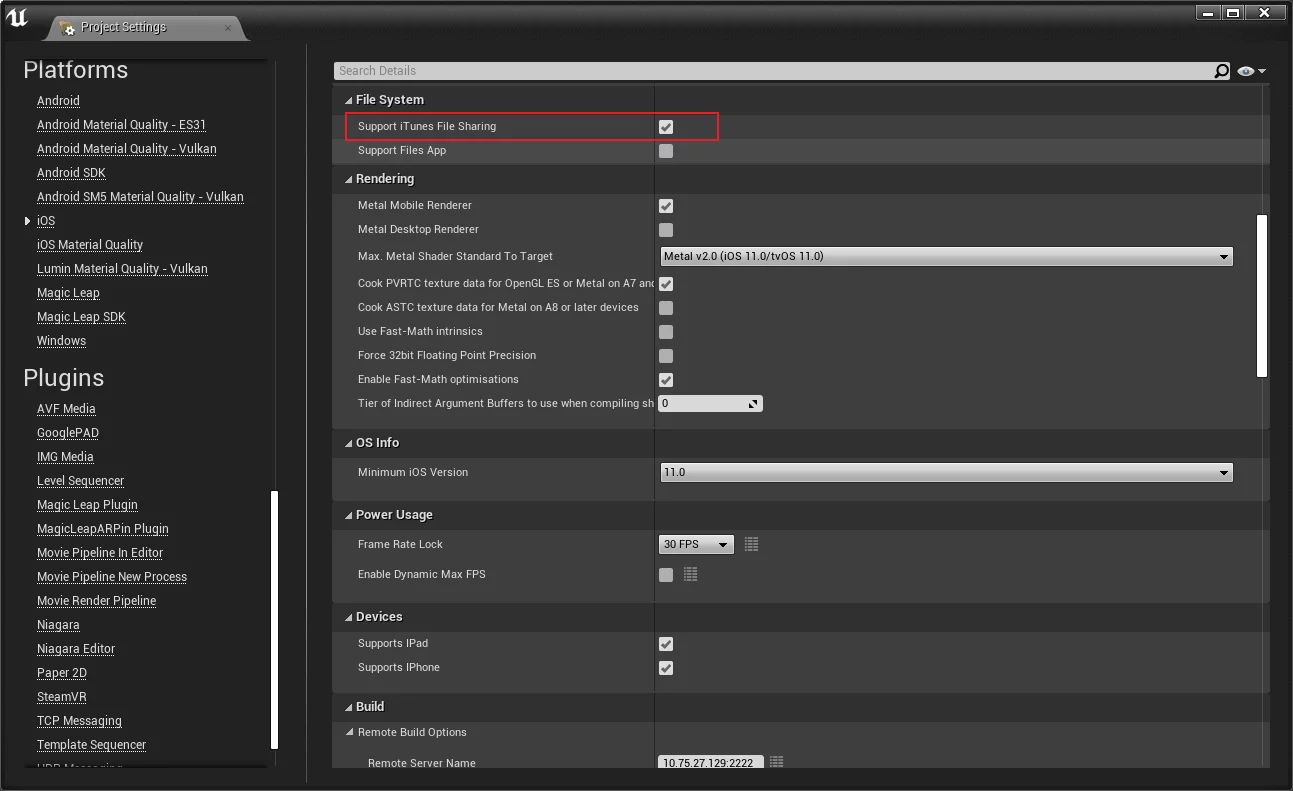
测试iOS包的常见问题 iOS UE4App的数据目录 访问iOS程序的文稿目录需要App开启文件共享(File Sharing),需要在UE的Project Settings-Platform-IOS-File System里开启:
这样打包之后才可以访问应用程序的文稿目录。
可以使用iMaZing 这个工具来访问ios App的文稿目录,可以创建文件夹、拷贝文件等等,还是比较方便的。
UE在Win和Android平台都有这样的目录结构:
1
2
3
4
5
6
7
8
9
+---Engine | +---Content \---FGame +---Content | +---Movies | \---Paks \---Saved +---Logs \---Paks
在Win上是相对于打包目录,在Android上默认是<Sdcard>/UE4Game/PROJECT_NAME/的。
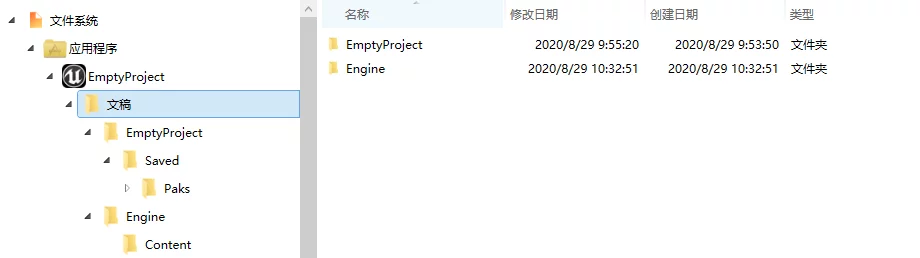
而在iOS上这个结构是相对于App的文稿目录的(这几个文件夹都是我手动创建的,Shipping时也没有log):
如果想要mount pak就按照这个目录结构把pak放到相关目录即可,在程序中就可以通过FPaths的API来访问了。
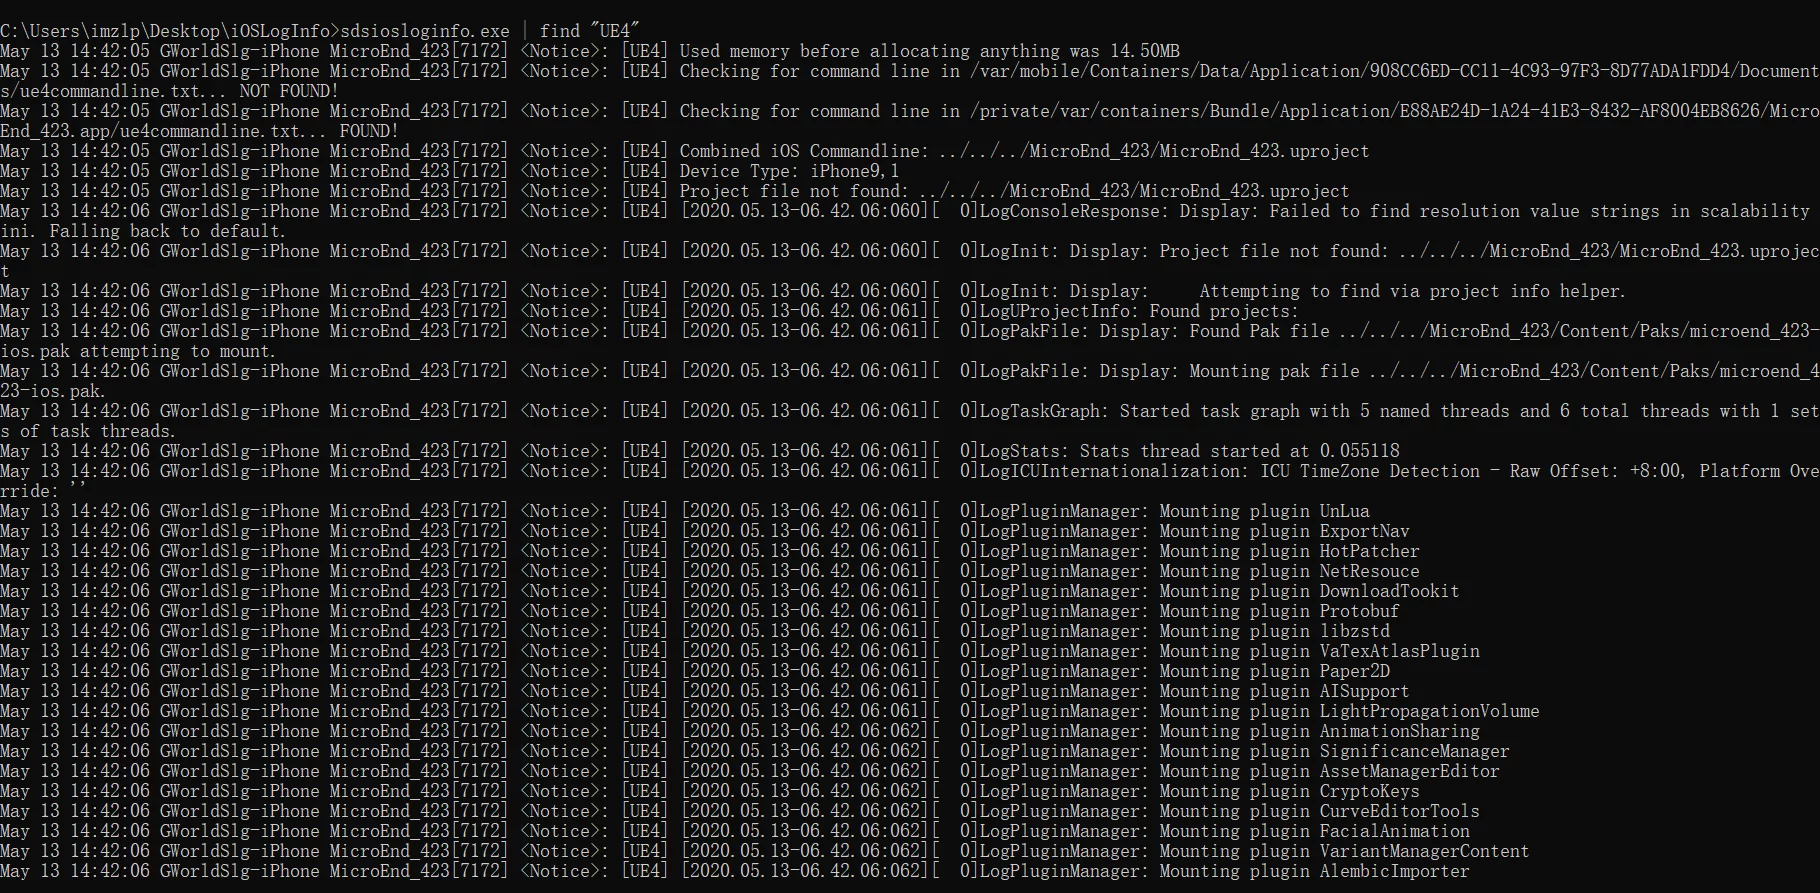
在Windows上查看iOS设备log Andorid的设备可以使用adb logcat来捕获log,在想要看iOS的log却十分麻烦,还要Mac。
但是经过一番查找,找到了一个工具,可以在Windows上实时地查看当前设备log:IOSLogInfo
下载之后解压,执行sdsiosloginfo.exe就可以看到类似logcat的日志输出了,如果装了Git bash环境也可以使用|来进行过滤。
UE项目在MAC上的Log位置
MacOS上打开UE项目的Log位置为~/Library/Logs/Unreal Engine/ProjectName,Locating Project Logs
Mac打包的Paklist位置 Mac上打包IPA生成的Paklist的位置为~/Library/Logs/Unreal Engine/LocalBuildLogs/BuildCookRun,与Windows上打包有区别。
相关链接