近期想研究下Boost库,网络上提供的大都是使用IDE(VS/Code::Blocks等)的教程,但是只是写一些测试代码就要开个臃肿的IDE我是很不爽的,今天折腾了一下在SublimeText中编译/链接使用Boost库的代码。顺便把折腾过程/工具整理了出来,如果别人有这样的需求而且恰好能看到这篇文章的话,就能少浪费时间了。
2016.11.01 Update
使用最新版本MinGW64-GCC6.2(x86_64-6.2.0-posix-seh-rt_v5-rev1)来编译出LLVM/Clang 3.9,再使用编译出来的Clang编译Boost1.62,之前在Clang中链接编译出来的Boost库出现的报错情况消失了。
注意:使用Clang编译Boost时,最好确保当前的clang版本是由当前系统中gcc的版本编译而来的,不然使用clang链接编译出来的静态链接库时会出现奇怪的问题。
可以在这里下载我编译好的版本:MinGW62-GCC6.2(x86_64-6.2.0-posix-seh-rt_v5-rev1),使用GCC6.2(上面的MinGW版本)编译的LLVM/Clang3.9,以及Boost(MinGW64-GCC6.2/LLVM3.9/VC14-ALL),需要的链接库版本(debug/release/static等)可以自行选择。
完整的编译工具链可以点此下载。
原文章
首先确保你电脑上装有LLVM(clang)+GCC(MinGW)/MSVC(这篇文章只写Clang/GCC版本)——或者下载我的C++工具链(Cmake/Mingw/LLVM/Cppcheck)添加到系统的PATH路径。
我所使用的GCC版本为6.2.0 (x86_64-posix-seh-rev1),LLVM(Clang 3.9)版本为x86_64-w64-windows-gnu(Thread model: posix)。
假定上一步你下载的是源码版本,下载到本地之后解压出来,其目录下会有bootstrap.bat文件,执行会自动编译出b2.exe与bjam.exe。
然后开始编译(使用Clang/GCC/MSVC14),这里我选择的是使用clang:
1 | # Clang编译 |
--toolset表示编译boost所使用的工具集。address-model=64:编译出来的是32位还是64位版本,该参数跟在--toolset之后,使用VS编译时若未指定,则默认时32位。--stagedir:指定编译结果的存放目录。--link:表示链接库的类型,static是静态链接库,shared是动态链接库。--runtime-link:指定使用运行库的方式,static表示静态链接C/C++运行库(/MT与/MTd),shared标识动态链接C/C++运行库(/MD与/MDd),用混链接库会产生LNK2038的链接错误。--threading:使用多线程库还是单线程库,multi多线程,single单线程。--address-model:编译出64位还是32位。--stage:表示只生成dll 或 lib,而不生成包含include目录的头文件目录, 如果要生成包含头文件的include目录,需要使用install参数。debug/release:生成debug或release版本。注意:clang和gcc编译出来的Boost版本(x86/x64)取决于你的编译器版本(x86/x64),而MSVC编译出来的默认是x86,所以使用上面默认编译的方案在VS中是不能用x64-debug或者x64-release来编译的,解决方案是,在编译Boost时指定编译x64版本
address-model=64
使用上面任意一种都会编译出四个版本的lib来,分别是(multiThread-Release/multiThread-Debug/multiThread-StaticLink-Release/multiThread-StaticLink-Debug),在这里可以下载我编译的这三个(clang/gcc/msvc)版本的boost。
大概需要几十分钟的时间,编译完毕后会在D盘根目录生成一个Boost文件夹。
通过编译参数我们可以看出生成的lib与对应的版本:
1、以“lib”开头的是“link-static”版本的,而直接以“boost”开头的是“link-shared”版本的。
2、有“d”的为debug版本,没有的则是release版本。
3、有“s”的为“runtime-link-static”版本,没有的则是“runtime-link-shared”版本。
4、有“mt”的为“threading-multi”版本,没有的则是“threading-single”版本。
如:
1 | # 使用这个命令编译会产生四个文件 |
将Boost源码中的/boost复制到LLVM/include/下,将编译生成的D:/Boost/lib中的文件复制到LLVM/lib下(或者说你直接将boost源码(/Boost/boost)和lib(/Boost/lib)所在的目录(~/boost)添加到系统的PATH路径,下面同理)。
OK,到这一步,Boost已经安装到你的电脑里了。如果需要定制模块,网上关于如何编译安装Boost的教程很多,一搜即可。
但是,编译和链接还是个很大的问题。很多教程都使用IDE来写Boost,但是我作为一个ST控我不喜欢臃肿的IDE,所以编译和链接命令都要自己手写了。
我们先可以测试以下代码:
1 | // printDirC.cc |
使用clang++编译该代码的命令为:
1 | $ clang++ -o boost.exe boost.cc -I"C:\Program Files\BuildPath\LLVM\include" -static -L"C:\Program Files\BuildPath\LLVM\lib" |
另外,因为上面的代码中使用了boost_filesystem所以我们在编译时要链接boost_filesystem库,而且由于boost_filesystem依赖boost_system,所以这里的连接选项中将boost_system也要加上。
1 | $ g++ -o printDirC.exe printDirC.cc -I"C:\Program Files\BuildPath\LLVM\include" -L"C:\Program Files\BuildPath\LLVM\lib" -libboost_system-clang39-mt-s-1_62 -libboost_filesystem-clang39-mt-s-1_62 |
网上很多文章都说要使用-lboost_system和,其实在Boost1.62.0使用clang编译的版本中名字不是这样的,而是libboost_system-clang39-mt-s-1_62.lib(gcc编译的是libboost_system-mgw62-mt-s-1_62.a)之类的。
MinGW连接静态库的时候,会自动增加prefix lib和.a的扩展名,而clang只会自动增加.a扩展名,然后在可用的路径下寻找对应库文件。
比如我们写-llibboost_system-clang39-mt-s-1_62会找到libboost_system-clang39-mt-s-1_62.lib(使用gcc编译的版本是写-lboost_system-mgw62-mt-s-1_62会找到libboost_system-mgw62-mt-s-1_62.lib)
所以我们想要链接库的库参数(GCC版本)为该静态库文件去掉头部的lib和文件后缀,Clang版本为去掉文件后缀。
Boost中我们所有可以链接的库和编译时的链接参数为(clang39/1_62为编译器版本和Boost版本,这里我只写出multiThread-StaticLink-Release版本的lib):
| 库 | clang版本链接参数 | GCC版本链接参数 |
|---|---|---|
| boost_atomic | -llibboost_atomic-clang39-mt-s-1_62 | -lboost_atomic-mgw62-mt-s-1_62 |
| boost_chrono | -llibboost_chrono-clang39-mt-s-1_62 | -lboost_chrono-mgw62-mt-s-1_62 |
| boost_container | -llibboost_container-clang39-mt-s-1_62 | -lboost_container-mgw62-mt-s-1_62 |
| boost_context | -lboost_context-mgw62-mt-s-1_62 | |
| boost_coroutine | -lboost_coroutine-mgw62-mt-s-1_62 | |
| boost_date_time | -llibboost_date_time-clang39-mt-s-1_62 | -lboost_date_time-mgw62-mt-s-1_62 |
| boost_exception | -llibboost_exception-clang39-mt-s-1_62 | -lboost_exception-mgw62-mt-s-1_62 |
| boost_filesystem | -llibboost_filesystem-clang39-mt-s-1_62 | -lboost_filesystem-mgw62-mt-s-1_62 |
| boost_graph | -llibboost_graph-clang39-mt-s-1_62 | -lboost_graph-mgw62-mt-s-1_62 |
| boost_iostreams | -llibboost_iostreams-clang39-mt-s-1_62 | -lboost_iostreams-mgw62-mt-s-1_62 |
| boost_locale | -lboost_locale-mgw62-mt-s-1_62 | |
| boost_log_setup | -llibboost_log_setup-clang39-mt-s-1_62 | -lboost_log_setup-mgw62-mt-s-1_62 |
| boost_log | -llibboost_log-clang39-mt-s-1_62 | -lboost_log-mgw62-mt-s-1_62 |
| boost_math_c99f | -llibboost_math_c99f-clang39-mt-s-1_62 | -lboost_math_c99f-mgw62-mt-s-1_62 |
| boost_math_c99l | -llibboost_math_c99l-clang39-mt-s-1_62 | -lboost_math_c99l-mgw62-mt-s-1_62 |
| boost_math_c99 | -llibboost_math_c99-clang39-mt-s-1_62 | -lboost_math_c99-mgw62-mt-s-1_62 |
| boost_math_tr1f | -llibboost_math_tr1f-clang39-mt-s-1_62 | -lboost_math_tr1f-mgw62-mt-s-1_62 |
| boost_math_tr1l | -llibboost_math_tr1l-clang39-mt-s-1_62 | -lboost_math_tr1l-mgw62-mt-s-1_62 |
| boost_math_tr1 | -llibboost_math_tr1-clang39-mt-s-1_62 | -lboost_math_tr1-mgw62-mt-s-1_62 |
| boost_prg_exec_monitor | -llibboost_prg_exec_monitor-clang39-mt-s-1_62 | -lboost_prg_exec_monitor-mgw62-mt-s-1_62 |
| boost_program_options | -llibboost_program_options-clang39-mt-s-1_62 | -lboost_program_options-mgw62-mt-s-1_62 |
| boost_python3 | -llibboost_python-clang39-mt-s-1_62 | |
| boost_python | -llibboost_python-clang39-mt-s-1_62 | |
| boost_random | -llibboost_random-clang39-mt-s-1_62 | -lboost_random-mgw62-mt-s-1_62 |
| boost_regex | -llibboost_regex-clang39-mt-s-1_62 | -lboost_regex-mgw62-mt-s-1_62 |
| boost_serialization | -llibboost_serialization-clang39-mt-s-1_62 | -lboost_serialization-mgw62-mt-s-1_62 |
| boost_signals | -llibboost_signals-clang39-mt-s-1_62 | -lboost_signals-mgw62-mt-s-1_62 |
| boost_system | -llibboost_system-clang39-mt-s-1_62 | -lboost_system-mgw62-mt-s-1_62 |
| boost_test_exec_monitor | -llibboost_test_exec_monitor-clang39-mt-s-1_62 | -lboost_test_exec_monitor-mgw62-mt-s-1_62 |
| boost_thread | -llibboost_thread-clang39-mt-s-1_62 | -lboost_thread-mgw62-mt-s-1_62 |
| boost_timer | -llibboost_timer-clang39-mt-s-1_62 | -lboost_timer-mgw62-mt-s-1_62 |
| boost_type_erasure | -llibboost_type_erasure-clang39-mt-s-1_62 | -lboost_type_erasure-mgw62-mt-s-1_62 |
| boost_unit_test_framework | -llibboost_unit_test_framework-clang39-mt-s-1_62 | -lboost_unit_test_framework-mgw62-mt-s-1_62 |
| boost_wave | -llibboost_wave-clang39-mt-s-1_62 | -lboost_wave-mgw62-mt-s-1_62 |
| boost_wserialization | -llibboost_wserialization-clang39-mt-s-1_62 | -lboost_wserialization-mgw62-mt-s-1_62 |
为了避免在编译时需要手动添加,我们可以把这些链接参数都写到ST的构建系统里,注意-I和-L的位置要改为你自己的Boost路径。关于如何修改SublimeText构建系统可以看我之前的文章——配置SublimeText为C/C++的轻量级IDE。
1 | { |
将所有的静态库链接参数写到里面:
注意链接顺序,因为链接时会先找到最前面的链接库,如果前面的链接库依赖于后面链接库的东西编译就会出错。
例如boost中的boost_filename模块依赖于boost_system,所以boost_system的链接要在boost_filename之前:
1 | $ clang++ -o test test.cc -std=c++11 -IC:\\Program Files\\BuildPath\\LLVM\\include -LC:\\Program Files\\BuildPath\\LLVM\\lib -llibboost_system-clang39-mt-s-1_62 -llibboost_filesystem-clang39-mt-s-1_62 |
关于链接顺序更多的讨论可以看这里还有stackoverflow的讨论,以及GCC LD对依赖库的输入顺序敏感
另外,如果有需要,可以用-Wl,-Bstatic来指定后面的部分是静态链接的,而-Wl,-Bdynamic则是指定后面的部分是动态链接的。
Clang版本:
1 | { |
GCC版本(与clang版本的区别就是使用g++编译,而且链接时不写链接库文件名的lib(-lboost...)):
1 | { |
注意:如果编译成功运行时提示找不到console_runner,可以在这里下载后放到你的PATH路径中的目录里即可(如MinGW/bin)。
若是在VS中配置Boost,需要配置win32和x64版本的,根据上面自己编译出来x86/x64版本的在视图->属性管理器中指定(win32-debug/win32-release)和(x64-debug/x64-release)两组。这样在VS中分别使用x86/x64就不会报错了。
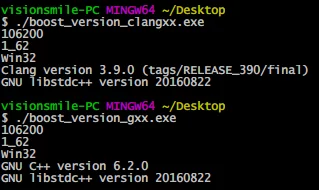
可以使用下面的代码来测试编译器和链接库的版本:
1 |
|
分别使用G++和Clang编译结果如下: