平时随笔写下的一些UE4和VR开发中的技术笔记,以及一些相关资料的收录,之前零零散散放在imzlp.com/notes 中,今天整理了一下,后续的笔记都会放到这篇文章中。
Engine Documents UE4 Online Documents
UE GamePlay Framework Tutorial
VR Devices UE适配不同VR设备的高度问题 在UE适配Oculus Rift和HTC Vive时注意把TrackingOrigin(EHMDTrackingOrigin::Type )改为Floor,不然默认的追踪起源是在眼睛位置,导致头盔位置在游戏场景中高度不对。
还有一个问题是,使用PlayerStart放置时,PlayerStart是有高度的,所以高度可能是不对的(取决于你的Pawn是怎么写的),解决的办法是可以重写AGameModeBase的SpawnDefaultPawnAtTransform,来指定高度。
UE中游戏启动VR头显初始化
1
2
Stereo On/Off Notice: Enables or Disables stereo rendering for Head Mounted Display (HMD) devices.
重置VR头显旋转和位置 因为VR头显默认的朝向X轴是与房间设置的定位有关的,所以,当我们初始就与定位时的朝向偏离时,进入游戏就会偏离我们设定让玩家看到的东西,所以需要进行修正。
1 2 3 4 5 6 7 8 9 UFUNCTION (BlueprintCallable, Category="Input|HeadMountedDisplay" )static void ResetOrientationAndPosition (float Yaw = 0.f , EOrientPositionSelector::Type Options = EOrientPositionSelector::OrientationAndPosition)
蓝图中也是同名的节点。
在UE中使用Oculus Rift 在Oculus Rift设备安装完成之后需要在Oculus商店中启用Unknow Source,不然无法在UE中使用Oculus Rift预览。
Unreal的文档中适配Oculus Rift的页面:Developing for Oculus Rift .
Oculus官方提供的按键操作介绍:
以及Oculus Rift在UE中的按键映射:
HTC Vive的按键映射 与上面的Oculus Rift作为对比,附一张HTC Vive的按键映射:
HTC VIVE设备设置
SteamVR 2.0定位基站 HTC Vive Pro支持的定位器是SteamVR 2.0,支持150°和7米的追踪范围,而且支持基站串联(最多16个)实现大空间定位方案。
注意:二代基站不支持一代HTC Vive头显。
使用Proxifier让Oculus走SS代理 昨天公司买了台Oculus Rift设备,在安装设备时需要全局代理,在Windows下我使用的是Proxifier来让Oculus相关软件走代理。
上面连接成功后可以添加一个代理规则,而Oculus程序相关的进程如下,我们需要做的是让下列的进程走SS的代理:
1 OculusSetup.exe;OculusClient.exe;OVRServiceLauncher.exe;OVRServer_x64.exe;OculusVR.exe;OculusCompatCheck.exe;CompatToolCommandLine.exe;OculusLogGatherer.exe;OVRLibrarian.exe;oculus-driver.exe;OVRLibraryService.exe;oculus-overlays.exe;OVRRedistributableInstaller.exe;
将上面的内容填入应用程序文本框内之后,选择走SS的本地代理端口就可以了。
其他的程序(如外服游戏、Steam等),如果需要强制走SS代理也是同样的方法。
VR画面模糊的问题 因为UE项目中默认的Screen Percentage 值是很低的,所以会感觉很模糊,但直接调高之后会有严重的帧率下降问题。
在4.19之前(不含4.19),VR HMD建议的理想值(r.ScreenPercentage )为:
DeviceType
r.ScreenPercentage
Oculus Rift
133
HTC Vive
140
PSVR
140
GearVR
120
GoogleVR
120
在4.19之后UE增加了vr.PixelDensity,在r.ScreenPercentage保持为100时,就可以在不同平台的设备上使用标准化的值:
DeviceType
r.ScreenPercentage
vr.PixelDensity
Oculus Rift
100
1
HTC Vive
100
1
PSVR
100
1
GearVR
100
1
GoogleVR
100
1
Lower values will perform faster but will be undersampled (more blurry) while values over 1 will perform slower and will supersample (extra sharp).
这样就可以通过控制vr.PixelDensity这个标准化的值来控制显示质量。Significant Changes Coming To VR Resolution Settings in 4.19
HTC VIVE定位器故障(03)的解决办法 如果定位器面板上闪红灯且SteamVR显示**定位器故障(03)**,请试着手动烧录定位器(基站)固件。步骤如下:Steam\steamapps\common\SteamVR\tools\lighthouse\firmware\lighthouse_tx\archive\htc_2.0,找到以下两个文件:
1
2
* lighthouse_tx_htc_2_0-calibration-rescue-244.bin * lighthouse_tx_htc_2_0-244-2016-03-12.bin
在定位器(基站)未通电情况下,将其通过micro-B USB传输线连接到电脑。
按住定位器(基站)背后的模式键并插入电源线.
一旦电脑端确认为USB大容量存储设备(USB mass storage device),才可以释放模式键。
被连接的定位器(基站)储存设备名为“CRP_DISABLED”,打开后包含一个文件“firmware.bin”,删除它。
将“lighthouse_tx_htc_2_0-calibration-rescue-244.bin”文件复制到基站的储存空间上。
复制完成后,拔掉电源线。
等几秒,然后再次插上电源。在此过程中不要按模式键。几秒后定位器(基站)应该会快速的闪烁绿灯或者红灯。绿灯表示修复成功。
如果它闪烁红灯,这表示不能自动修复,请您送修。
再次拔下电源。
重复步骤1到7,但第5步复制文件改为“lighthouse_tx_htc_2_0-244-2016-03-12.bin”。
完整后定位器(基站)就恢复正常了,讲其频道设置为“A”并单独跟踪(另一个基站不通电)来确认运行情况。一旦确认工作正常,再打开另一个基站。
如果出现闪烁绿灯无法正常使用,重复步骤1到7,但在第五步清除”CRP_DISABLED”中所有文件,只复制 “lighthouse_tx_htc_2_0-244-2016-03-12.bin” 即可。
如果手动烧录定位器(基站)固件和校准文还是无效,请使用手机拍照确定下列两个雷射点是否正常(不能用iphone/ipad雷射点拍不出來),如果这两个雷射点任一个没有显示,代表雷射损坏,请送客服检查。
定位器故障(03)
Engine Analysis UE Game的启动 游戏的初始化是从UGameInstance::StartGameInstance开始的。FEngineLoop::Init()中调用GEngine->Start()多态调用到UGameEngine::Start()中调用GameInstance->StartGameInstance();:
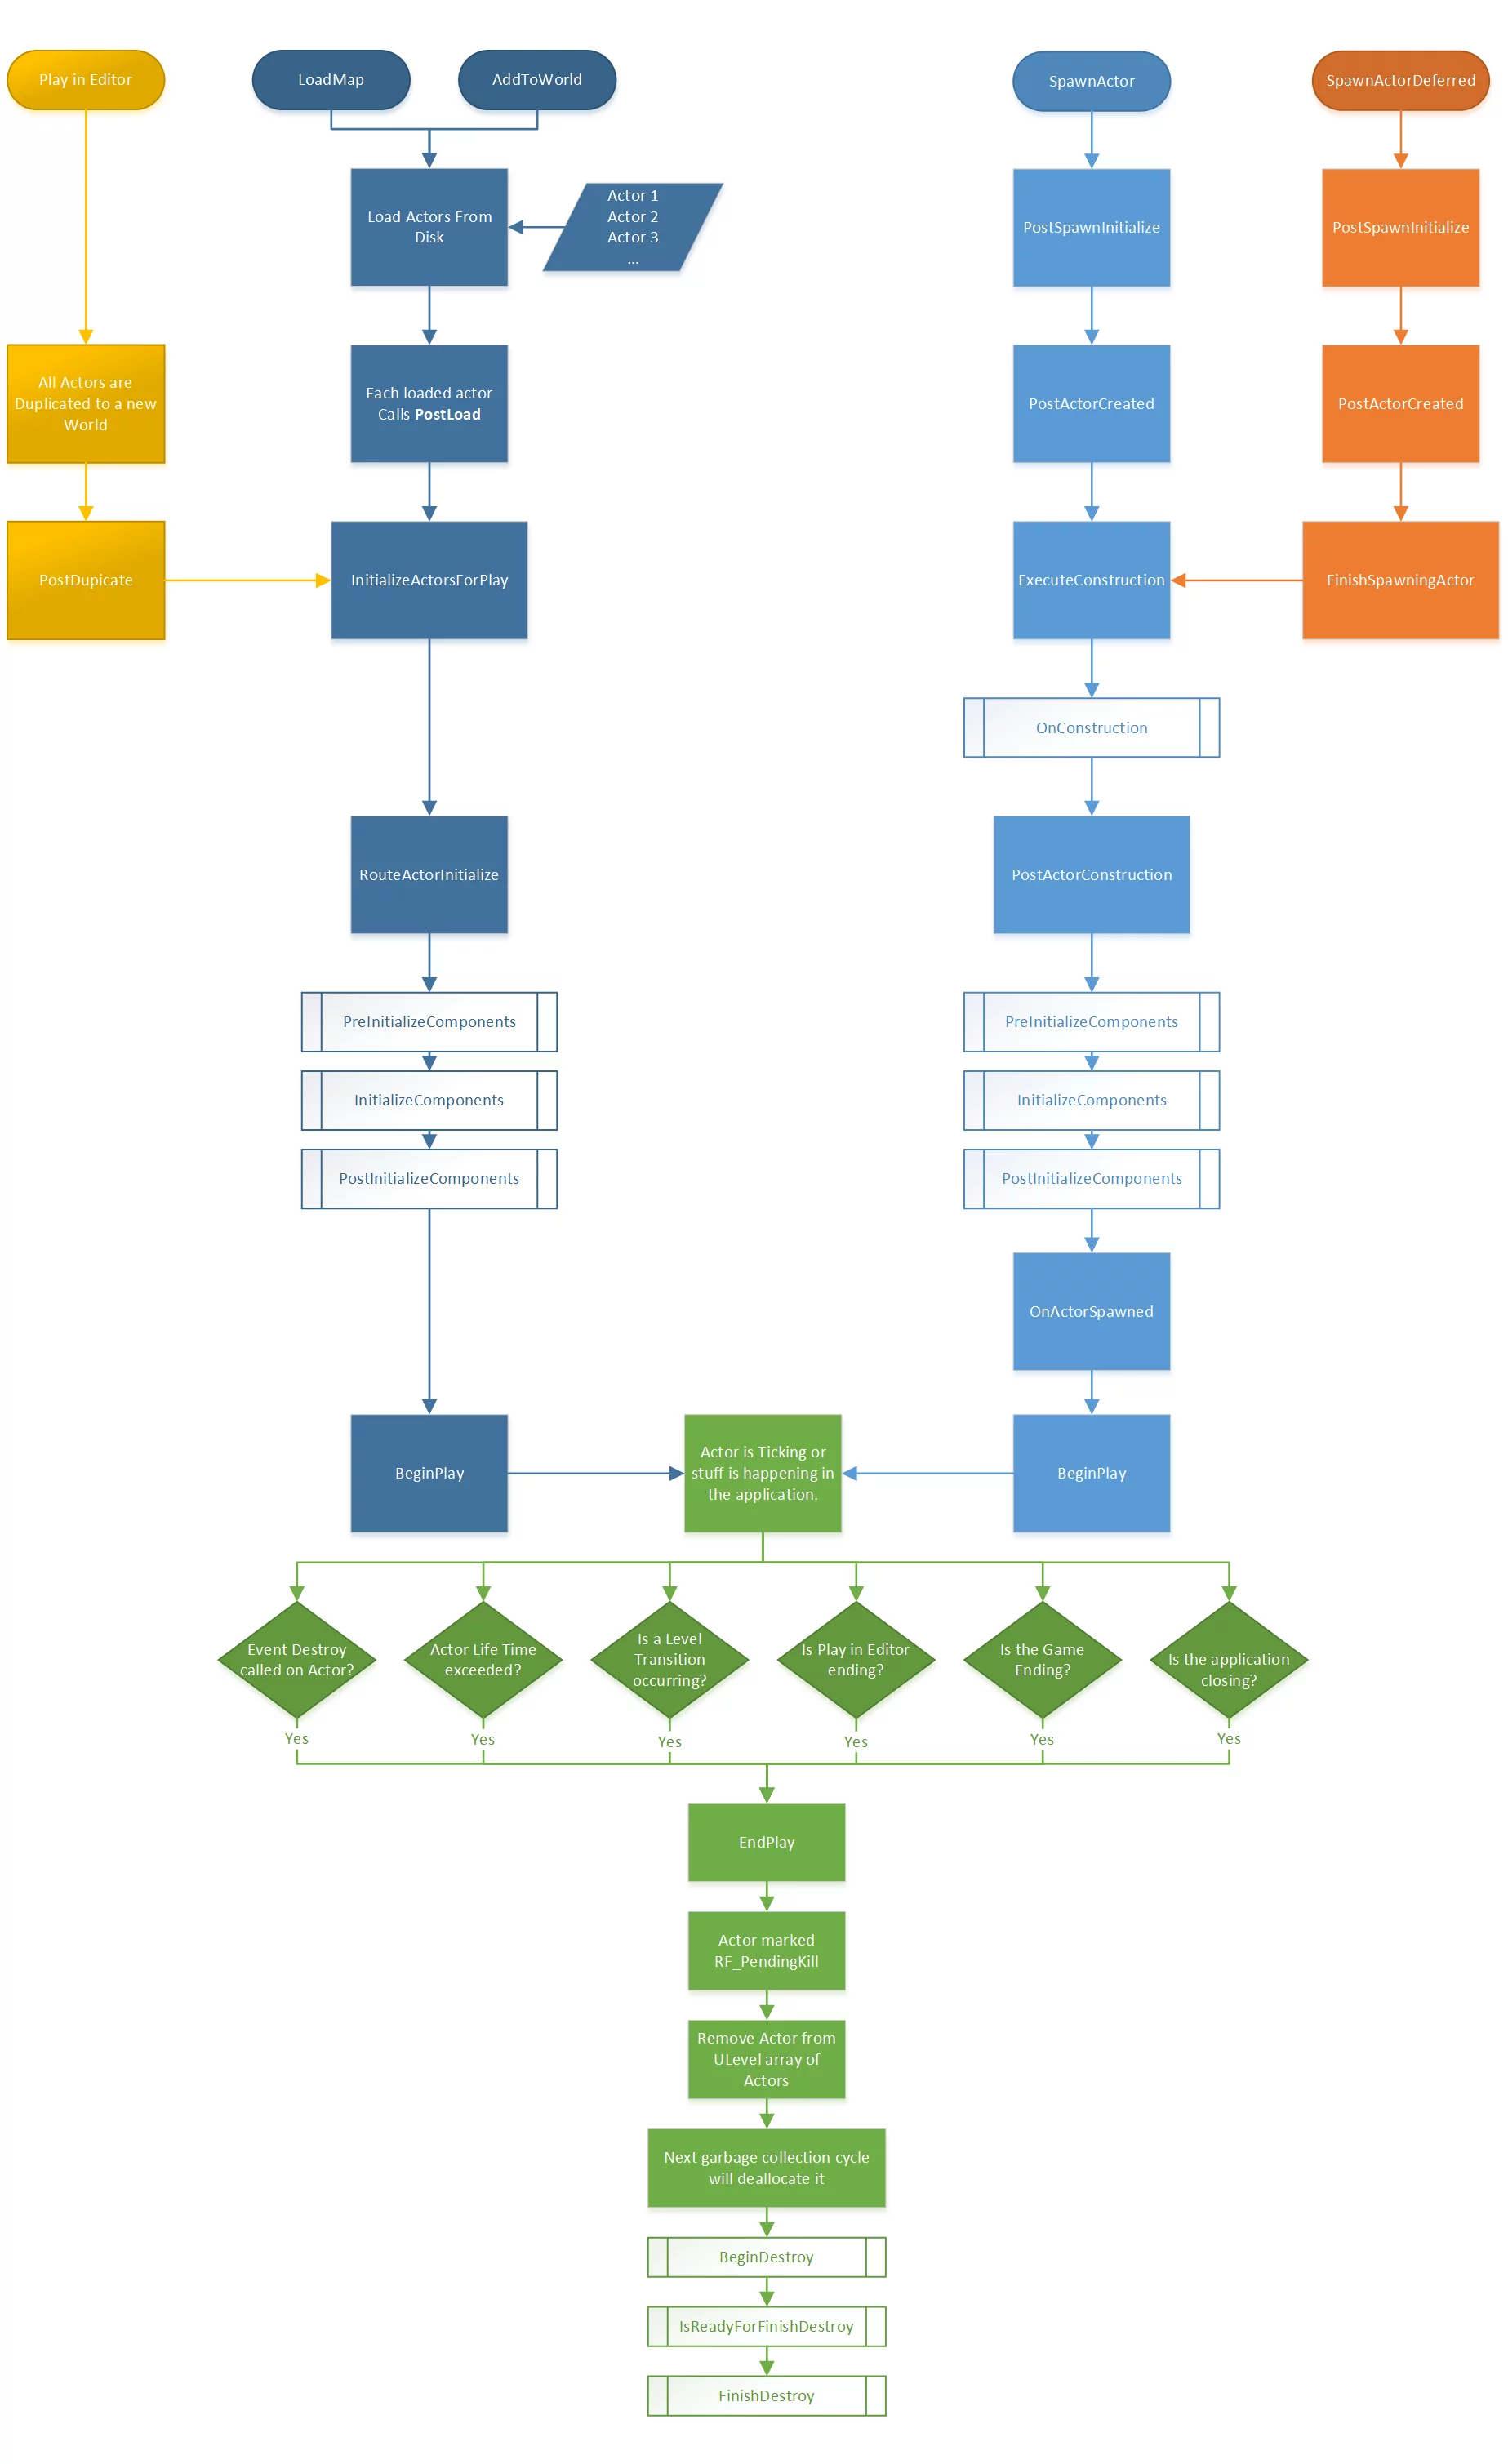
UE中Actor初始化 AActor的PreInitializeComponents/InitializeComponents/PostInitializeComponents以及DispatchBeginPlay均在ULevel::RouteActorInitialize 中调用。
1
2
3
4
5
6
7
8
9
10
11
12
13
14
15
16
17
18
19
20
21
22
23
24
25
26
27
28
29
30
31
32
33
34
35
36
37
38
39
40
41
42
43
44
45
46
47
48
49
50
51
52
53
void ULevel::RouteActorInitialize () for ( int32 Index = 0 ; Index < Actors.Num (); ++Index ) { AActor* const Actor = Actors[Index]; if ( Actor && !Actor->IsActorInitialized () ) { Actor->PreInitializeComponents (); } } const bool bCallBeginPlay = OwningWorld->HasBegunPlay (); TArray<AActor *> ActorsToBeginPlay; for ( int32 Index = 0 ; Index < Actors.Num (); ++Index ) { AActor* const Actor = Actors[Index]; if ( Actor ) { if ( !Actor->IsActorInitialized () ) { Actor->InitializeComponents (); Actor->PostInitializeComponents (); if (!Actor->IsActorInitialized () && !Actor->IsPendingKill ()) { UE_LOG (LogActor, Fatal, TEXT ("%s failed to route PostInitializeComponents. Please call Super::PostInitializeComponents() in your <className>::PostInitializeComponents() function. " ), *Actor->GetFullName () ); } if (bCallBeginPlay && !Actor->IsChildActor ()) { ActorsToBeginPlay.Add (Actor); } } Actor->UpdateOverlaps (Actor->bGenerateOverlapEventsDuringLevelStreaming); } } for (int32 ActorIndex = 0 ; ActorIndex < ActorsToBeginPlay.Num (); ActorIndex++) { AActor* Actor = ActorsToBeginPlay[ActorIndex]; SCOPE_CYCLE_COUNTER (STAT_ActorBeginPlay); Actor->DispatchBeginPlay (); } }
UE4:Engine Start Order
UE引擎的Tick调用栈(call stack) 1 2 3 4 5 6 7 8 9 10 11 12 13 14 15 16 17 18 19 20 21 22 23 24 25 26 27 28 29 30 31 32 33 34 35 36 37 38 39 40 41 42 43 44 45 46 47 48 FEngineLoop_Tick=>start: void FEngineLoop::Tick() UGameEngine_Tick=>operation: void UGameEngine::Tick( float DeltaSeconds, bool bIdleMode ) UWorld_Tick=>operation: void UWorld::Tick( ELevelTick TickType, float DeltaSeconds) UWorld_RunTickGroup=>operation: void UWorld::RunTickGroup(ETickingGroup Group, bool bBlockTillComplete = true) FTickTaskManager_RunTickGroup=>operation: void FTickTaskManager::RunTickGroup(ETickingGroup Group, bool bBlockTillComplete ) FTickTaskSequencer_ReleaseTickGroup=>operation: void FTickTaskSequencer::ReleaseTickGroup(ETickingGroup WorldTickGroup, bool bBlockTillComplete) FTaskGraphImplementation_WaitUntilTaskComplete=>operation: FTaskGraphImplementation::WaitUntilTaskComplete() FNamedTaskThread_ProcessTaskUntilQuit=>operation: FNamedTaskThread::ProcessTaskUntilQuit() FNameTaskThread_ProcessTaskNamedThread=>operation: FNameTaskThread::ProcessTaskNamedThread() FTaskGraphInterfaces_ExecuteTask=>operation: FTaskGraphInterfaces::ExecuteTask() FTickFunction_DoTask=>operation: FTickFunction::DoTask() DynamicExecFTickFunctionExecuteTick=>condition: Polymorphism execute FTickFunction::ExecuteTask() AActor_Tick=>subroutine: AActor AActor_Tick_FActorTickFunction_ExecuteTick=>operation: FActorTickFunction::ExecuteTick() AActor_Tick_AActor_TickActor=>operation: AActor::TickActor() AActor_Tick_AActor_Tick=>operation: AActor::Tick() AActor_Tick_AActor_ReceiveTick=>operation: AActor::ReceiveTick() // BpTick ActorComponent_Tick=>subroutine: ActorComponent ActorComponent_Tick_FActorComponentTickFunction_ExecuteTick=>operation: FActorComponentTickFunction::ExecuteTick() ActorComponent_Tick_FActorComponentTickFunction_ExecuteTickHelper=>operation: FActorComponentTickFunction::ExecuteTickHelper() ActorComponent_Tick_UActorComponent_TickComponent=>operation: UActorComponent::TickComponent() ActorComponent_Tick_ReceiveTick=>operation: UActorComponent::ReceiveTick(DeltaTime) // BpTick end=>end: End FEngineLoop_Tick->UGameEngine_Tick UGameEngine_Tick->UWorld_Tick UWorld_Tick->UWorld_RunTickGroup UWorld_RunTickGroup->FTickTaskManager_RunTickGroup FTickTaskManager_RunTickGroup->FTickTaskSequencer_ReleaseTickGroup FTickTaskSequencer_ReleaseTickGroup->FTaskGraphImplementation_WaitUntilTaskComplete FTaskGraphImplementation_WaitUntilTaskComplete->FNamedTaskThread_ProcessTaskUntilQuit FNamedTaskThread_ProcessTaskUntilQuit->FNameTaskThread_ProcessTaskNamedThread FNameTaskThread_ProcessTaskNamedThread->FTaskGraphInterfaces_ExecuteTask FTaskGraphInterfaces_ExecuteTask->FTickFunction_DoTask FTickFunction_DoTask->DynamicExecFTickFunctionExecuteTick DynamicExecFTickFunctionExecuteTick(yes,left)->AActor_Tick AActor_Tick->AActor_Tick_FActorTickFunction_ExecuteTick AActor_Tick_FActorTickFunction_ExecuteTick->AActor_Tick_AActor_TickActor AActor_Tick_AActor_TickActor->AActor_Tick_AActor_Tick AActor_Tick_AActor_Tick->AActor_Tick_AActor_ReceiveTick AActor_Tick_AActor_ReceiveTick->end DynamicExecFTickFunctionExecuteTick(no,right)->ActorComponent_Tick ActorComponent_Tick->ActorComponent_Tick_FActorComponentTickFunction_ExecuteTick ActorComponent_Tick_FActorComponentTickFunction_ExecuteTick->ActorComponent_Tick_FActorComponentTickFunction_ExecuteTickHelper ActorComponent_Tick_FActorComponentTickFunction_ExecuteTickHelper->ActorComponent_Tick_UActorComponent_TickComponent ActorComponent_Tick_UActorComponent_TickComponent->ActorComponent_Tick_ReceiveTick ActorComponent_Tick_ReceiveTick->end
Game Flow on UE4 Game Flow Overview on UE4
Actor LifeCycle Actor Lifecycle on Unreal Engine
UE Log macro defined UE源码中的一些Log定义:EngineLogs.h 中定义了这些Log:
1 2 3 4 5 6 7 8 9 10 11 12 13 14 15 16 17 18 19 20 21 22 ENGINE_API DECLARE_LOG_CATEGORY_EXTERN (LogPath, Warning, All) ;ENGINE_API DECLARE_LOG_CATEGORY_EXTERN (LogPhysics, Warning, All) ;ENGINE_API DECLARE_LOG_CATEGORY_EXTERN (LogBlueprint, Warning, All) ;ENGINE_API DECLARE_LOG_CATEGORY_EXTERN (LogBlueprintUserMessages, Log, All) ;ENGINE_API DECLARE_LOG_CATEGORY_EXTERN (LogAnimation, Warning, All) ;ENGINE_API DECLARE_LOG_CATEGORY_EXTERN (LogRootMotion, Warning, All) ;ENGINE_API DECLARE_LOG_CATEGORY_EXTERN (LogLevel, Log, All) ;ENGINE_API DECLARE_LOG_CATEGORY_EXTERN (LogSkeletalMesh, Log, All) ;ENGINE_API DECLARE_LOG_CATEGORY_EXTERN (LogStaticMesh, Log, All) ;ENGINE_API DECLARE_LOG_CATEGORY_EXTERN (LogNet, Log, All) ;ENGINE_API DECLARE_LOG_CATEGORY_EXTERN (LogRep, Log, All) ;ENGINE_API DECLARE_LOG_CATEGORY_EXTERN (LogNetPlayerMovement, Warning, All) ;ENGINE_API DECLARE_LOG_CATEGORY_EXTERN (LogNetTraffic, Warning, All) ;ENGINE_API DECLARE_LOG_CATEGORY_EXTERN (LogRepTraffic, Warning, All) ;ENGINE_API DECLARE_LOG_CATEGORY_EXTERN (LogNetFastTArray, Warning, All) ;ENGINE_API DECLARE_LOG_CATEGORY_EXTERN (LogNetDormancy, Warning, All) ;ENGINE_API DECLARE_LOG_CATEGORY_EXTERN (LogSkeletalControl, Warning, All) ;ENGINE_API DECLARE_LOG_CATEGORY_EXTERN (LogSubtitle, Log, All) ;ENGINE_API DECLARE_LOG_CATEGORY_EXTERN (LogTexture, Log, All) ;ENGINE_API DECLARE_LOG_CATEGORY_EXTERN (LogPlayerManagement, Error, All) ;ENGINE_API DECLARE_LOG_CATEGORY_EXTERN (LogSecurity, Warning, All) ;ENGINE_API DECLARE_LOG_CATEGORY_EXTERN (LogEngineSessionManager, Log, All) ;
CoreGlobals.h 中定义了下面这些Log:
1 2 3 4 5 6 7 8 9 10 11 12 13 14 15 16 17 18 19 20 21 22 23 24 25 26 27 28 29 30 31 32 33 34 35 CORE_API DECLARE_LOG_CATEGORY_EXTERN (LogHAL, Log, All) ;CORE_API DECLARE_LOG_CATEGORY_EXTERN (LogMac, Log, All) ;CORE_API DECLARE_LOG_CATEGORY_EXTERN (LogLinux, Log, All) ;CORE_API DECLARE_LOG_CATEGORY_EXTERN (LogIOS, Log, All) ;CORE_API DECLARE_LOG_CATEGORY_EXTERN (LogAndroid, Log, All) ;CORE_API DECLARE_LOG_CATEGORY_EXTERN (LogPS4, Log, All) ;CORE_API DECLARE_LOG_CATEGORY_EXTERN (LogXboxOne, Log, All) ;CORE_API DECLARE_LOG_CATEGORY_EXTERN (LogWindows, Log, All) ;CORE_API DECLARE_LOG_CATEGORY_EXTERN (LogSwitch, Log, All) ;CORE_API DECLARE_LOG_CATEGORY_EXTERN (LogQuail, Log, All) ;CORE_API DECLARE_LOG_CATEGORY_EXTERN (LogSerialization, Log, All) ;CORE_API DECLARE_LOG_CATEGORY_EXTERN (LogUnrealMath, Log, All) ;CORE_API DECLARE_LOG_CATEGORY_EXTERN (LogUnrealMatrix, Log, All) ;CORE_API DECLARE_LOG_CATEGORY_EXTERN (LogContentComparisonCommandlet, Log, All) ;CORE_API DECLARE_LOG_CATEGORY_EXTERN (LogNetPackageMap, Warning, All) ;CORE_API DECLARE_LOG_CATEGORY_EXTERN (LogNetSerialization, Warning, All) ;CORE_API DECLARE_LOG_CATEGORY_EXTERN (LogMemory, Log, All) ;CORE_API DECLARE_LOG_CATEGORY_EXTERN (LogProfilingDebugging, Log, All) ;CORE_API DECLARE_LOG_CATEGORY_EXTERN (LogCore, Log, All) ;CORE_API DECLARE_LOG_CATEGORY_EXTERN (LogOutputDevice, Log, All) ;CORE_API DECLARE_LOG_CATEGORY_EXTERN (LogSHA, Warning, All) ;CORE_API DECLARE_LOG_CATEGORY_EXTERN (LogStats, Log, All) ;CORE_API DECLARE_LOG_CATEGORY_EXTERN (LogStreaming, Display, All) ;CORE_API DECLARE_LOG_CATEGORY_EXTERN (LogInit, Log, All) ;CORE_API DECLARE_LOG_CATEGORY_EXTERN (LogExit, Log, All) ;CORE_API DECLARE_LOG_CATEGORY_EXTERN (LogExec, Warning, All) ;CORE_API DECLARE_LOG_CATEGORY_EXTERN (LogScript, Warning, All) ;CORE_API DECLARE_LOG_CATEGORY_EXTERN (LogLocalization, Error, All) ;CORE_API DECLARE_LOG_CATEGORY_EXTERN (LogLongPackageNames, Log, All) ;CORE_API DECLARE_LOG_CATEGORY_EXTERN (LogProcess, Log, All) ;CORE_API DECLARE_LOG_CATEGORY_EXTERN (LogLoad, Log, All) ;CORE_API DECLARE_LOG_CATEGORY_EXTERN (LogTemp, Log, All) ;
最近用到的一些Log定义地方一并贴出:
1 2 3 JSON_API DECLARE_LOG_CATEGORY_EXTERN (LogJson, Log, All) ;
检测是否为安装版引擎的方法 在EpicGameLauncher安装的引擎版本是不能通过UnrealBuildTool.exe -ProjectFiles "ProgramProjectName"来创建TargetProgram的项目的,会提示下列错误:
1 ERROR: UnrealBuildTool Exception: A game project path was not specified, which is required when generating project files using an installed build or passing -game on the command line
这个异常在UBT里的相关代码在ProjectFileGenreator.cs:
1 2 3 4 5 6 7 8 9 10 11 12 13 14 15 16 17 18 19 20 21 22 23 24 25 26 27 28 29 30 31 32 33 34 35 36 37 38 39 40 protected virtual void ConfigureProjectFileGeneration ( String[] Arguments, ref bool IncludeAllPlatforms ){ else switch ( CurArgument.ToUpperInvariant() ) { case "-GAME" : bGeneratingGameProjectFiles = true ; break ; } if ( bGeneratingGameProjectFiles || UnrealBuildTool.IsEngineInstalled() ) { if (OnlyGameProject == null ) { throw new BuildException("A game project path was not specified, which is required when generating project files using an installed build or passing -game on the command line" ); } GameProjectName = OnlyGameProject.GetFileNameWithoutExtension(); if (String.IsNullOrEmpty(GameProjectName)) { throw new BuildException("A valid game project was not found in the specified location (" + OnlyGameProject.Directory.FullName + ")" ); } bool bInstalledEngineWithSource = UnrealBuildTool.IsEngineInstalled() && DirectoryReference.Exists(UnrealBuildTool.EngineSourceDirectory); bIncludeEngineSource = bAlwaysIncludeEngineModules || bInstalledEngineWithSource; bIncludeDocumentation = false ; bIncludeBuildSystemFiles = false ; bIncludeShaderSource = true ; bIncludeTemplateFiles = false ; bIncludeConfigFiles = true ; IncludeEnginePrograms = bAlwaysIncludeEngineModules; } }
可以看到,if这里如果传递给UBT-game参数并且是引擎是安装版本(EpicGameLauncher)时会检测有没有传入project参数,如果没有就会抛异常。
1 UnrelBuildTool.exe -ProjectFiles -project="D:\UnrealProjects\UEProject.uproject" -game
这种普通的Game参数在UBT里面是不会抛异常的。但是用生成Program的命令来调用UBT,安装版引擎就会抛异常:
1 UnrelBuildTool.exe -ProjectFiles ProgramName
根据上面ProjectFileGenreator.cs的检测代码,我们要做到的是把UnrealBuildTool.IsEngineInstalled()获取的结果变为false.UnrealBuildTool.IsEngineInstalled()获得的是UnrealBuildTool中的一个bool变量bIsEngineInstalled:
1 2 3 4 5 6 7 8 9 static public bool IsEngineInstalled (){ if (!bIsEngineInstalled.HasValue) { throw new BuildException("IsEngineInstalled() called before being initialized." ); } return bIsEngineInstalled.Value; }
查找引用发现在GuardedMain里有设置bIsEngineInstalled这个变量的地方:
1 2 3 4 5 6 7 8 9 10 11 12 13 14 15 16 17 18 19 20 21 22 23 24 25 private static int GuardedMain (string [] Arguments{ try { foreach (string Argument in Arguments) { string LowercaseArg = Argument.ToLowerInvariant(); if (LowercaseArg == "-installed" || LowercaseArg == "-installedengine" ) { bIsEngineInstalled = true ; } else if (LowercaseArg == "-notinstalledengine" ) { bIsEngineInstalled = false ; } } if (!bIsEngineInstalled.HasValue) { bIsEngineInstalled = FileReference.Exists(FileReference.Combine(RootDirectory, "Engine" , "Build" , "InstalledBuild.txt" )); } } }
从代码可以看到,UBT对是不是安装版引擎的检测有三种方法:
传入参数是否有-installled和-installedengine
传入参数是否有-notinstallengine
判断引擎路径Engine\Build下是否具有InstalledBuild.txt文件
(说是三种其实也就是两种,就算指定了-notinstallengine也是要判断存不存在Engine\Build\InstalledBuild.txt这个文件)
1 -installled > -installedengine > -notinstalledengine > Engine\Build\InstalledBuild.txt
所以,当我想要让UBT认为我的引擎版本不是安装版,有两种办法:
对UBT的调用传入-notinstalledengine参数,并且删掉Engine\Build目录下的InstalledBuild.txt文件
对UBT的调用不传入-installled和-installedengine参数,并且删掉Engine\Build目录下的InstalledBuild.txt文件
注 :UBT里还有下面两种检测:
1 2 3 4 5 6 7 8 9 10 11 12 13 14 15 16 17 static public bool IsEnterpriseInstalled (){ if (!bIsEnterpriseInstalled.HasValue) { bIsEnterpriseInstalled = FileReference.Exists(FileReference.Combine(EnterpriseDirectory, "Build" , "InstalledBuild.txt" )); } return bIsEnterpriseInstalled.Value; } static public bool IsProjectInstalled (){ if (!bIsProjectInstalled.HasValue) { bIsProjectInstalled = FileReference.Exists(FileReference.Combine(RootDirectory, "Engine" , "Build" , "InstalledProjectBuild.txt" )); } return bIsProjectInstalled.Value; }
UE:Get all registed Engine 可以使用IDesktopPlatform::EnumerateEngineInstallations来获取当前系统中所有从启动器安装、以及用户使用UnrealVersionSelector注册的引擎版本。
1 2 TMap<FString,FString> Installations; FDesktopPlatformModule::Get ()->EnumerateEngineInstallations (Installations)
UnrealVersionSelector注册引擎路径 使用UnrealVersionSelector注册引擎时,会将注册的引擎路径写入到注册表:
1 HKEY_CURRENT_USER\SOFTWARE\Epic Games\Unreal Engine\Builds
其注册表项的lpValueName则是生成的一个GUID:
1 2 3 4 5 6 7 8 9 10 11 12 13 14 15 16 17 18 19 20 21 22 bool FDesktopPlatformWindows::RegisterEngineInstallation (const FString &RootDir, FString &OutIdentifier) bool bRes = false ; if (IsValidRootDirectory (RootDir)) { HKEY hRootKey; if (RegCreateKeyEx (HKEY_CURRENT_USER, InstallationsSubKey, 0 , NULL , REG_OPTION_NON_VOLATILE, KEY_ALL_ACCESS, NULL , &hRootKey, NULL ) == ERROR_SUCCESS) { FString NewIdentifier = FGuid::NewGuid ().ToString (EGuidFormats::DigitsWithHyphensInBraces); LRESULT SetResult = RegSetValueEx (hRootKey, *NewIdentifier, 0 , REG_SZ, (const BYTE*)*RootDir, (RootDir.Len () + 1 ) * sizeof (TCHAR)); RegCloseKey (hRootKey); if (SetResult == ERROR_SUCCESS) { OutIdentifier = NewIdentifier; bRes = true ; } } } return bRes; }
UE并没有直接在IDesktopPlatfrom中单独提供 获取用户通过使用UnrealVersionSelector注册的引擎列表。EnumerateEngineInstallations中写了从注册表获取per-user installations引擎:
1 2 3 4 5 6 7 8 9 10 11 12 13 14 15 16 17 18 19 20 21 22 23 24 25 26 27 28 29 30 31 32 33 34 35 36 37 38 39 40 41 42 43 44 45 46 47 48 49 50 51 52 53 54 55 56 57 58 void FDesktopPlatformWindows::EnumerateEngineInstallations (TMap<FString, FString> &OutInstallations) EnumerateLauncherEngineInstallations (OutInstallations); HKEY hKey; if (RegOpenKeyEx (HKEY_CURRENT_USER, InstallationsSubKey, 0 , KEY_ALL_ACCESS, &hKey) == ERROR_SUCCESS) { TArray<FString> UniqueDirectories; OutInstallations.GenerateValueArray (UniqueDirectories); TArray<FString> InvalidKeys; for (::DWORD Index = 0 ;; Index++) { TCHAR ValueName[256 ]; TCHAR ValueData[MAX_PATH]; ::DWORD ValueType = 0 ; ::DWORD ValueNameLength = sizeof (ValueName) / sizeof (ValueName[0 ]); ::DWORD ValueDataSize = sizeof (ValueData); LRESULT Result = RegEnumValue (hKey, Index, ValueName, &ValueNameLength, NULL , &ValueType, (BYTE*)&ValueData[0 ], &ValueDataSize); if (Result == ERROR_SUCCESS) { int32 ValueDataLength = ValueDataSize / sizeof (TCHAR); if (ValueDataLength > 0 && ValueData[ValueDataLength - 1 ] == 0 ) ValueDataLength--; FString NormalizedInstalledDirectory (ValueDataLength, ValueData) ; FPaths::NormalizeDirectoryName (NormalizedInstalledDirectory); FPaths::CollapseRelativeDirectories (NormalizedInstalledDirectory); if (IsValidRootDirectory (NormalizedInstalledDirectory) && !UniqueDirectories.Contains (NormalizedInstalledDirectory)) { OutInstallations.Add (ValueName, NormalizedInstalledDirectory); UniqueDirectories.Add (NormalizedInstalledDirectory); } else { InvalidKeys.Add (ValueName); } } else if (Result == ERROR_NO_MORE_ITEMS) { break ; } } for (const FString InvalidKey: InvalidKeys) { RegDeleteValue (hKey, *InvalidKey); } RegCloseKey (hKey); } }
EpicGameLauncher版引擎注册表路径 上面提到,如果非源码版引擎,使用UnrealVersionSelector注册时会写入到注册表:
1 HKEY_CURRENT_USER\SOFTWARE\Epic Games\Unreal Engine\Builds
从EpicGameLauncher安装的版本则会写入到另一个注册表路径下:
1 HKEY_LOCAL_MACHINE\SOFTWARE\EpicGames\Unreal Engine
其值为(从注册表导出的):
1 2 3 4 Windows Registry Editor Version 5.00 [HKEY_LOCAL_MACHINE\SOFTWARE\EpicGames\Unreal Engine\4.18] "InstalledDirectory"="C:\\Program Files\\Epic Games\\UE_4.18"
UE提供了方法来得到从EpicGameLauncher安装的引擎(通过IDesktopPlatfrom接口):
1 2 TMap<FString,FString> Installations; FDesktopPlatformModule::Get ()->EnumerateLauncherEngineInstallations (OutInstallations);
UnrealVersionSelector的注册表文件关联 1 2 3 4 5 6 7 8 9 10 11 12 13 14 15 16 17 18 19 20 21 22 23 24 25 26 27 28 29 30 31 32 33 34 35 36 37 38 39 Windows Registry Editor Version 5.00 [HKEY_CLASSES_ROOT\.uproject] @="Unreal.ProjectFile" [HKEY_CLASSES_ROOT\Unreal.ProjectFile] @="Unreal Engine Project File" [HKEY_CLASSES_ROOT\Unreal.ProjectFile\DefaultIcon] @="\"C:\\Program Files (x86)\\Epic Games\\Launcher\\Engine\\Binaries\\Win64\\UnrealVersionSelector.exe\"" [HKEY_CLASSES_ROOT\Unreal.ProjectFile\shell] [HKEY_CLASSES_ROOT\Unreal.ProjectFile\shell\open] @="Open" [HKEY_CLASSES_ROOT\Unreal.ProjectFile\shell\open\command] @="\"C:\\Program Files (x86)\\Epic Games\\Launcher\\Engine\\Binaries\\Win64\\UnrealVersionSelector.exe\" /editor \"%1\"" [HKEY_CLASSES_ROOT\Unreal.ProjectFile\shell\run] @="Launch game" "Icon"="\"C:\\Program Files (x86)\\Epic Games\\Launcher\\Engine\\Binaries\\Win64\\UnrealVersionSelector.exe\"" [HKEY_CLASSES_ROOT\Unreal.ProjectFile\shell\run\command] @="\"C:\\Program Files (x86)\\Epic Games\\Launcher\\Engine\\Binaries\\Win64\\UnrealVersionSelector.exe\" /game \"%1\"" [HKEY_CLASSES_ROOT\Unreal.ProjectFile\shell\rungenproj] @="Generate Visual Studio project files" "Icon"="\"C:\\Program Files (x86)\\Epic Games\\Launcher\\Engine\\Binaries\\Win64\\UnrealVersionSelector.exe\"" [HKEY_CLASSES_ROOT\Unreal.ProjectFile\shell\rungenproj\command] @="\"C:\\Program Files (x86)\\Epic Games\\Launcher\\Engine\\Binaries\\Win64\\UnrealVersionSelector.exe\" /projectfiles \"%1\"" [HKEY_CLASSES_ROOT\Unreal.ProjectFile\shell\switchversion] @="Switch Unreal Engine version..." "Icon"="\"C:\\Program Files (x86)\\Epic Games\\Launcher\\Engine\\Binaries\\Win64\\UnrealVersionSelector.exe\"" [HKEY_CLASSES_ROOT\Unreal.ProjectFile\shell\switchversion\command] @="\"C:\\Program Files (x86)\\Epic Games\\Launcher\\Engine\\Binaries\\Win64\\UnrealVersionSelector.exe\" /switchversion \"%1\""
注:如果想要为自己定义的文件加上启动方式,也可以使用这种方式。
UE注册编译版引擎的安装路径 UE提供了UnrealVersionSelector工具用来选择引擎版本/生成sln等功能,其也可以用来注册本地的引擎(非Launcher安装的引擎,如自己编译的源码版引擎)到项目文件的右键Select Unreal Engine Version...列表中。UnrealVersionSelector的代码,它的注册流程如下:
1 2 3 4 5 6 7 8 9 10 11 12 13 14 WinMain_Func=>start: WinMain Main_Func=>operation: Main(Arguments) RegisterCurrentEngineDirectoryWithPrompt_Func=>operation: RegisterCurrentEngineDirectoryWithPrompt() RegisterCurrentEngineDirectory_Func=>operation: RegisterCurrentEngineDirectory(false) GetEngineIdentifierFromRootDir_Func=>operation: FDesktopPlatformModule::Get()->GetEngineIdentifierFromRootDir(EngineRootDir, Identifier) RegisterEngineInstallation_Func=>operation: RegisterEngineInstallation(RootDir, OutIdentifier) end=>end: End WinMain_Func->Main_Func Main_Func->RegisterCurrentEngineDirectoryWithPrompt_Func RegisterCurrentEngineDirectoryWithPrompt_Func->RegisterCurrentEngineDirectory_Func RegisterCurrentEngineDirectory_Func->GetEngineIdentifierFromRootDir_Func GetEngineIdentifierFromRootDir_Func->RegisterEngineInstallation_Func RegisterEngineInstallation_Func->end
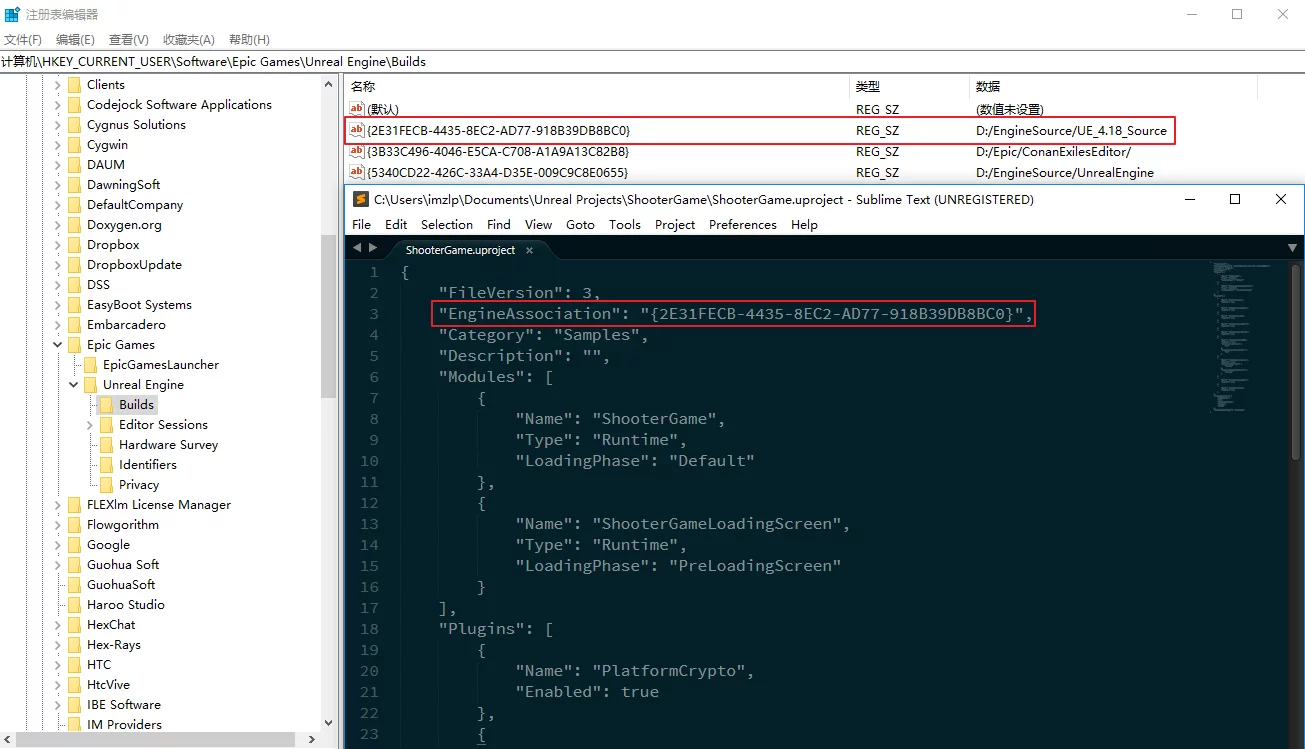
向注册表写入的操作在FDesktopPlatformWindows::RegisterEngineInstallation这个函数中。HKEY_CURRENT_USER\Software\Epic Games\Unreal Engine\Builds中的字符串项中。Switch Unreal Engine Version...的时候,会修改.uproject文件中的EngineAssociation值:
其调用流如下:
1 2 3 4 5 6 7 8 9 10 11 12 13 14 15 16 17 18 19 20 WinMain_Func=>start: WinMain Main_Func=>operation: Main(Arguments) SwitchVersion_Func=>operation: SwitchVersion(const FString& ProjectFileName) GetEngineIdentifierForProject_fUNC=>operation: FDesktopPlatformModule::Get()->GetEngineIdentifierForProject(ProjectFileName, Identifier) // 获取当前选择的引擎 SelectEngineInstallation_Func=>operation: FPlatformInstallation::SelectEngineInstallation(Identifier) // 弹出选择引擎列表框,当前选择的为默认 SetEngineIdentifierForProject_func=>operation: FDesktopPlatformModule::Get()->SetEngineIdentifierForProject(ProjectFileName, Identifier) // 设置选择的引擎,并写入uproject文件 ContentOnly=>condition: Is Content Only Project? GenerateProjectFiles_func=>operation: GenerateProjectFiles(ProjectFileName) end=>end: End WinMain_Func->Main_Func Main_Func->SwitchVersion_Func SwitchVersion_Func->GetEngineIdentifierForProject_fUNC GetEngineIdentifierForProject_fUNC->SelectEngineInstallation_Func SelectEngineInstallation_Func->SetEngineIdentifierForProject_func SetEngineIdentifierForProject_func->ContentOnly ContentOnly(yes)->end ContentOnly(no)->GenerateProjectFiles_func GenerateProjectFiles_func->end
执行项目文件写入的操作在FDesktopPlatformBase::SetEngineIdentifierForProject中:
1 2 3 4 5 6 7 8 9 10 11 12 13 14 15 16 17 18 19 20 21 22 23 24 25 26 27 28 29 30 bool FDesktopPlatformBase::SetEngineIdentifierForProject (const FString &ProjectFileName, const FString &InIdentifier) TSharedPtr<FJsonObject> ProjectFile = LoadProjectFile (ProjectFileName); if (!ProjectFile.IsValid ()) { return false ; } FString Identifier = InIdentifier; if (Identifier.Len () > 0 ) { FString RootDir; if (GetEngineRootDirFromIdentifier (Identifier, RootDir)) { const FUProjectDictionary &Dictionary = GetCachedProjectDictionary (RootDir); if (!Dictionary.IsForeignProject (ProjectFileName)) { Identifier.Empty (); } } } ProjectFile->SetStringField (TEXT ("EngineAssociation" ), Identifier); return SaveProjectFile (ProjectFileName, ProjectFile); }
所以如果你选择了一个项目使用编译版引擎,可以使用文本编辑器打开该项目的.uproject文件,可以看到其中的EngineAssociation项的值就是注册表中的引擎版本值。
注:UnrealVersionSelector 所支持的命令行参数及其用途在UnrealVersionSelector.cpp#L224 :
1 2 3 4 5 6 7 8 9 10 11 12 13 14 15 16 17 18 19 20 21 22 23 24 25 26 27 28 29 30 31 32 33 34 35 36 37 38 39 40 41 42 43 44 45 46 47 48 49 50 int Main (const TArray<FString>& Arguments) bool bRes = false ; if (Arguments.Num () == 0 ) { bRes = RegisterCurrentEngineDirectoryWithPrompt (); } else if (Arguments.Num () == 1 && Arguments[0 ] == TEXT ("-register" )) { bRes = RegisterCurrentEngineDirectory (true ); } else if (Arguments.Num () == 1 && Arguments[0 ] == TEXT ("-fileassociations" )) { bRes = UpdateFileAssociations (); } else if (Arguments.Num () == 2 && Arguments[0 ] == TEXT ("-switchversion" )) { bRes = SwitchVersion (Arguments[1 ]); } else if (Arguments.Num () == 3 && Arguments[0 ] == TEXT ("-switchversionsilent" )) { bRes = SwitchVersionSilent (Arguments[1 ], Arguments[2 ]); } else if (Arguments.Num () == 2 && Arguments[0 ] == TEXT ("-editor" )) { bRes = LaunchEditor (Arguments[1 ], L"" ); } else if (Arguments.Num () == 2 && Arguments[0 ] == TEXT ("-game" )) { bRes = LaunchEditor (Arguments[1 ], L"-game" ); } else if (Arguments.Num () == 2 && Arguments[0 ] == TEXT ("-projectfiles" )) { bRes = GenerateProjectFiles (Arguments[1 ]); } else { FPlatformMisc::MessageBoxExt (EAppMsgType::Ok, TEXT ("Invalid command line" ), NULL ); } return bRes ? 0 : 1 ; }
解决.uproject右键生成失败 首先要查看右键菜单所使用的UnrealVersionSelector.exe的路径,可以打开注册表:
1 HKEY_CLASSES_ROOT\Unreal.ProjectFile
然后找到shell\open\command条目查看UnrealVersionSelector.exe的位置(如果没有安装过源码版引擎则默认在EpicGamesLauncher的Binaries路径下),如:
1 "C:\Program Files (x86)\Epic Games\Launcher\Engine\Binaries\Win64\UnrealVersionSelector.exe" /editor "%1"
然后打开C:\Program Files (x86)\Epic Games\Launcher\Engine\Binaries\Win64,将UnrealVersionSelector.exe设置为以管理员权限启动即可(右键-属性-兼容性-以管理员身份运行此程序)。
GamePlay UE宏库的问题 在UE蓝图中使用宏库,在编辑了宏库里面的宏之后,只保存宏库是没用的,必须在用到宏库的蓝图里编译一遍才会生效,相当于蓝图里面的编译才会直接展开宏,否则还是原来未修改之前的版本,这问题实在太操蛋了。
UE使用Shipping模式打包的Saved目录 UE项目在工程和Develement或DebugGame打包出来的Saved目录均包含在项目目录或打包到的目标目录下,其中包含Autosaves/Backup/Config/Logs/Crashs/SaveGames等等。打包到的目标目录下,而是在C:/User/%username%/AppData/Local/ProjectName下,ProjectName替换为你的项目名。
更多关于UE打包的内容可以看UE的文档:
CharacterMovement开启RVO避障 CharacterMovementComponent具有自动避障的功能,只需要启用UseRVOAvoidance。SetAvoidanceEnable来关闭。
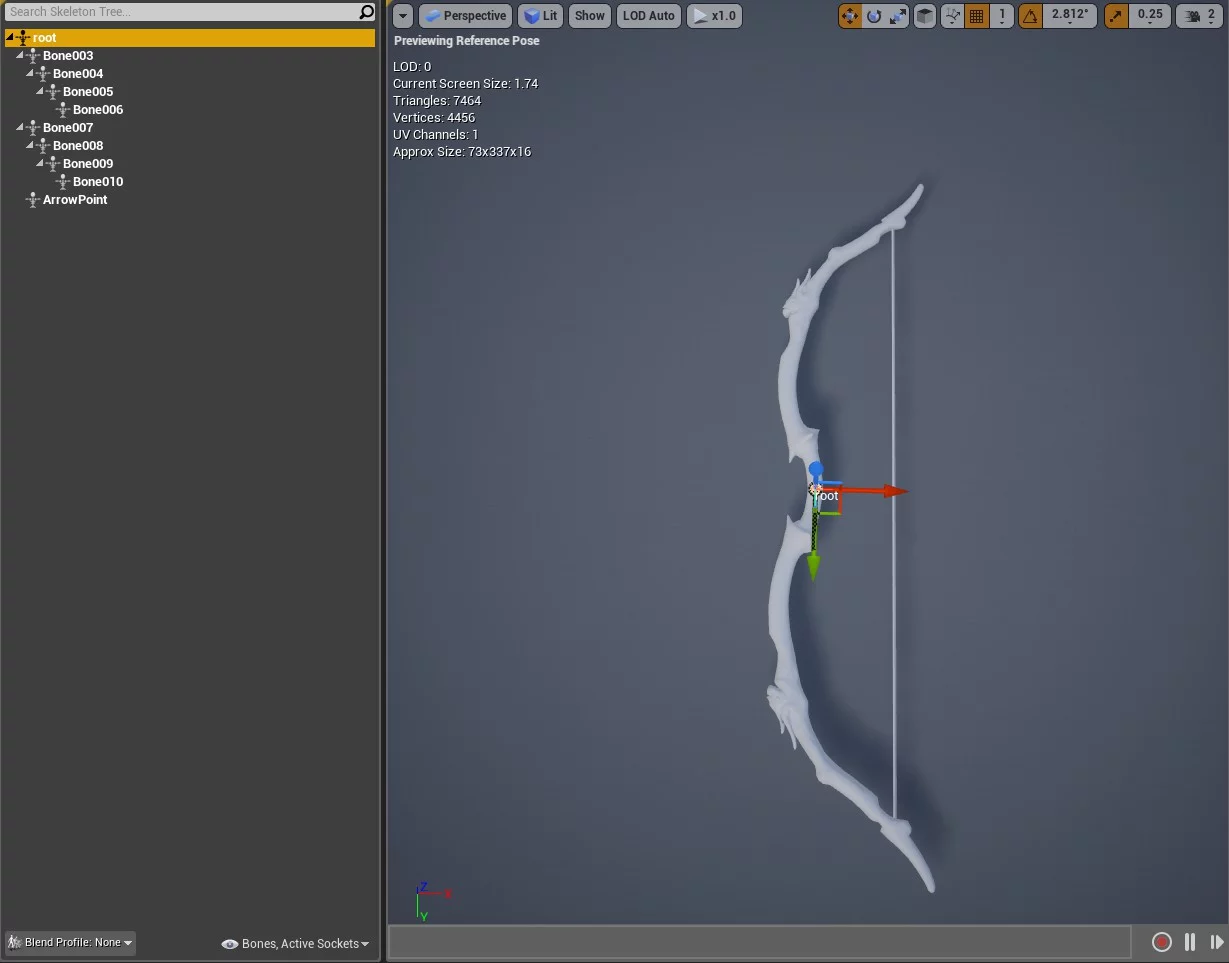
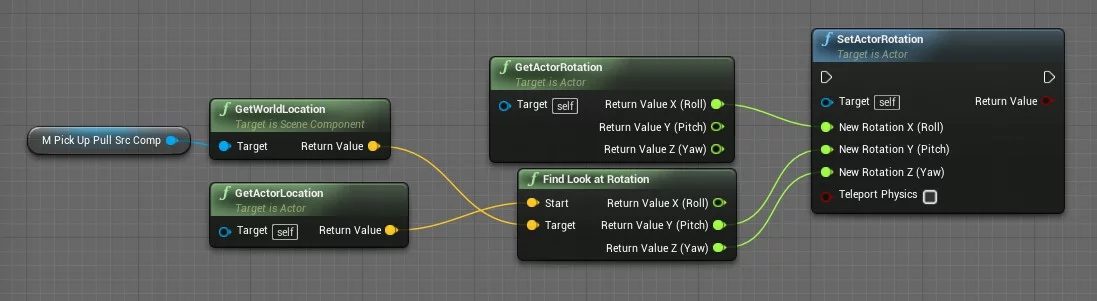
VR弓的模型标准 VR中需要用的弓为SkeleMesh,模型的root骨骼点要位于抓取的位置(最好是弓箭握持中心点),而且为了程序计算方便模型方向要求下图:
拉弓时抓弓的手 提供Roll的旋转,Pitch与Yaw则由抓弓的手LookAt到拉弓的手 所需要的旋转提供。
所有的弓使用相同的模型旋转标准,这点美术上很好实现,如果不同程序调整上很麻烦。
而且箭的模型原点要在箭羽尾部:
做一把体验好的弓是个挺麻烦的事,重要的就是细节优化。
UE换装的一个实现 在UE的USkinnedMeshComponent 中有这样一个函数:
1 2 3 4 5 6 7 8 9 10 11 class ENGINE_API USkinnedMeshComponent : public UMeshComponent{ public : UFUNCTION (BlueprintCallable, Category="Components|SkinnedMesh" ) void SetMasterPoseComponent (USkinnedMeshComponent* NewMasterBoneComponent) };
大概意思就是让当前的SkinnedMeshComponent随着NewMasterBoneComponent的姿态运动。USkinnedMeshComponent模型组件来表示不同的部位。USkinnedMeshComponent当作身体,然后将上面的五个USkinnedMeshComponent的MasterPose设置为它。
从蓝图编译到C++代码 UE支持从蓝图编译到C++代码,需要在Project Setting-Packaging-Blueprints里选择Exclusive(只有选择的蓝图资源会生成C++)或者Inclusive(为所有的蓝图资源生成C++)。Intermediate\Plugins\NativizedAssets\Windows\Game\Source\NativizedAssets路径下的public/private目录里找到以蓝图名字开头的.cpp与.h文件。
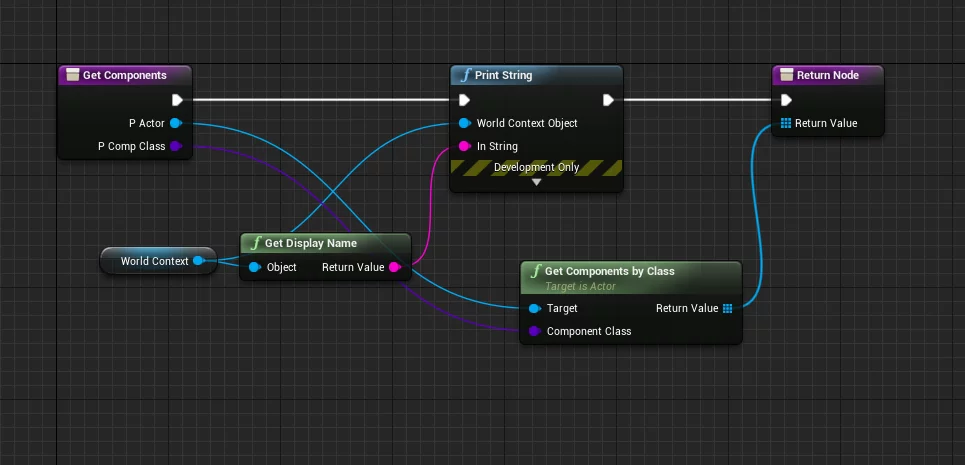
UE蓝图函数库无法在UObject对象中调用 在编辑器中创建一个蓝图函数库(Blueprint Function Library)并创建一个函数,该函数是不能在蓝图的Object中调用的,会提示:
1 Function Requires A World Context.
写一个测试的蓝图函数库生成C++代码:这里 查看):
1 2 3 4 5 6 7 8 9 10 11 12 13 14 15 16 17 18 19 UFUNCTION (BlueprintCallable, BlueprintPure, meta=(WorldContext="__WorldContext" , Category, OverrideNativeName="GetComponents" ))static TArray<UActorComponent*> bpf__GetComponents__pf (AActor* bpp__pActor__pf, UClass* bpp__pCompClass__pf, UObject* bpp____WorldContext__pf) TArray<UActorComponent*> UTestFuncLib_C__pf1448227310::bpf__GetComponents__pf (AActor* bpp__pActor__pf, UClass* bpp__pCompClass__pf, UObject* bpp____WorldContext__pf) TArray<UActorComponent*> bpp__ReturnValue__pf{}; TArray<UActorComponent*> bpfv__CallFunc_GetComponentsByClass_ReturnValue__pf{}; FString bpfv__CallFunc_GetDisplayName_ReturnValue__pf{}; bpfv__CallFunc_GetDisplayName_ReturnValue__pf = UKismetSystemLibrary::GetDisplayName (bpp____WorldContext__pf); UKismetSystemLibrary::PrintString (bpp____WorldContext__pf, bpfv__CallFunc_GetDisplayName_ReturnValue__pf, true , true , FLinearColor (0.000000 ,0.660000 ,1.000000 ,1.000000 ), 2.000000 ); if (IsValid (bpp__pActor__pf)) { bpfv__CallFunc_GetComponentsByClass_ReturnValue__pf = bpp__pActor__pf->AActor::GetComponentsByClass (bpp__pCompClass__pf); } bpp__ReturnValue__pf = bpfv__CallFunc_GetComponentsByClass_ReturnValue__pf; return bpp__ReturnValue__pf; }
直接把上面的代码抄到一个C++的蓝图函数库里是可以在UObject的对象中调用的…这就有毒了。
UE中放置组件到骨骼插槽(socket) 在蓝图中直接可以在蓝图编辑器中设置parent socket属性来将一个组件放置到骨骼插槽中。
1 2 3 4 5 6 7 8 9 10 11 12 13 14 15 16 17 18 19 20 21 22 23 24 25 26 27 28 void AShooterWeapon::AttachMeshToPawn () if (MyPawn) { DetachMeshFromPawn (); FName AttachPoint = MyPawn->GetWeaponAttachPoint (); if ( MyPawn->IsLocallyControlled () == true ) { USkeletalMeshComponent* PawnMesh1p = MyPawn->GetSpecifcPawnMesh (true ); USkeletalMeshComponent* PawnMesh3p = MyPawn->GetSpecifcPawnMesh (false ); Mesh1P->SetHiddenInGame ( false ); Mesh3P->SetHiddenInGame ( false ); Mesh1P->AttachToComponent (PawnMesh1p, FAttachmentTransformRules::KeepRelativeTransform, AttachPoint); Mesh3P->AttachToComponent (PawnMesh3p, FAttachmentTransformRules::KeepRelativeTransform, AttachPoint); } else { USkeletalMeshComponent* UseWeaponMesh = GetWeaponMesh (); USkeletalMeshComponent* UsePawnMesh = MyPawn->GetPawnMesh (); UseWeaponMesh->AttachToComponent (UsePawnMesh, FAttachmentTransformRules::KeepRelativeTransform, AttachPoint); UseWeaponMesh->SetHiddenInGame ( false ); } } }
同样是用的也是AttachToComponent,蓝图中也可以用相同名字的蓝图节点来attach到骨骼插槽上。
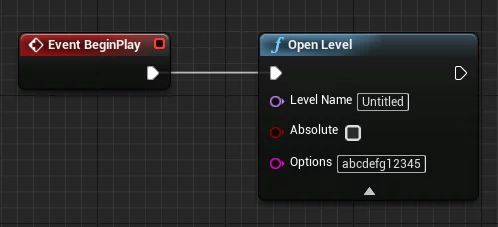
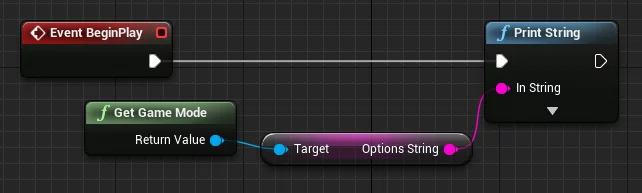
Unreal中获取OpenLevel的Options 在UE中加载关卡时,可以传一个FString的Options过去:
在被加载的关卡中可以通过GetGameMode来获取:
使用C++的代码是这样:
1 2 AGameModeBase* OurGameMode=UGameplayStatics::GetGameMode (this ); FString LevelOptionString=OurGameMode->OptionsString;
注意: 在切换关卡后,原关卡中创建出来的对象都会被销毁,解决的办法是使用GameMode的GetSeamlessTravelActorList来留存指定的Actor在切换关卡时不会被销毁。
转换游戏场景中的3D位置到屏幕位置
设置鼠标的光标在viewport内的相对位置 首先安装LowEntry-ExtendedStandardLibrary这个插件,可以使用其中的ULowEntryExtendedStandardLibrary::SetMousePosition函数来设置鼠标的光标在viewport内的相对位置,viewport的大小可以通过UWidgetLayoutLibrary::GetViewportSize来获取。
UE启动游戏后鼠标焦点不在窗口内 可以使用SetInputModeGameAndUI来设置鼠标的焦点在窗口内,InMourseLockMode设置为LockAlways即可。
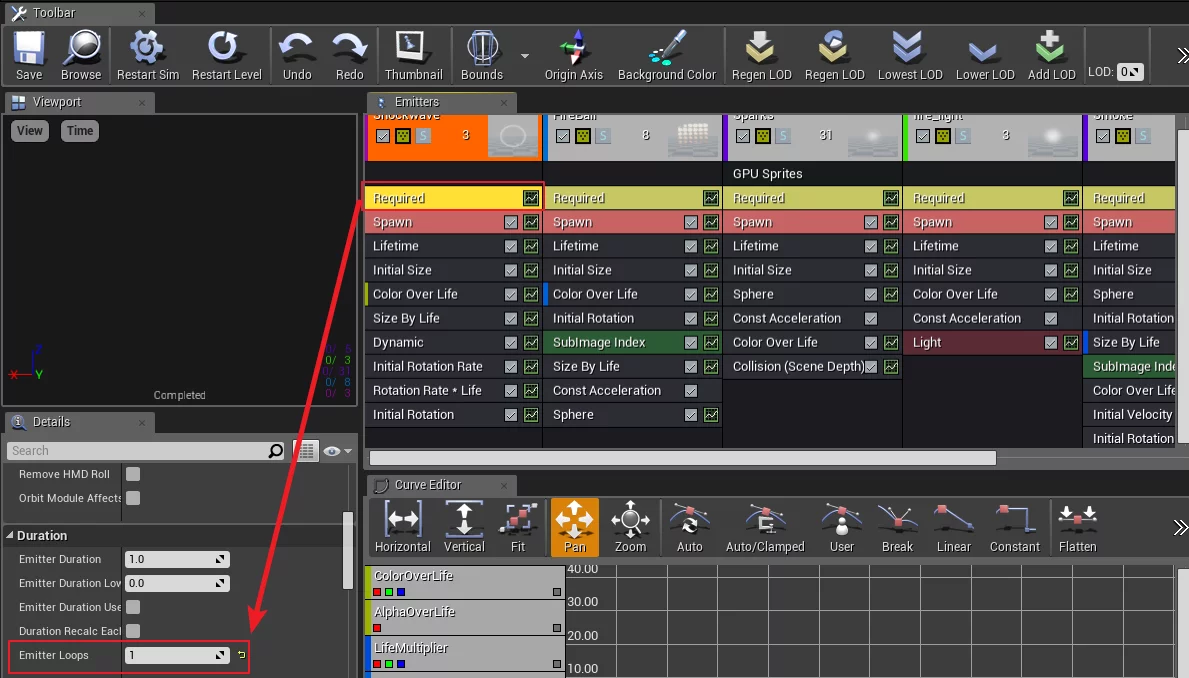
判断一个特效是否循环 从一个UParticleSystem的Emitter的Required的Emitter Loops为0则是循环特效:
UE提供了方法可以判断一个特效是不是循环特效:
1 bool UParticleSystem::IsLooping () const
只要该特效里有一个循环的Emitter,则该特效就是循环的。
跨模块使用类注意是否导出符号 在继承/访问UE引擎内的类时,一定要注意类是否具有导出符号,没有导出符号的类是没办法链接到定义的。Engine模块下的FParticleSpriteEmitterInstance这个类就是没有导出符号的。
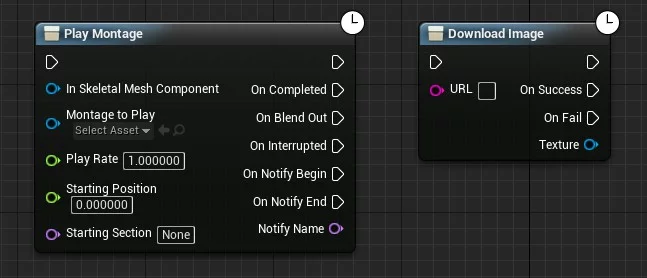
Blueprint创建异步节点 在工程中有一些异步操作的需求,比如下载文件的行为,一个下载命令等待下载完成之后回调,而且要尽量避免太多的事件绑定和解绑操作。PlayMontage/DownloadImage等,都是异步操作中有多个输出节点的:Engine\Source\Runtime\UMG\Public\Blueprint\AsyncTaskDownloadImage.h中查看DownloadImage 节点的实现(C++API )。
关键就是要继承UBlueprintAsyncActionBase,这个是必须的。
然后写一个static的函数,返回类的指针,并用UFUNCTION的mate标记为BlueprintInternalUseOnly="true"
声明并定义几个派发器成员,这些派发器成员就是异步的节点,也就是蓝图节点右侧的exec节点。
我们先来看一下DownloadImage的声明:
1 2 3 4 5 6 7 8 9 10 11 12 13 14 15 16 17 18 19 20 21 22 23 24 class UTexture2DDynamic ;DECLARE_DYNAMIC_MULTICAST_DELEGATE_OneParam (FDownloadImageDelegate, UTexture2DDynamic*, Texture);UCLASS ()class UMG_API UAsyncTaskDownloadImage : public UBlueprintAsyncActionBase{ GENERATED_UCLASS_BODY () public : UFUNCTION (BlueprintCallable, meta=( BlueprintInternalUseOnly="true" )) static UAsyncTaskDownloadImage* DownloadImage (FString URL) public : UPROPERTY (BlueprintAssignable) FDownloadImageDelegate OnSuccess; UPROPERTY (BlueprintAssignable) FDownloadImageDelegate OnFail; public : void Start (FString URL) private : void HandleImageRequest (FHttpRequestPtr HttpRequest, FHttpResponsePtr HttpResponse, bool bSucceeded) };
对比上面的DownloadImage的节点,可以看到:FDownloadImageDelegate,并且需要传入一个参数
UAsyncTaskDownloadImage类中声明了两个事件派发器OnSuccess和OnFail,这也是蓝图节点右侧的Exec和参数Texture,本质都是派发器(动态多播代理)UAsyncTaskDownloadImage的static函数DownloadImage接收一个FString的参数,返回一个UAsyncTaskDownloadImage*,这个返回就是把派发器的执行节点在蓝图中显示出来
即:声明的动态多播的成员和该多播的参数都会显示在蓝图节点的右侧。
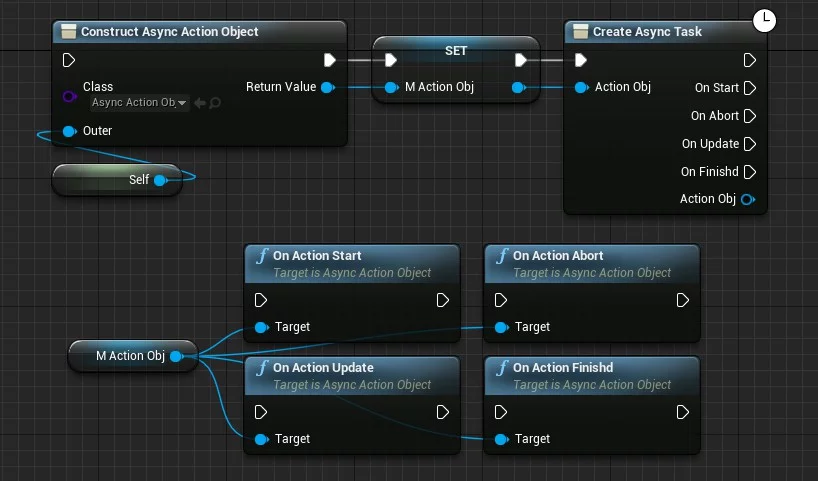
我自己实现了一个异步行为的操作,先在蓝图中看操作:AsyncActionObject的对象作为后期触发异步操作的对象,然后执行CreateAsyncTask里面对上一步创建的AsyncActionObject进行事件绑定。OnActionStart之类的操作就可以调用CreateAsyncTask右侧的相关节点。AsyncActionObject正在被其他的task绑定,则创建task会失败。
1 2 3 4 5 6 7 8 9 10 11 12 13 14 15 16 17 18 19 20 21 22 23 24 25 26 27 28 29 30 31 32 33 34 35 36 37 38 39 40 41 42 43 44 45 46 47 48 49 50 51 52 53 54 55 56 #pragma once #include "AsyncActionObject.h" #include "Array.h" #include "Kismet/KismetSystemLibrary.h" #include "CoreMinimal.h" #include "UObject/ObjectMacros.h" #include "Kismet/BlueprintAsyncActionBase.h" #include "AsyncTask.generated.h" #ifndef PRINT_LOG #define PRINT_LOG(lOG_TEXT) UKismetSystemLibrary::PrintString(this,lOG_TEXT,true,true); #endif #ifndef PRINT_ASYNC_ACTION_TOOLS_DEBUG_INFO #define PRINT_ASYNC_ACTION_TOOLS_DEBUG_INFO 0 #endif DECLARE_DYNAMIC_MULTICAST_DELEGATE_OneParam (FAsyncTaskDelegate,UAsyncActionObject*,ActionObj);UCLASS (BlueprintType)class UAsyncTask : public UBlueprintAsyncActionBase{ GENERATED_UCLASS_BODY () public : UFUNCTION (BlueprintCallable, meta=( BlueprintInternalUseOnly="true" )) static UAsyncTask* CreateAsyncTask (UAsyncActionObject* ActionObj) public : UPROPERTY (BlueprintAssignable) FAsyncTaskDelegate OnStart; UPROPERTY (BlueprintAssignable) FAsyncTaskDelegate OnAbort; UPROPERTY (BlueprintAssignable) FAsyncTaskDelegate OnUpdate; UPROPERTY (BlueprintAssignable) FAsyncTaskDelegate OnFinishd; protected : void StartTask (UAsyncActionObject* ActionObj) virtual void OnActionStart (UAsyncActionObject* ActionObj) virtual void OnActionAbort (UAsyncActionObject* ActionObj) virtual void OnActionUpdate (UAsyncActionObject* ActionObj) virtual void OnActionFinishd (UAsyncActionObject* ActionObj) };
然后是实现:
1 2 3 4 5 6 7 8 9 10 11 12 13 14 15 16 17 18 19 20 21 22 23 24 25 26 27 28 29 30 31 32 33 34 35 36 37 38 39 40 41 42 43 44 45 46 47 48 49 50 51 52 53 54 55 56 57 58 59 60 61 62 63 64 65 66 67 68 69 #include "AsyncTask.h" #include "Modules/ModuleManager.h" UAsyncTask::UAsyncTask (const FObjectInitializer& ObjectInitializer) : Super (ObjectInitializer) { if ( HasAnyFlags (RF_ClassDefaultObject) == false ) { AddToRoot (); } } UAsyncTask* UAsyncTask::CreateAsyncTask (UAsyncActionObject* ActionObj) UAsyncTask* AsyncActionTask = NewObject <UAsyncTask>(); AsyncActionTask->StartTask (ActionObj); return AsyncActionTask; } void UAsyncTask::StartTask (UAsyncActionObject* ActionObj) if (ActionObj && !ActionObj->Action_IsRunning ()) { #if PRINT_ASYNC_ACTION_TOOLS_DEBUG_INFO PRINT_LOG (TEXT ("UAsyncTask::StartTask Bind Event" )); #endif (ActionObj->OnStart).BindUObject (this ,&UAsyncTask::OnActionStart); (ActionObj->OnAbort).BindUObject (this ,&UAsyncTask::OnActionAbort); (ActionObj->OnUpdate).BindUObject (this ,&UAsyncTask::OnActionUpdate); (ActionObj->OnFinishd).BindUObject (this ,&UAsyncTask::OnActionFinishd); } } void UAsyncTask::OnActionStart (UAsyncActionObject* ActionObj) #if PRINT_ASYNC_ACTION_TOOLS_DEBUG_INFO PRINT_LOG (TEXT ("UAsyncTask::OnStart" )); #endif OnStart.Broadcast (ActionObj); } void UAsyncTask::OnActionAbort (UAsyncActionObject* ActionObj) #if PRINT_ASYNC_ACTION_TOOLS_DEBUG_INFO PRINT_LOG (TEXT ("UAsyncTask::OnActionAbort" )); #endif OnAbort.Broadcast (ActionObj); } void UAsyncTask::OnActionUpdate (UAsyncActionObject* ActionObj) #if PRINT_ASYNC_ACTION_TOOLS_DEBUG_INFO PRINT_LOG (TEXT ("UAsyncTask::OnActionUpdate" )); #endif OnUpdate.Broadcast (ActionObj); } void UAsyncTask::OnActionFinishd (UAsyncActionObject* ActionObj) #if PRINT_ASYNC_ACTION_TOOLS_DEBUG_INFO PRINT_LOG (TEXT ("UAsyncTask::OnActionFinishd" )); #endif OnFinishd.Broadcast (ActionObj); }
AsyncActionObject类的声明:
1 2 3 4 5 6 7 8 9 10 11 12 13 14 15 16 17 18 19 20 21 22 23 24 25 26 27 28 29 30 31 32 33 34 35 36 37 38 39 40 41 42 43 44 45 46 47 48 49 50 51 52 53 54 55 56 57 58 59 60 61 62 63 64 65 66 67 68 #pragma once #include "Array.h" #include "Kismet/KismetSystemLibrary.h" #include "CoreMinimal.h" #include "UObject/NoExportTypes.h" #include "AsyncActionObject.generated.h" #ifndef PRINT_LOG #define PRINT_LOG(lOG_TEXT) UKismetSystemLibrary::PrintString(this,lOG_TEXT,true,true); #endif #ifndef PRINT_ASYNC_ACTION_OBJ_DEBUG_INFO #define PRINT_ASYNC_ACTION_OBJ_DEBUG_INFO 0 #endif class UAsyncActionObject ;DECLARE_DELEGATE_OneParam (FAsyncActionDelegate,UAsyncActionObject*);UCLASS (BlueprintType,Blueprintable)class UAsyncActionObject : public UObject{ GENERATED_BODY () public : UAsyncActionObject (const FObjectInitializer& objectInitializer); FAsyncActionDelegate OnStart; FAsyncActionDelegate OnAbort; FAsyncActionDelegate OnUpdate; FAsyncActionDelegate OnFinishd; public : UFUNCTION (BlueprintCallable) virtual bool OnActionStart (FString& rReason) UFUNCTION (BlueprintCallable) virtual void OnActionAbort () UFUNCTION (BlueprintCallable) virtual void OnActionUpdate () UFUNCTION (BlueprintCallable) virtual void OnActionFinishd () public : UFUNCTION (BlueprintCallable) virtual bool Action_IsRunning () const UFUNCTION (BlueprintCallable) virtual bool Action_ExecutableStart () const protected : virtual void EndAction () virtual void UnBindAll () virtual void InitDelegateList () virtual bool Action_IsStarted () const virtual bool Action_EventIsBinded () const protected : bool mActionStarted=false ; TArray<FAsyncActionDelegate*> DelegateList; };
以及它的实现:
1 2 3 4 5 6 7 8 9 10 11 12 13 14 15 16 17 18 19 20 21 22 23 24 25 26 27 28 29 30 31 32 33 34 35 36 37 38 39 40 41 42 43 44 45 46 47 48 49 50 51 52 53 54 55 56 57 58 59 60 61 62 63 64 65 66 67 68 69 70 71 72 73 74 75 76 77 78 79 80 81 82 83 84 85 86 87 88 89 90 91 92 93 94 95 96 97 98 99 100 101 102 103 104 105 106 107 108 109 110 111 112 113 114 115 116 117 118 119 120 121 122 123 124 125 126 127 128 129 130 131 132 133 134 135 136 137 138 139 140 141 142 143 144 145 146 147 148 149 150 151 152 153 #include "AsyncActionObject.h" UAsyncActionObject::UAsyncActionObject (const FObjectInitializer& objectInitializer) { #if PRINT_ASYNC_ACTION_OBJ_DEBUG_INFO PRINT_LOG (TEXT ("UAsyncActionObject::UAsyncActionObject" )); #endif InitDelegateList (); } bool UAsyncActionObject::OnActionStart (FString& rReason) rReason.Reset (); bool local_bResault=false ; if (Action_ExecutableStart ()) { #if PRINT_ASYNC_ACTION_OBJ_DEBUG_INFO PRINT_LOG (TEXT ("UAsyncActionObject::OnActionStart" )); #endif mActionStarted=true ; OnStart.ExecuteIfBound (this ); local_bResault=true ; }else { #if PRINT_ASYNC_ACTION_OBJ_DEBUG_INFO PRINT_LOG (TEXT ("call UAsyncActionObject::OnActionStart Faild." )); #endif local_bResault=false ; if (Action_IsStarted ()) { #if PRINT_ASYNC_ACTION_OBJ_DEBUG_INFO PRINT_LOG (TEXT ("StartFaild: Action is Started." )); #endif rReason.Append (FString (TEXT ("Action is Started.\n" ))); } if (!Action_EventIsBinded ()) { #if PRINT_ASYNC_ACTION_OBJ_DEBUG_INFO PRINT_LOG (TEXT ("StartFaild: Action is not bind anything event." )); #endif rReason.Append (FString (TEXT ("Action is not bind to anything Task" ))); } } return local_bResault; } void UAsyncActionObject::OnActionAbort () if (Action_IsRunning ()) { #if PRINT_ASYNC_ACTION_OBJ_DEBUG_INFO PRINT_LOG (TEXT ("UAsyncActionObject::OnActionAbort" )); #endif OnAbort.ExecuteIfBound (this ); EndAction (); } } void UAsyncActionObject::OnActionUpdate () if (Action_IsRunning ()) { #if PRINT_ASYNC_ACTION_OBJ_DEBUG_INFO PRINT_LOG (TEXT ("UAsyncActionObject::OnActionUpdate" )); #endif OnUpdate.ExecuteIfBound (this ); } } void UAsyncActionObject::OnActionFinishd () if (Action_IsRunning ()) { #if PRINT_ASYNC_ACTION_OBJ_DEBUG_INFO PRINT_LOG (TEXT ("UAsyncActionObject::OnActionFinishd" )); #endif OnFinishd.ExecuteIfBound (this ); EndAction (); } } void UAsyncActionObject::EndAction () if (Action_IsRunning ()) { #if PRINT_ASYNC_ACTION_OBJ_DEBUG_INFO PRINT_LOG (TEXT ("UAsyncActionObject::EndAction" )); #endif UnBindAll (); mActionStarted=false ; } } void UAsyncActionObject::UnBindAll () #if PRINT_ASYNC_ACTION_OBJ_DEBUG_INFO PRINT_LOG (TEXT ("UAsyncActionObject::UnBindAll" )); #endif for (auto & DeleIndex:DelegateList) { if (DeleIndex->IsBound ()) { DeleIndex->Unbind (); } } } void UAsyncActionObject::InitDelegateList () if (!Action_IsStarted ()) { DelegateList.AddUnique (&OnStart); DelegateList.AddUnique (&OnAbort); DelegateList.AddUnique (&OnUpdate); DelegateList.AddUnique (&OnFinishd); } } bool UAsyncActionObject::Action_EventIsBinded () const bool EventIsBinded=true ; for (auto & DeleIndex:DelegateList) { if (!DeleIndex->IsBound ()) EventIsBinded=false ; } return EventIsBinded; } bool UAsyncActionObject::Action_IsStarted () const return mActionStarted; } bool UAsyncActionObject::Action_IsRunning () const return Action_IsStarted () && Action_EventIsBinded (); } bool UAsyncActionObject::Action_ExecutableStart () const return !Action_IsStarted () && Action_EventIsBinded (); }
其实就是本质上裹了两层派发器而已…
UE引用windows头文件的警告/错误 如果你在UE中使用了windows.h在VS可能会爆出4668这样的错误,在之前的UE版本中是警告,但是在UE4.18变成了错误,UE本身对windowsAPI的头文件做了封装,可以包含相应的:
1 2 3 #include <windows.h> #include "Windows/MinWindows.h"
或者不用这个办法,使用:
1 #pragma warning (disable:4668)
也是可以的.
而且,如果你在代码里用到了WindowsAPI,如windows.h等.
1 2 3 4 1>C:\Program Files\Epic Games\UE_4.15\Engine\Source\Runtime\Core\Public\Async/TaskGraphInterfaces.h(892): error C2039: '__faststorefence' : is not a member of 'FWindowsPlatformMisc' 1>c:\program files\epic games\ue_4.15\engine\source \runtime\core\public\Windows/WindowsPlatformMisc.h(33): note: see declaration of 'FWindowsPlatformMisc' 1>C:\Program Files\Epic Games\UE_4.15\Engine\Source\Runtime\Core\Public\Async/TaskGraphInterfaces.h(868): note: while compiling class template member function 'void TGraphTask<FFunctionGraphTask>::ExecuteTask(TArray<FBaseGraphTask *,FDefaultAllocator> &,ENamedThreads::Type)' 1>C:\Program Files\Epic Games\UE_4.15\Engine\Source\Runtime\Core\Public\Async/TaskGraphInterfaces.h(1379): note: see reference to class template instantiation 'TGraphTask<FFunctionGraphTask>' being compiled
解决这个问题的办法是把这些windowsAPI的头文件不要在UE的头文件中包含,移动到使用这些windowsAPI的.cpp中即可.
UE获取光标在窗口的相对比例 首先先要获取当前的窗口大小,可以通过UGameViewportClient获得SWindow,进而可以通过SWindow::GetSizeInScreen得到窗口的大小:
1 2 3 4 5 6 7 8 9 10 11 12 13 14 15 16 17 18 19 20 21 22 23 24 25 26 27 28 29 void GetWindowSize (bool & Success, int32& Width, int32& Height) Success = false ; Width = 0 ; Height = 0 ; if (GEngine == nullptr ) { return ; } UGameViewportClient* ViewportClient = GEngine->GameViewport; if (ViewportClient == nullptr ) { return ; } TSharedPtr<SWindow> Window = ViewportClient->GetWindow (); if (!Window.IsValid ()) { return ; } FVector2D Size = Window->GetSizeInScreen (); Success = true ; Width = Size.X; Height = Size.Y; }
然后得到光标在当前窗口的位置,可以通过APlayerController::GetMousePosition来得到(其实他也是通过Viveport来得到的):
1 2 3 4 5 6 7 8 9 10 11 12 13 14 15 16 17 18 19 20 bool APlayerController::GetMousePosition (float & LocationX, float & LocationY) const bool bGotMousePosition = false ; ULocalPlayer* LocalPlayer = Cast <ULocalPlayer>(Player); if (LocalPlayer && LocalPlayer->ViewportClient) { FVector2D MousePosition; bGotMousePosition = LocalPlayer->ViewportClient->GetMousePosition (MousePosition); if (bGotMousePosition) { LocationX = MousePosition.X; LocationY = MousePosition.Y; } } return bGotMousePosition; }
然后两者相除即可得到鼠标在当前窗口的相对位置。
UE SceneCapture2D捕获的gamma值 在使用USceneCapture2D捕获画面到RenderTarget使用Spectator Screen再贴到屏幕上时发现颜色不对:
解决的办法是:
设置SceneCapture2D的CaptureSouce为Final Color (LDR) in RGB
设置RenderTarget资源的Gamma值为2.2就看起来和原图十分接近了
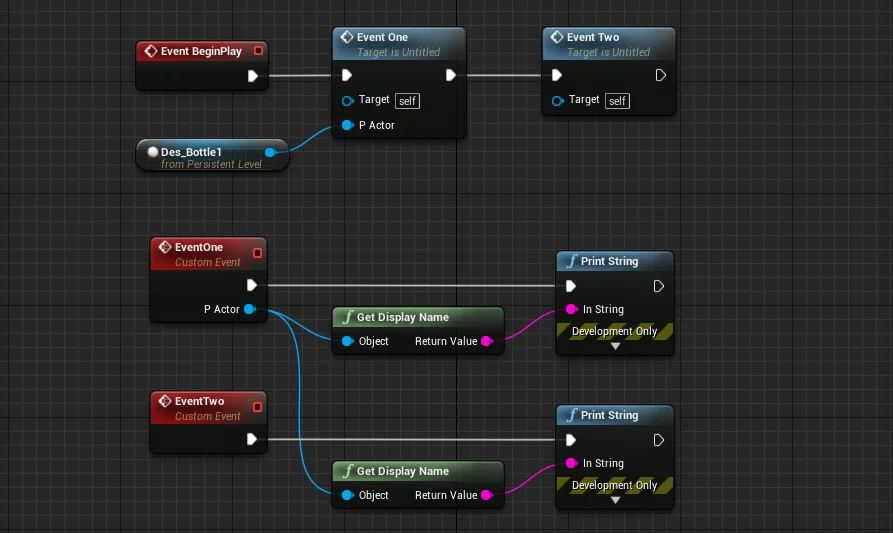
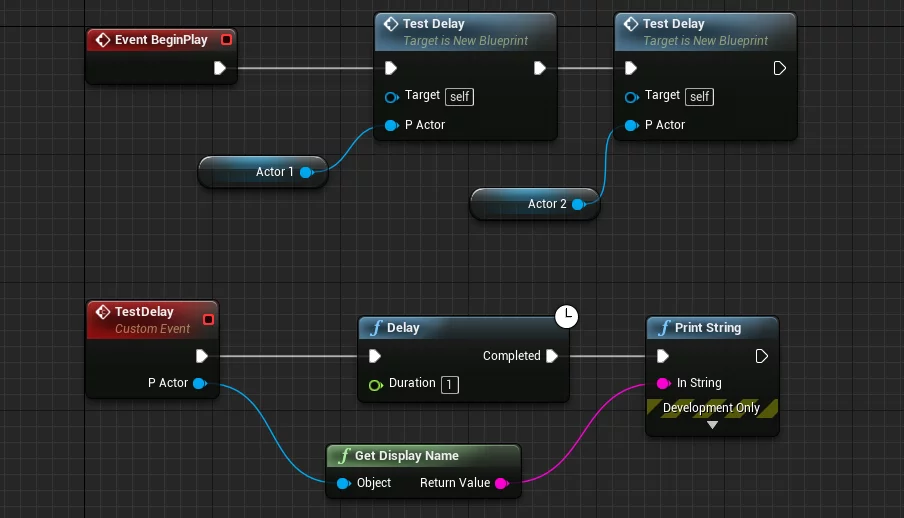
蓝图Event参数的一个骚操作 在一些插件中看到了类似这种的操作:
其实实际上,Unreal蓝图的事件节点(Event)的参数是类的成员变量(data member of class),所以可以在其他的地方直接使用他的参数。
类似的问题还有delay的操作:
UE使用UProjectileMovementComponent的碰撞检测问题 在UE中使用UProjectileMovementComponent 弹射组件来做一些比如弓箭之类的功能,可能会因为速度太快的原因导致碰撞无法被触发。
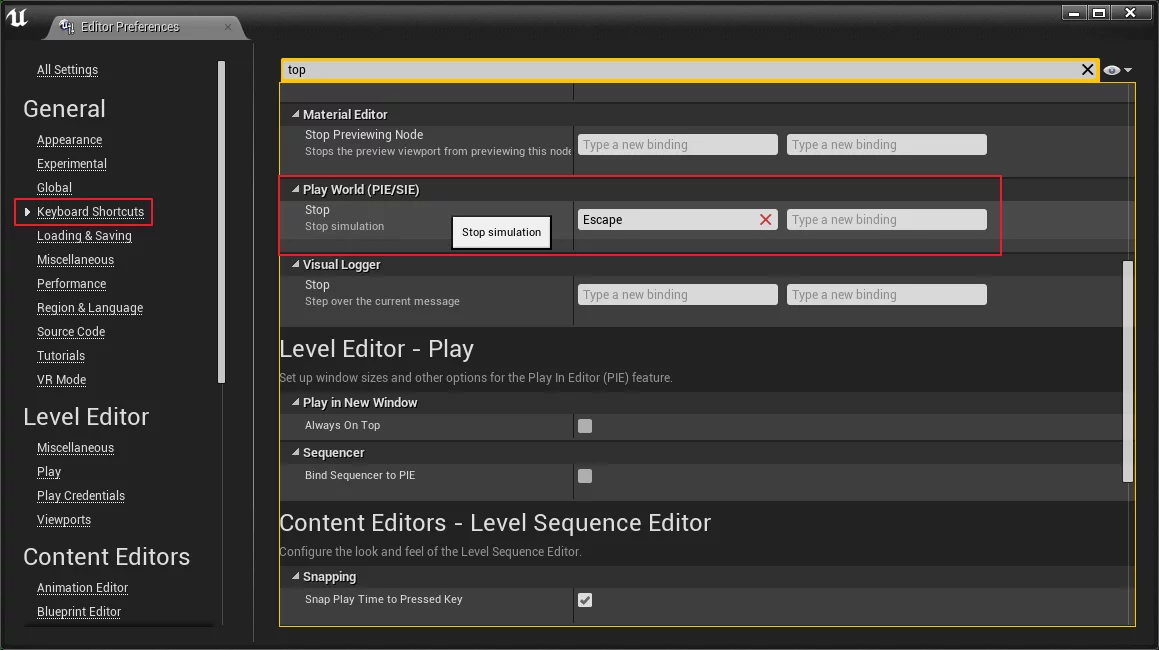
Config and Editor 修改UE的编辑器模式下的Esc退出快捷键 打开Editor Preferences-Keybord Shortcuts修改Play World(PIE/SIE)的按键即可。
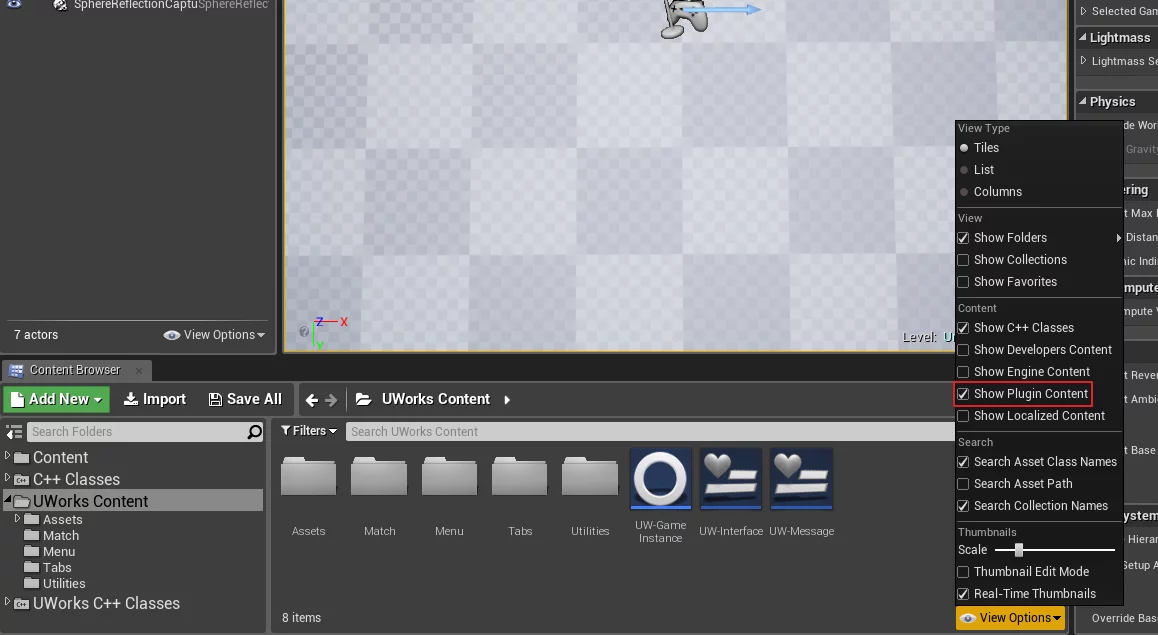
UE在编辑器中显示插件的Content
修改UE编译时的parallel数量 在Windows上可以修改下列文件:
1 2 3 Engine/Saved/UnrealBuildTool/BuildConfiguration.xml User Folder/AppData/Roaming/Unreal Engine/UnrealBuildTool/BuildConfiguration.xml My Documents/Unreal Engine/UnrealBuildTool/BuildConfiguration.xml
在Mac和Linux上就要修改下面的路径:
1 2 3 /Users/<USER>/.config//Unreal Engine/UnrealBuildTool/BuildConfiguration.xml /Users/<USER>/Unreal Engine/UnrealBuildTool/BuildConfiguration.xml <PROJECT_DIRECTORY>/Saved/UnrealBuildTool/BuildConfiguration.xml
如下:
1 2 3 4 5 6 <?xml version="1.0" encoding="utf-8" ?> <Configuration xmlns ="https://www.unrealengine.com/BuildConfiguration" > <BuildConfiguration > <MaxProcessorCount > 1</MaxProcessorCount > </BuildConfiguration > </Configuration >
MaxProcessorCount即是修改本地执行的最大处理器数。UBT configuration
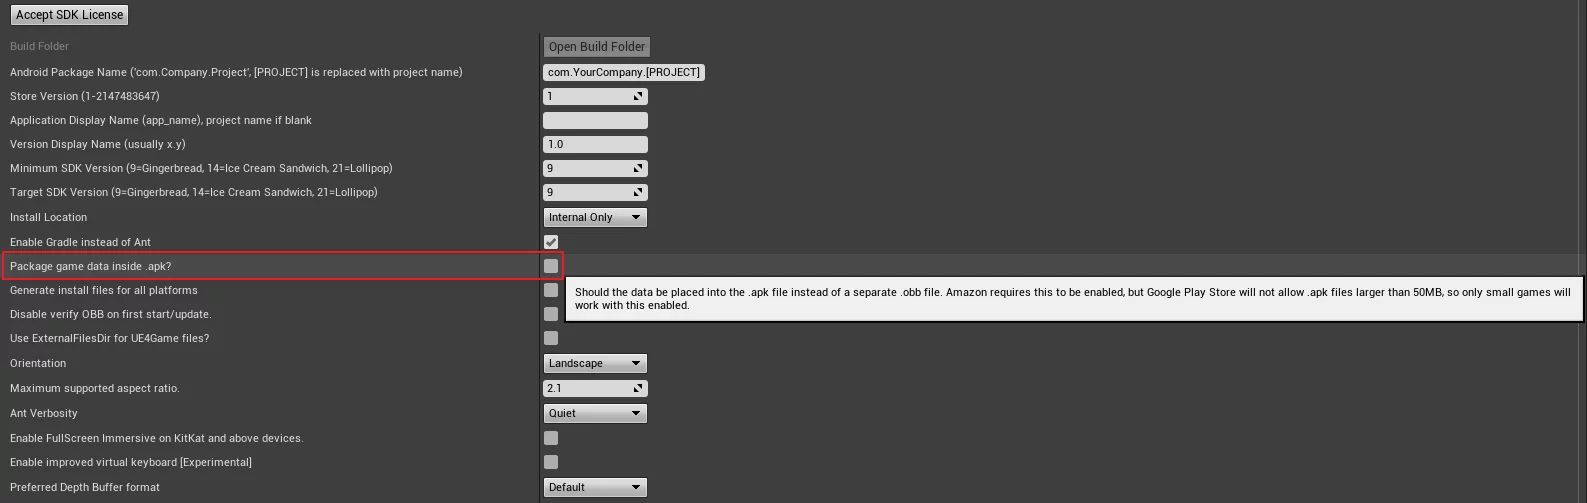
UE Android打包将数据存放在obb文件中
UE编辑器模式下焦点不在窗口内的卡顿 在Windows平台上运行UE时如果在编辑器内Play游戏,若当前的焦点不在编辑器/VR应用内,会减少对CPU的占用,从而出现卡顿的问题(打包出来不会出现这个问题)。
1 2 3 4 5 6 7 8 9 10 11 12 13 14 15 16 17 18 19 20 21 22 23 24 25 26 27 28 29 30 31 32 33 34 35 36 37 38 39 40 41 void FWindowsPlatformApplicationMisc::PumpMessages (bool bFromMainLoop) if (!bFromMainLoop) { TGuardValue<bool > PumpMessageGuard ( GPumpingMessagesOutsideOfMainLoop, true ) ; WinPumpSentMessages (); return ; } GPumpingMessagesOutsideOfMainLoop = false ; WinPumpMessages (); bool HasFocus = FApp::UseVRFocus () ? FApp::HasVRFocus () : FWindowsPlatformApplicationMisc::IsThisApplicationForeground (); if ( GIsEditor ) { static bool HadFocus=1 ; if ( HadFocus && !HasFocus ) { SetThreadPriority ( GetCurrentThread (), THREAD_PRIORITY_BELOW_NORMAL ); } else if ( HasFocus && !HadFocus ) { SetThreadPriority ( GetCurrentThread (), THREAD_PRIORITY_NORMAL ); } if ( !HasFocus ) { FPlatformProcess::Sleep (0.005f ); } HadFocus = HasFocus; } }
只需要把FPlatformProcess::Sleep(0.005f);这一行注释掉就可以了。
Win10下解决UE编辑器内编译日志的中文乱码
注意:可能会出现某些软件内的编码问题(如GBK编码出现烫烫烫/锟斤拷等)。
Package ObservedKeyNames.Num()>0 解决详情具体看:UE Package Error:ObservedKeyNames.Num()>0
UE Package Error:RenderDocPlugin
RenderDocPlugin: Error: unable to initialize the plugin because no RenderDoc libray has been located.
UE4打包32bit要求16byte对齐错误 在引擎中选择32bit平台打包的时候会出现下列错误:
1 error C2719: 'SpawnTransform' : formal parameter with requested alignment of 16 won't be aligned
这是因为在代码里使用pass-by-value的方式传递了FTransform:
1 AProps* SpawnProps (FTransform SpawnTransform) ;
因为FTransform要求使用16byte对齐:Math/TransformVectorized.h#L36
1 2 3 4 MS_ALIGN (16 ) struct FTransform { }
MS_ALIGN这个宏是在Core/Public/Windows/WindowsPlatform.h#L131 中定义的:
1 2 3 4 5 6 7 8 9 10 #if defined(__clang__) #define GCC_PACK(n) __attribute__((packed,aligned(n))) #define GCC_ALIGN(n) __attribute__((aligned(n))) #if defined(_MSC_VER) #define MS_ALIGN(n) __declspec(align(n)) #endif #else #define MS_ALIGN(n) __declspec(align(n)) #endif
所以FTransform要求的是16byte对齐。
FTransform is implemented using vector intrinsics, and instances of it need to have 16-byte alignment. I think the stack is guaranteed to be aligned to 16-bytes on Win64 so the compiler can pass it on the stack correctly, but there’s no such guarantee on Win32 (which is what we use for shipping builds).
那么改为传递指针或引用就可以了(传引用和传指针均是sizeof(void*)的大小):
1 AProps* SpawnProps (const FTransform& SpawnTransform) ;
相关问题:
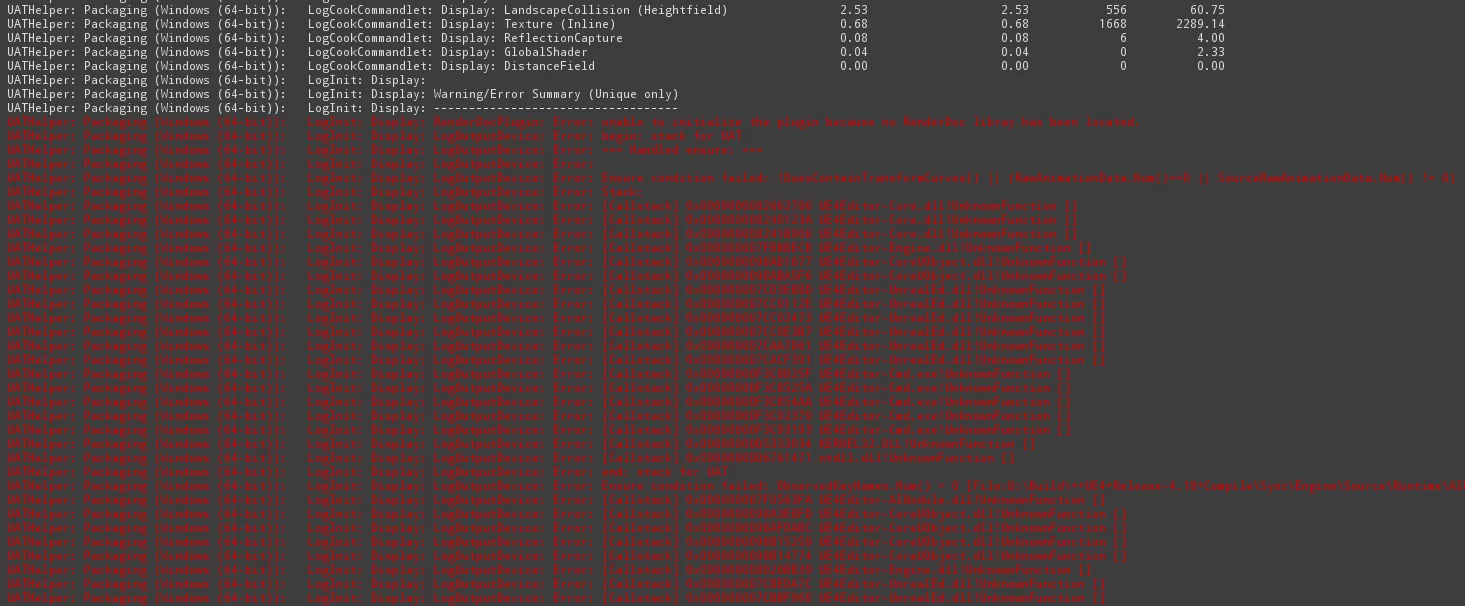
UE打包时提示文件占用导致打包失败
引擎版本:4.18.3
打包平台:Windows
运行模式:VR
BuildConfiguration: Shipping
打包中的错误信息log:
1 UATHelper: Packaging (Windows (64-bit)): Program.Main: ERROR: AutomationTool terminated with exception: System.IO.IOException: The process cannot access the file** ‘C:\YourProjectPath\Saved\StagedBuilds\WindowsNoEditor\Engine\Extras\Redist\en-us\UE4PrereqSetup_x64.exe’ **because it is being used by another process**.
UE打包时的错误提示为is being used by another process 的原因是进程里也启动了EpicGameLauncher,打包之前把它关掉就可以了。
Online UE Actor Replication Config Replication OnlyRelecantToServer(default false)
Always Relevant(default false) Always relevant for network(overrides bOnlyRelevantToOwner)
ReplicateMovement(default true) if true,replicate movement/location related properties.
see SetReplicates()
see https://doc.unrealengine.com/latest/INT/Gameplay/Networking/Replication/
NetLoadOnClient(default true) This actor will be loaded on network clients during map load.
NetUseOwnerReplovancy(default false) If actor has valid Owner, call Owner’s IsNetRelevantFor and GetNetPriovity
Replicates(default true) if true,this actor will replicate to remote machines
NetDormancy(default DORM_Awake) Dormancy setting for actor ro take itself off the replication list without being destory on clients.
1 2 3 4 5 6 7 8 9 10 11 12 13 14 15 16 enum ENetDormancy { DORM_Never, DORM_Awake, DORM_DormantAll, DORM_DormantPartial, DORM_Initial, DORM_MAX, } DORM_Never: This actor can never go network dormant. DORM_Awake: This actor can go dormant, but is not currently dormant. Game code will tell it when it go dormant. DORM_DormantAll: This actor wants to go fully dormant for all connections. DORM_DormantPartial: This actor may want to go dormant for some connections, GetNetDormancy () will be called to find out which. DORM_Initial: This actor is initially dormant for all connection if it was placed in map. DORM_MAX
NeuCullDistanceSquared(default 225000000.0) Suqare of the max distance from the client’s viewpoint that this actor is relevant and will be replicated.
NetUpdateFrequency(default 100.0) how often(per second) this actor will be considered for replication,used to determine NetUpdateTime.
MinNetUpdateFrequency(default 2.0) Used to determine what rate to throttle down to when replicated properties are changing infrequently.
NetPriority: (default 3.0) Priority for this actor when checking for replication in a low bandwidth or saturated siuation,higher priority means it is more likely to replicate.
Replicated Movement LocationQuantization Level: (default EVectorQuantization::RoundTwoDecimals)
1 2 3 4 5 6 7 8 9 enum EVectorQuantization { RoundWholeNumber, RoundOneDecimal, RoundTwoDecimals, } RoundWholeNumber: Each vector component will be rounded to the nearest whole number. RoundOneDecimal: Each vector component will be rounded, preserving one decimal place. RoundTwoDecimals: Each vector component will be rounded, preserving two decimal places.
VelocityQuantization Level: (default ERotatorQuantization::RoundWholeNumber)
1 2 3 4 5 6 7 enum ERotatorQuantization { ByteComponents, ShortComponents, } ByteComponents: The rotator will be compressed to 8 bits per component. ShortComponents: The rotator will be compressed to 16 bits per component.
RotationQuantization Level(default ByteComponents) Allow turing the compression level for replicated rotation.You should only need to change this from the default if you see visual artfacts.
1 2 3 4 5 6 7 enum ERotatorQuantization { ByteComponents, ShortComponents, } ByteComponents: The rotator will be compressed to 8 bits per component. ShortComponents: The rotator will be compressed to 16 bits per component.
UE编辑器内测试多人时禁用自动连接
使用UE联网的部分问题 UE里提供了AController::IsLocalControlled来判断当前控制器控制的是否是本地实体:
1 2 3 4 5 6 7 8 9 10 11 12 13 14 15 16 17 18 19 20 21 22 23 24 bool AController::IsLocalController () const const ENetMode NetMode = GetNetMode (); if (NetMode == NM_Standalone) { return true ; } if (NetMode == NM_Client && Role == ROLE_AutonomousProxy) { return true ; } if (GetRemoteRole () != ROLE_AutonomousProxy && Role == ROLE_Authority) { return true ; } return false ; }
注意:千万谨慎不要在Pawn里使用AutoPossessPlayer选项。这会使加入进来的玩家的Controller自动作为Player0,造成奇葩的bug.
还有UKismetSystemLibrary::IsServer/UKismetSystemLibrary::IsDedicatedServer,他们获取的都是当前World的GetNetMode来判断的:
1 2 3 4 5 6 7 8 9 10 11 12 13 14 15 16 17 18 19 20 21 bool UKismetSystemLibrary::IsServer (UObject* WorldContextObject) UWorld* World = GEngine->GetWorldFromContextObject (WorldContextObject, EGetWorldErrorMode::LogAndReturnNull); return World ? (World->GetNetMode () != NM_Client) : false ; } bool UKismetSystemLibrary::IsDedicatedServer (UObject* WorldContextObject) UWorld* World = GEngine->GetWorldFromContextObject (WorldContextObject, EGetWorldErrorMode::LogAndReturnNull); if (World) { return (World->GetNetMode () == NM_DedicatedServer); } return IsRunningDedicatedServer (); } bool UKismetSystemLibrary::IsStandalone (UObject* WorldContextObject) UWorld* World = GEngine->GetWorldFromContextObject (WorldContextObject, EGetWorldErrorMode::LogAndReturnNull); return World ? (World->GetNetMode () == NM_Standalone) : false ; }
enum ENetMode的成员及其含义如下:
Name
Descript
NM_Standalone
Standalone: a game without networking, with one or more local players.
NM_DedicatedServer
Dedicated server: server with no local players.
NM_ListenServer
Listen server: a server that also has a local player who is hosting the game, available to other players on the network.
NM_Client
Network client: client connected to a remote server.
NM_MAX
使用UE的OnlineSubsystem联网 UE的联网可以通过CreateSession/FindSeccsion/JoinSession来实现,但要先进行一些简单配置。Config\DefaultEngine.ini,加入以下内容:
1 2 3 4 +NetDriverDefinitions=(DefName="GameNetDriver",DriverClassName="/Script/OnlineSubsystemSteam.SteamNetDriver",DriverClassNameFallback="/Script/OnlineSubsystemUtils.IpNetDriver") [OnlineSubsystem] DefaultPlatformService=Null
注意和对接Steam的不同,要把DefaultPlatformService改为Null,不然无法加入Session.
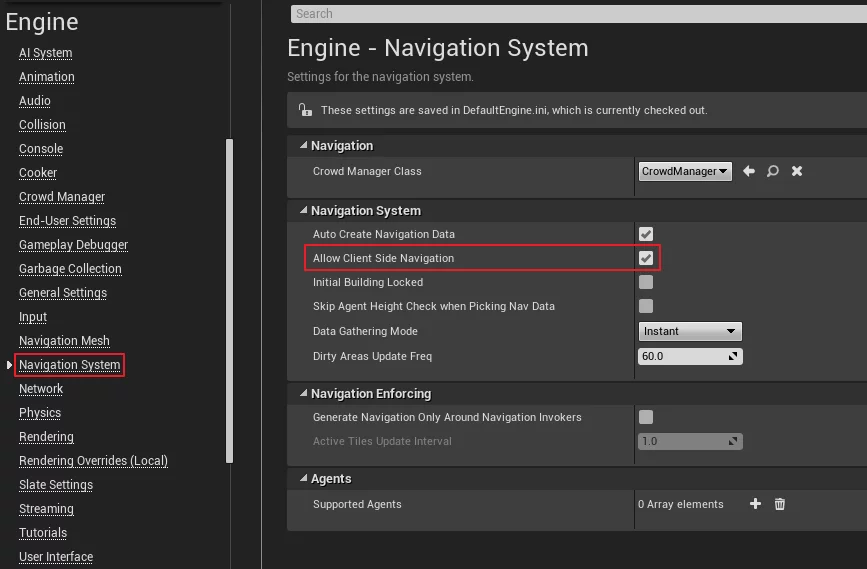
UE联网客户端没有寻路 需要在Project Settings-NavigationSystem里设置Allow Client Side Navigation为true:
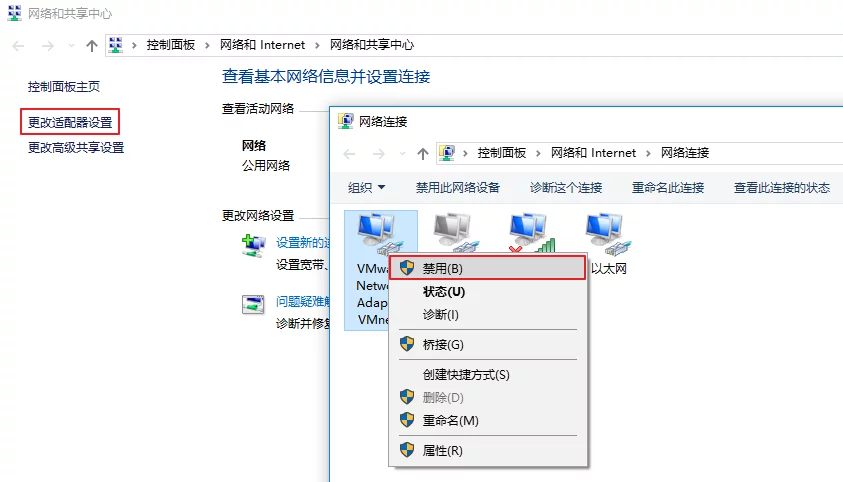
UE的Session在LAN中搜索不到 使用UE的CreateSession创建,然后在LAN的另一台机器上使用FindSession无法找到Session列表。VMware Network Adapter或者VirtualBox NetWork Adapter禁用掉就可以了。控制面板/网络和Internet/网络和共享中心/更改适配器设置:
Other Script UE莫名其妙的编译和链接错误 修改代码后最好把下面的文件删了:
1 2 3 4 5 Binaries Debug Intermediate Saved(注意打包缓存可以不清理) *.VC.db
bat脚本如下:
1 2 3 4 5 del *.VC.dbrd /s /q Binariesrd /s /q Debugrd /s /q Intermediaterd /s /q Saved
还有搜索所有插件目录的Binaries和Intermediate:
1 2 $ find . -name "Binaries" |xargs rm -rf $ find . -name "Intermediate" |xargs rm -rf
Profiling Commands 显示FPS
显示统计单元 (每帧的总时间,逻辑线程/渲染线程和GPU的时间消耗):
显示渲染线程中的各种参数值
显示渲染线程命令的消耗
1 stat RenderThreadCommands
显示游戏线程上的参数 (AI/物理/动画/蓝图/内存分配等)
显示剔除所需的时间和效率数据
显示照明和着色所需的渲染时间
抓取当前帧的GPU信息
会弹出GPU Data Bisualizer的GPU Visualizer显示抓取帧的数据。
抓取Profiling信息(CPU/GPU)
1 2 stat StartFilestat StopFile
会在项目的Saved/Profiling/UnrealStats下产生*.ue4stats文件,可以使用UnrealFornted打开。
UE网络分析
1 2 3 4 5 6 netprofile netprofile enable netprofile disable
捕获的数据保存在Saved/Profiling下,后缀名为*.nprof。Network Profiler .
链接: