在之前的一篇文章中,介绍了Mac/IOS的开发笔记和一些工程实践:UE4 开发笔记:Mac/iOS 篇。本篇文章作为姊妹篇,记录我在使用UE在开发Android时所用的标准化环境、调试工具、工程实践以及分析相关的引擎代码等内容,记录了一些在项目中遇到的坑,主要从我之前的笔记notes/ue中整理而来,后续Android相关的内容也都会更新到这篇文章里。
博客文章
博客中与Android有关的文章:
编译环境
Android的开发环境需要JDK/NDK/SDK/Ant/Gradle等组合而成,UE的文档中介绍需要安装NVDIA的CodeWorks,但是由于国内网络问题难以下载,并且有些组件并不需要,所以我打包了一份Android的开发环境,可以快速部署。
组件版本:
- JDK 18077
- NDK r14b
- SDK android19-26
- Ant 1.8.2
- Gradle 4.1
下载地址:AndroidSDK_1R7u1_20190923.7z,解压之后有AddToPath.bat脚本,一键添加所需的环境变量。
1 | @echo off |
如果需要更新版本的NDK和SDK支持的版本有些老,可以自行在下载所需的版本:
下载之后放到对应的目录下即可,并且需要修改环境变量中的值。
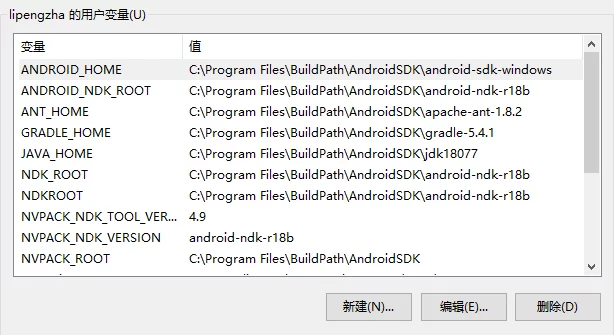
添加完环境变量之后之后无需再从UE中设置SDK与NDK的路径,保持默认即可打包。
引擎依赖与支持
引擎对Android版本的支持
在之前的笔记里:Android SDK版本与Android的版本列出了Android系统版本和API Leve版本之间的对照表。
但是UE不同的引擎版本对Android的系统支持也是不一样的,在Project Setting-Android中的Minimum SDK Version中可以设置最小的SDK版本,也就是UE打包Android所支持的最低系统版本。
在UE4.25中,最低可以设置Level为19,即Android4.4,在4.25之前的引擎版本最低支持Level 9,也就是Android 2.3。
这部分的代码可以在Runtime/Android/AndroidRuntimeSettings/Classes/AndroidRuntimeSettings.h中查看,并对比不同引擎版本的区别。
SDK版本与Android的版本对照表
可以在Google的开发者站点看到:Android SDK Platform
Build.VERSION_CODES的含义:Build.VERSION_CODES
| AndroidVersion | SDK Version | Build.VERSION_CODES |
|---|---|---|
| Android 11 | (API level 30) | R |
| Android 10 | (API level 29) | Q |
| Android 9 | (API level 28) | P |
| Android 8.1 | (API level27) | O_MR1 |
| Android 8.0 | (API level 26) | O |
| Android 7.1 | (API level 25) | N_MR1 |
| Android 7.0 | (API level 24) | N |
| Android 6.0 | (API level 23) | M |
| Android 5.1 | (API level 22) | LOLLIPOP_MR1 |
| Android 5.0 | (API level 21) | LOLLIPOP |
| Android 4.4W | (API level 20) | KITKAT_WATCH |
| Android 4.4 | (API level 19) | KITKAT |
| Android 4.3 | (API level 18) | JELLY_BEAN_MR2 |
| Android 4.2 | (API level 17) | JELLY_BEAN_MR1 |
| Android 4.1 | (API level 16) | JELLY_BEAN |
| Android 4.0.3 | (API level15) | ICE_CREAM_SANDWICH_MR1 |
| Android 4.0 | (API level 14) | ICE_CREAM_SANDWICH |
| Android 3.2 | (API level 13) | HONEYCOMB_MR2 |
| Android 3.1 | (API level 12) | HONEYCOMB_MR1 |
| Android 3.0 | (API level 11) | HONEYCOMB |
| Android 2.3.3 | (API level 10) | GINGERBREAD_MR1 |
| Android 2.3 | (API level 9) | GINGERBREAD |
UE4对Android的最低支持是SDK9,也就是Android2.3。
引擎对AndroidNDK的要求
UE在打包Android的时候会要求系统中具有NDK环境,但是不同的引擎版本对NDK的版本要求也不一样。
当使用不支持的NDK版本时,打包会有如下错误:
1 | UATHelper: Packaging (Android (ETC2)): ERROR: Android toolchain NDK r14b not supported; please use NDK r21 to NDK r23 (NDK r21b recommended) |
提示当前系统中的NDK版本不支持,并会显示支持的版本。
UE打包时对NDK版本的检测是在UBT中执行的,具体文件为UnrealBuildTool/Platform/Android/AndroidToolChain.cs。
其中定义了当前引擎版本支持的NDK的最低和最高版本:
1 | // in ue 4.25 |
可以在Github上比较方便地查看不同引擎版本要求的NDK版本:UE_425_AndroidToolChain.cs
不同的引擎版本对NDK的要求UE文档中也有介绍:Setting Up Android SDK and NDK for Unreal
| Unreal Engine | NDK Version |
|---|---|
| 4.25+ | NDK r21b, NDK r20b |
| 4.21 - 4.24 | NDK r14b |
| 4.19 - 4.20 | NDK r12b |
NDK的编译器版本
UE4支持r14b-r18b的Android NDK,但是我在UE4.22.3中设置r18b被引擎识别为r18c:
1 | UATHelper: Packaging (Android (ETC2)): Using 'git status' to determine working set for adaptive non-unity build (C:\Users\imzlp\Documents\Unreal Projects\GWorldClient). |
之所以要换NDK的版本是因为不同的NDK版本所包含的编译器对C++11标准支持度不同。
| NDK | clang version |
|---|---|
| r14b | clang 3.8.275480 (based on LLVM 3.8.275480) |
| r17c | clang version 6.0.2 |
| r18b | clang version 7.0.2 |
| r20b | clang version 8.0.7 |
工具
Adb
adb是Android的调试工具,非常强大,熟悉一些adb的命令能够让效率加倍。首先先要下载Adb。
安装Apk
1 | $ adb install APK_FILE_NAME.apk |
启动App
安装的renderdoccmd是没有桌面图标的,想要自己启动的话只能使用下列adb命令:
1 | adb shell am start org.renderdoc.renderdoccmd.arm64/.Loader -e renderdoccmd "remoteserver" |
adb启动App的shell命令模板:
1 | adb shell am start PACKAGE_NAME/.ActivityName |
这个方法需要知道App的包名和Activity名,包名很容易知道,但是Activity如果不知道可以通过下列操作获取:
首先使用一个反编译工具将apk解包(可以使用之前的apktools):
1 | apktool.bat d -o ./renderdoccmd_arm64 org.renderdoc.renderdoccmd.arm64.apk |
然后打开org.renderdoc.renderdoccmd.arm64目录下的AndroidManifest.xml文件,找到其中的Application项:
1 | <manifest xmlns:android="http://schemas.android.com/apk/res/android" package="org.renderdoc.renderdoccmd.arm64" platformBuildVersionCode="26" platformBuildVersionName="8.0.0"> |
其中有所有注册的Activity,没有有界面的apk只有一个Activity,所以上面的renderdoccmd的主Activity就是.Loader。
如果说有界面的app,则会有多个,则可以从AndroidManifest.xml查找Category或者根据命名(名字带main的Activity)来判断哪个是主Activity。一般都是从lanucher开始,到main,或者有的进登陆界面。
PS:使用UE打包出游戏的主Activity是
com.epicgames.ue4.SplashActivity,可以通过下列命令启动。
1 | adb shell am start com.imzlp.GWorld/com.epicgames.ue4.SplashActivity |
传输文件
使用adb往手机传文件:
1 |
|
从手机传递到电脑:
1 |
|
Logcat
使用logcast可以看到Android的设备Log信息。
1 | adb logcat |
会打印出当前设备的所有信息,但是我们调试App时不需要看到这么多,可以使用find进行筛选(注意大小写严格区分):
1 | adb logcat | find "GWorld" |
查看UE打包的APP所有的log可以筛选:
1 | adb logcat | find "UE4" |
如果运行的次数过多积累了大量的Log,可以使用清理:
1 | adb logcat -c |
从设备中提取已安装的APK
注意:执行下列命令时需要检查手机是否开放开发者权限,手机上提示的验证指纹信息要允许。
1 | # 查看链接设备 |
刷入Recovery
下载Adb,然后根据具体情况使用下列命令(如果当前已经在bootloader就不需要执行第一条了)。
1 | adb reboot bootloader |
端口转发
可以通过adb命令来指定:
1 | # PC to Device |
根据包名查看apk位置
可以使用以下adb命令:
1 | $ adb shell pm list package -f com.tencent.tmgp.fm |
最后一个参数是包名,输出的则是apk的路径。
查看当前窗口的app的包名
使用以下adb命令:
1 | $ adb shell dumpsys window w | findstr \/ | findstr name= |
其中的mAnimationIsEntrance=true mSurface=Surface(name=之后,到/之前的字符串就是我们的app包名。
查看so中的符号
可以使用objdump工具,在NDK中有兼容多种平台的可执行程序:
1 | x86_64-linux-android-objdump.exe |
等等,选择需要的即可。
使用命令objdump -tT libUE4.so即可输出so符号表中的内容。
SessionFrontEnd实时分析
有几个条件:
- 需要USB连接PC和手机
- 需要安装adb
首先需要映射端口,因为SessionFrontEnd是通过监听端口的方式来与游戏内通信的,手机和PC并不在同一个网段,所以需要以adb的形式把PC的监听端口转发给手机的端口。
SessionFrontEnd的监听端口可以通过对UE4Editor.exe的端口分析获取:
1 | C:\Users\lipengzha>netstat -ano | findstr "231096" |
需要把PC的1985端口映射到Android的1985端口,这样手机上APP启动时,连接0.0.0.0的1985端口就可以连接到PC上的端口。
通过adb命令来执行:
1 | adb reverse tcp:1985 tcp:1985 |
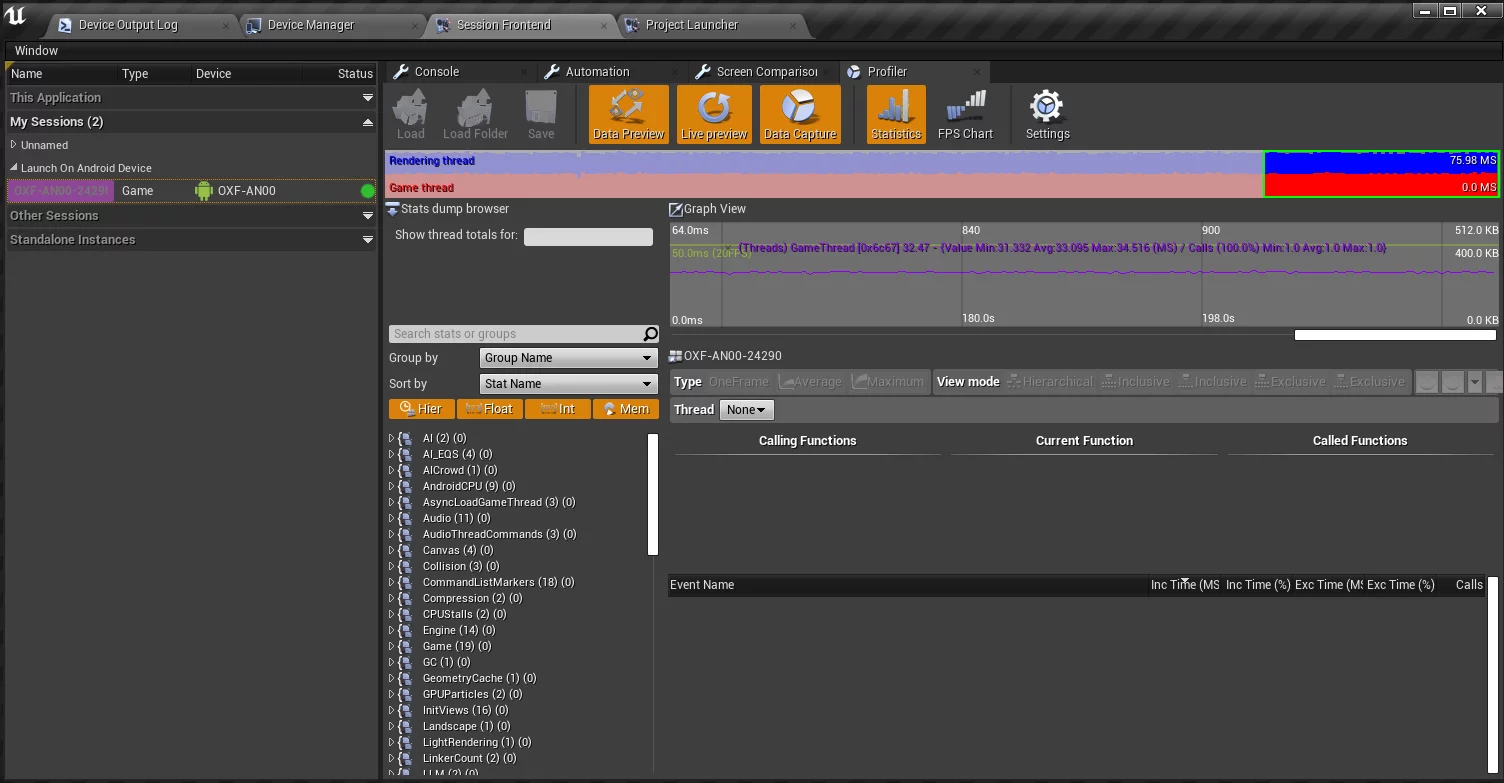
然后需要给手机上App指定启动参数:
1 | ../../../FGame/FGame.uproject -Messaging -SessionOwner="lipengzha" -SessionName="Launch On Android Device" |
把这些文本保存为UE4Commandline.txt文件,放到项目的数据目录下即可,具体路径为:
1 | /sdcard/UE4Game/PROJECT_NAME/ |
之后直接启动App,在PC上的SessionFrontEnd中就可以看到设备的数据了。
Unreal Insights实时分析
上一节提到了使用SessionFrontEnd实时分析Android的方法,在实际的测试当中发现不太稳定,会造成游戏的Crash,UE在新的引擎版本中也提供了新的性能分析工具Unreal Insights,可以更方便和直观地进行Profile。
文档:
同样也需要端口映射,需要把PC的1980端口映射到设备上:
1 | adb reverse tcp:1980 tcp:1980 |
然后需要给Android设备添加启动命令:
1 | ../../../FGame/FGame.uproject -Messaging -SessionOwner="lipengzha" -SessionName="Launch On Android Device" -iterative -tracehost=127.0.0.1 -Trace=CPU |
在PC上开启Unreal Insights,在手机上启动游戏,即可实时捕获:
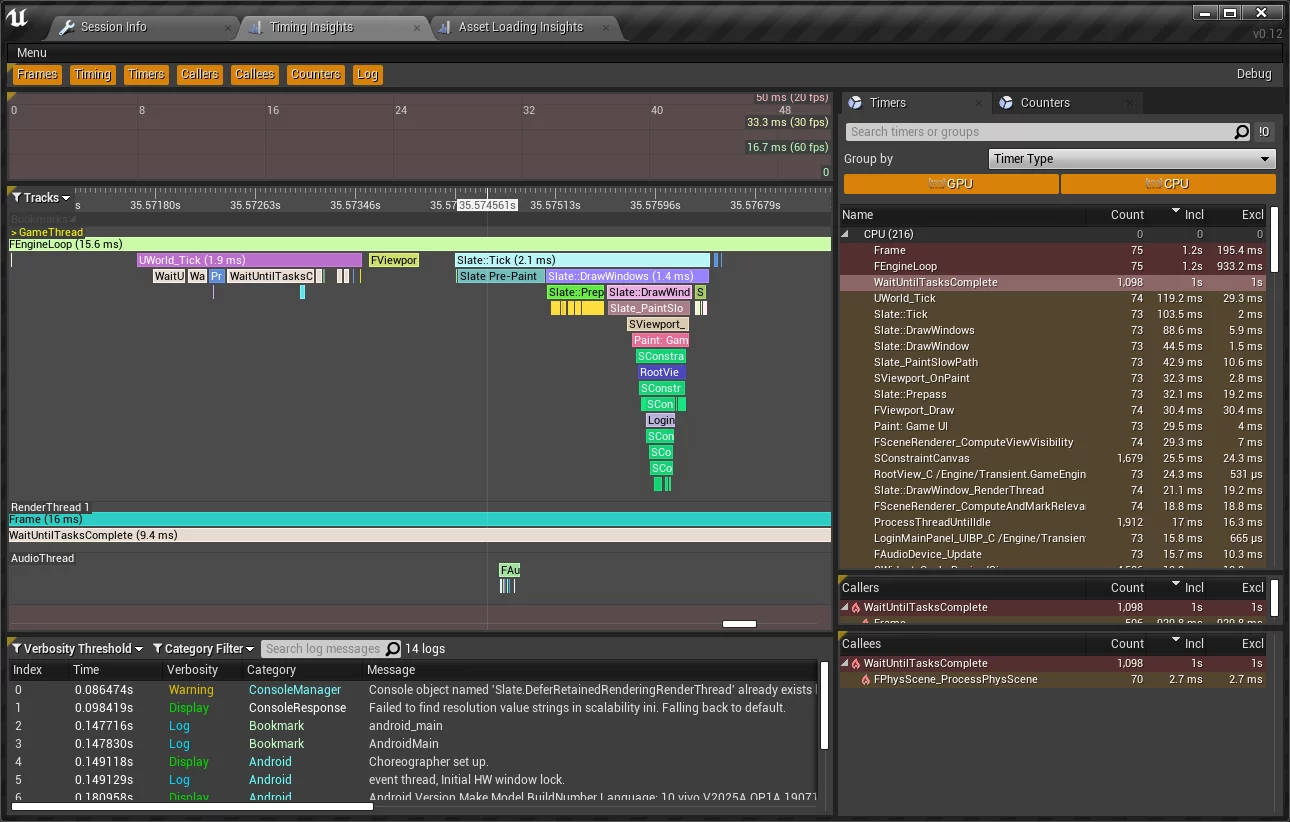
Unreal Insights也可以实时捕获PIE的数据,需要在Editor启动时添加-trace参数:
1 | UE4Editor.exe PROJECT_NAME.uproject -trace=counters,cpu,frame,bookmark,gpu |
在启动游戏后在Unreal Insights里通过New Connection监听127.0.0.1即可。
工程实践
同时支持armv7和arm64的链接库
在开发Android的时候,有需求需要同时支持arm64和armv7,需要在Build.cs中同时把armv7和arm64的链接库都添加到PublicAdditionalLibraries中:
1 | PublicAdditionalLibraries.AddRange(new string[] |
但是,在UE的ModuleRules里没有能判断当前编译的架构的方法(ModuleRules的构造在编译时只会执行一次),导致编译arm64的时候找到了armv7的链接库,导致链接错误:
1 | 14>ld.lld: error: D:/Client/Plugins/WWise/ThirdParty/Android_armeabi-v7a/Profile/lib\libAkSoundEngine.a(AkAudioLib.o) is incompatible with aarch64linux |
所以,需要找到一种方法,能够在使用PublicAdditionalLibraries同时添加了arm64和armv7链接库的情况下让编译器能够自动地匹配到应该去什么路径来执行链接。
翻了一下UBT的代码,发现UE中对在Android上对链接库的路径做了模式匹配:
1 | static private Dictionary<string, string[]> AllArchNames = new Dictionary<string, string[]> { |
最关键的就是这这一行:
1 | if (Regex.IsMatch(Dir, "/" + ArchName + "$") || Regex.IsMatch(Dir, "/" + ArchName + "/") || Regex.IsMatch(Dir, "/" + ArchName + "_API[0-9]+_NDK[0-9]+", RegexOptions.IgnoreCase)) |
根据上面正则的规则,可以把链接库的路径改为:
1 | XXXX/armeabi-v7a/ |
只要我们为Android添加的链接库路径匹配这个规则,使用UE编译时就会自动使用对应架构的链接库(.a和.so都是可以使用这个规则的)。
UE这也太坑了,这个要求文档没写,完全是一个潜规则。
Android运行时请求权限
ActivityCompact 里面有个 requestPermission方法,可以用来处理这种情况。
Android获取包名
通过UPL在Java里添加以下代码:
1 | public String AndroidThunkJava_GetPackageName() |
在C++里通过JNI调用即可:
1 | FString UFlibAppHelper::GetAppPackageName() |
Android获取外部存储路径
获取App的沙盒路径:
1 | // /storage/emulated/0/Android/data/com.xxxx.yyyy.zzzz/files |
Android获取已安装App的Apk路径
有个需求,需要在运行时获取到,App的Apk路径,查了一下UE里没有现成的接口,只能用JNI调用从Java那边想办法了。
通过在Android Developer上查找,发现ApplicationInfo中具有sourceDir属性,记录着APK的路径。
而可以通过PackageManager调用getApplicationInfo可以获取指定包名的ApplicationInfo。
那么就好说了,UPL里java代码走起:
1 | public String AndroidThunkJava_GetInstalledApkPath() |
然后在UE里使用JNI调用:
1 | if (JNIEnv* Env = FAndroidApplication::GetJavaEnv()) |
其中FJavaHelperEx::FStringFromLocalRef是我封装的从jstring到FString的转换函数:
1 | namespace FJavaHelperEx |
获取的结果:
升级至AndroidX
使用UPL来介入打包过程:
1 | <gradleProperties> |
在UE4.27上不支持AndroidX会打包失败。
在SplashActivity.java的这两行代码中具有错误:
1 | import android.support.v4.app.ActivityCompat; |
错误日志:Task :app:compileDebugJavaWithJavac FAILED,使用文中方法支持AndroidX后打包成功。
资料:
为APK添加外部存储读写权限
在Project Settings-Platform-Android-Advanced APK Packaging-Extra Permissions下添加:
1 | android.permission.WRITE EXTERNAL STORAGE |

AndroidP HTTP请求错误
在Android P上使用HTTP请求上传数据会有以下错误提示:
1 | 2018-10-10 16:39:21.312 31611-31646/com.xfhy.tinkerfirmdemo W/CrashReport: java.io.IOException: Cleartext HTTP traffic to android.bugly.qq.com not permitted |
这需要我们在打包时把指定的域名给配置成白名单。
方法如下:
在res/xml下创建network_security_config.xml文件
填入以下内容(网址自行修改):
1 |
|
然后在AndroifManifest.xml中引用该文件:
1 | <application android:networkSecurityConfig="@xml/network_security_config"/> |
重新打包即可,在运行时会有以下Log:
1 | 02-25 21:09:15.831 27760 27791 D NetworkSecurityConfig: Using Network Security Config from resource network_security_config debugBuild: true |
Android写入文件
当调用FFileHelper::SaveArrayToFile时:
1 | FFileHelper::SaveArrayToFile(TArrayView<const uint8>(data, delta), *path, &IFileManager::Get(), EFileWrite::FILEWRITE_Append)); |
在该函数内部会创建一个FArchive的对象来管理当前文件,其内部具有一个IFileHandle的对象Handle,在Android平台上是FFileHandleAndroid。
在FArchive中写入文件调用的是Serialize,它又会调用Handle的Write:
1 | bool FArchiveFileWriterGeneric::WriteLowLevel( const uint8* Src, int64 CountToWrite ) |
Android的Write的实现为:
1 | // Runtime/Core/Private/Android/AndroidFile.h |
可以看到是每次1M往文件里存的。
Android写入文件错误码对照
根据 error code number 查找 error string.
- http://androidxref.com/8.0.0_r4/xref/bionic/libc/bionic/strerror_r.cpp#_sys_error_strings
- http://androidxref.com/8.0.0_r4/xref/bionic/libc/private/bionic_errdefs.h
1 | // bionic_errdefs.h |
获取GPU和OpenGL ES版本信息
1 | $ adb shell dumpsys | grep GLES |
UE项目启动参数
看了一下引擎里的代码,在Launch模块下Launch\Private\Android\LaunchAndroid.cpp中有InitCommandLine函数:
1 | // Launch\Private\Android\LaunchAndroid.cpp |
简单来说就是在UE4Game/ProjectName/ue4commandline.txt中把启动参数写到里面,引擎启动的时候会从这个文件去读,然后添加到FCommandLine中。
Android设置宽高比
在Project Settings-Platforms-Android-Maximum support aspect ratio的值,默认是2.1,但是在全面屏的情况下会有黑边。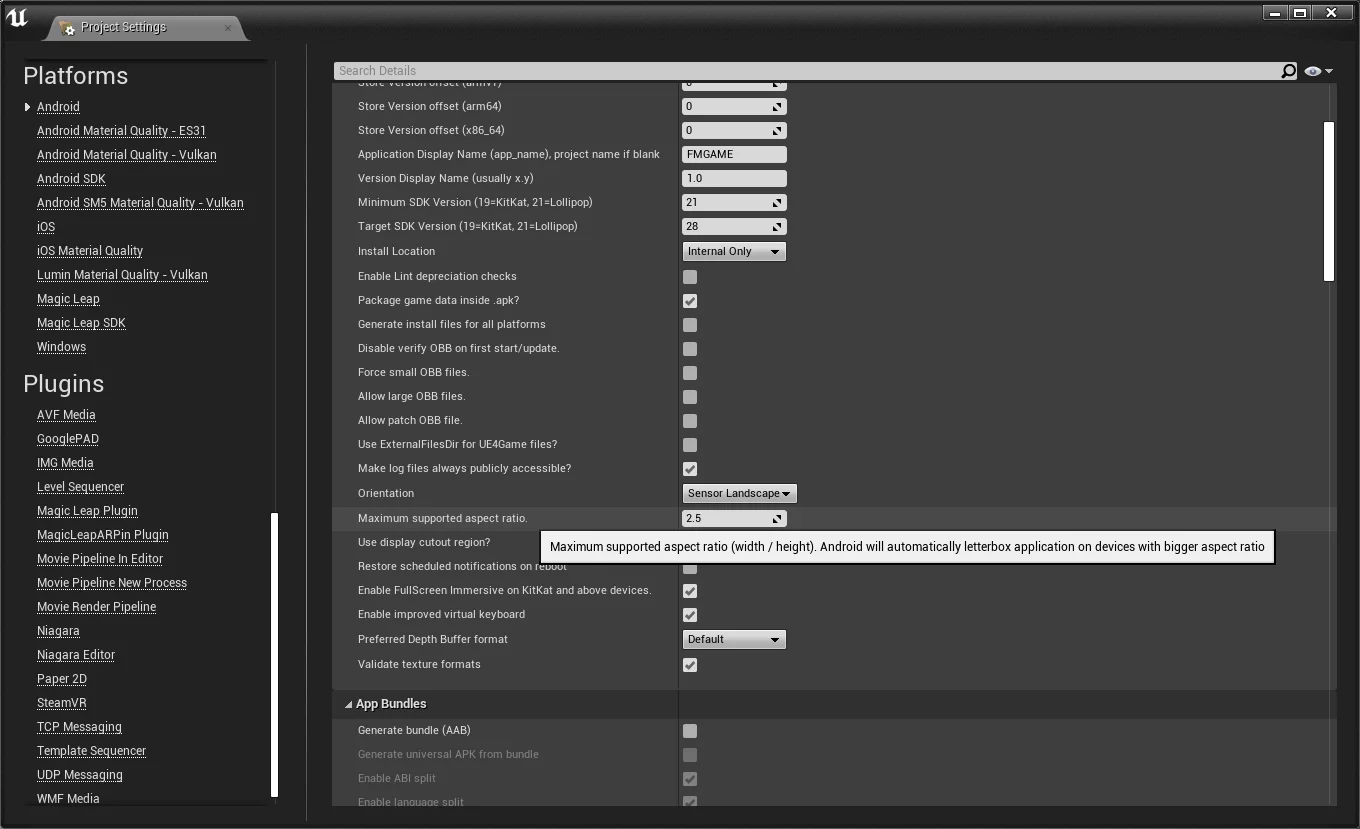
它控制的值是AndroidManifest.xml中的值:
1 | <meta-data android:name="android.max_aspect" android:value="2.1"/> |
我目前设置的值是2.5.
注:
Enable FullScreen Immersive on KitKat and above devices控制的是进入游戏时是否隐藏虚拟按键。
UPL for Android
在UE中为移动端添加第三方模块或者修改配置文件时经常会用到AdditionalPropertiesForReceipt,里面创建ReceiptProperty传入的xml文件就是UE的Unreal Plugin Language脚本。
ReceiptProperty的平台名称在IOS和Android上是固定的,分别是IOSPlugin和AndroidPlugin,不可以指定其他的名字(详见代码UEDeployIOS.cs#L1153和UEDeployAndroid.cs#L4303)。
1 | AdditionalPropertiesForReceipt.Add(new ReceiptProperty("AndroidPlugin", Path.Combine(ThirdPartyPath, "Android/PlatformUtils_UPL_Android.xml"))); |
- Unreal Plugin Language
- 虚幻插件语言参考(Android版)
- Engine/Source/Programs/UnrealBuildTool/System/UnrealPluginLanguage.cs
Android项目中所有的UPL
可以在项目路径下Intermediate/Android/ActiveUPL.xml,里面列出了当前项目中所有的UPL文件路径:
1 | Plugins\Online\Android\OnlineSubsystemGooglePlay\Source\OnlineSubsystemGooglePlay_UPL.xml |
删除AndroidManifest.xml中的项
因为UE默认会给AndroidManifest.xml添加项,如果其中的项我们想要手动控制,直接添加的话会产生错误,提示已经存在:
1 | UATHelper: Packaging (Android (ASTC)): > Task :app:processDebugManifest FAILED |
如果想要修改或者删除UE默认生成的AndroidManifest.xml中的项,可以通过先删除再添加的方式。
以删除以下项为例:
1 | <meta-data android:name="com.epicgames.ue4.GameActivity.bUseExternalFilesDir" android:value="false" /> |
在UPL的androidManifestUpdates中编写以下代码:
1 | <androidManifestUpdates> |
就是去遍历AndroidManfest.xml中已经存在meta-data中,android:name为com.epicgames.ue4.GameActivity.bUseExternalFilesDir的项给删除。
JNI调用接收ActivityResult
有时需要通过startActivityForResult来创建Intent来执行一些操作,如打开摄像头、打开相册选择图片等。
但是Android做这些操作的时候不是阻塞在当前的函数中的,所以不能直接在调用的函数里接收这些数据。而通过startActivityForResult执行的Action的结果都会调用到Activity的onActivityResult中。
1 | // GameActivity.java |
UE在UPL中提供了往OnActivityResult追加Java代码的用法:
1 | <!-- optional additions to GameActivity onActivityResult in GameActivity.java --> |
使用这种方式添加的Java代码会追加到OnActivityResult函数的末尾,但是这种方式有一个问题,那就是执行了自己追加到OnActivityResult的代码之后,还要处理接收到的结果,并且传递到UE端来,有点麻烦。
经过翻阅代码,发现UE提供了Java端的OnActivityResult的多播代理事件,这样就可以直接在UE里用C++来监听OnActivityResult的事件,自己做处理。
1 | // Launch/Puclic/Android/AndroidJNI.h |
在UE侧就可以通过绑定这个多播代理来监听Java端的OnActivityResult调用,可以在其中做分别的处理。
它由AndroidJNI.cpp中的Java_com_epicgames_ue4_GameActivity_nativeOnActivityResult函数从Java那边调用过来,调用机制在上个笔记中有记录。
Java调C++
有些需求和实现需要从Java调到C++这边,可以通过下面这种方式:
首先,在GameActivity中新建一个native的java函数声明(不需要定义):
1 | public native void nativeOnActivityResult(GameActivity activity, int requestCode, int resultCode, Intent data); |
然后在C++端按照下面的规则定义一个C++函数:
1 | JNI_METHOD void Java_com_epicgames_ue4_GameActivity_nativeOnActivityResult(JNIEnv* jenv, jobject thiz, jobject activity, jint requestCode, jint resultCode, jobject data) |
可以看到函数名字的规则为:
- 函数前需要加
JNI_METHOD修饰,它是一个宏__attribute__ ((visibility ("default"))) extern "C" - 函数名需要以
Java_开头,并且后面跟上com_epicgames_ue4_GameActivity_,标识是定义在GameActivity中的 - 然后再跟上java中的函数名
接受参数的规则:
- 第一个参数是Java的Env
- 第二个是java里的this
- 后面的参数以此是从java里传递参数
AndroidP的全面屏适配
在UE4打包的时候,会给项目生成GameActivity.java文件,里面的OnCreate具有适配全面屏的代码:
1 |
|
Android P和之后的系统不支持,所以就要自己写Jni调用来强制让P和之后系统版本支持。
在UE4.23+以后的引擎版本,支持了通过UPL往OnCreate函数添加代码,就可以直接把代码插入到GameActivity.java了:
1 | <gameActivityOnCreateFinalAdditions> |
在UE4.23之前不可以给OnCreate添加代码,只能自己写个JNI调用:
1 | public void AndroidThunkJava_SetFullScreenDisplayForP() |
将其在UPL中通过<gameActivityClassAdditions>添加到GameActivity.java中,在游戏启动时通过JNI调用即可。
注:
layoutInDisplayCutoutMode的可选项为:
- LAYOUT_IN_DISPLAY_CUTOUT_MODE_ALWAYS(Added in API level 30):始终允许窗口扩展到
DisplayCutout屏幕所有边缘上的区域。 - LAYOUT_IN_DISPLAY_CUTOUT_MODE_DEFAULT(Added in API level 28):仅当窗口完全包含在系统栏中时
DisplayCutout,才允许该窗口扩展到该区域DisplayCutout。 - LAYOUT_IN_DISPLAY_CUTOUT_MODE_NEVER(Added in API level 28):永远不要让窗口与DisplayCutout区域重叠。
- LAYOUT_IN_DISPLAY_CUTOUT_MODE_SHORT_EDGES(Added in API level 28):始终允许窗口扩展到
DisplayCutout屏幕短边的区域。
外部资料
Android重启App
当游戏更新完毕之后有时候需要重启App才可以生效,在UE中可以使用UPL写入以下java代码:
1 | public void AndroidThunkJava_AndroidAPI_RestartApplication( ) { |
在需要重启的时候通过jni调用来触发:
1 | void RestartApplication() |
常见问题
app:assembleDebug报错
1 | UATHelper: Packaging (Android…) ERROR: cmd.exe failed with args /c “[ProjectPath]\Intermediate/Android/APK/gradle/rungradle.bat” :app:assembleDebug |
将下面选项取消勾选即可: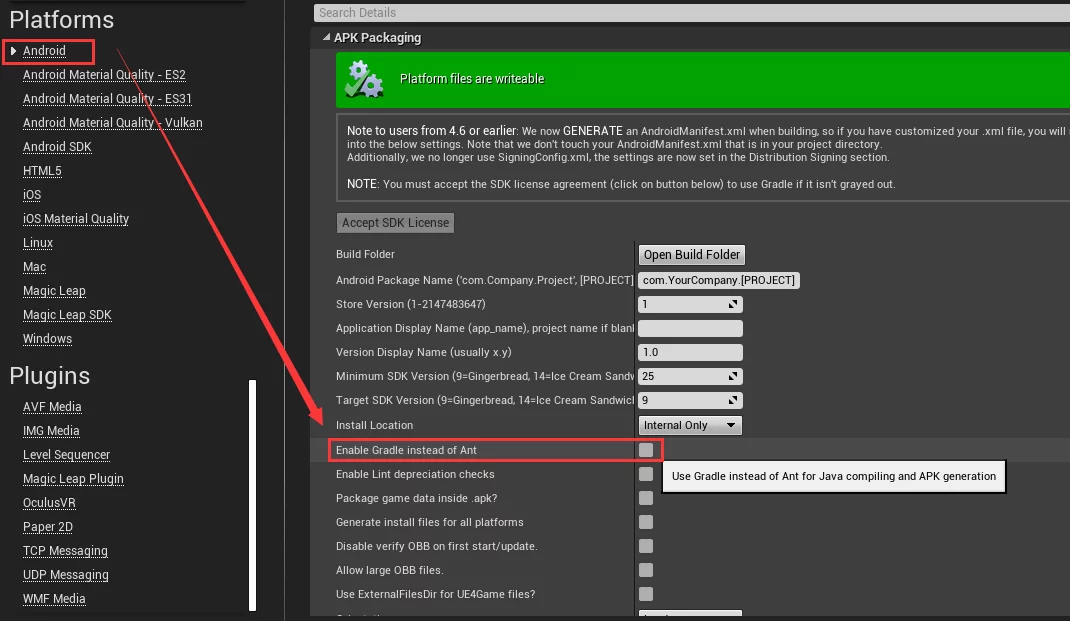
在4.24+中没有了Enable Gradle instead of Ant选项,仔细看了下log发现是因为UE要从网络上下载Grade下载失败导致的,可以在打包时开启全局代理。或者使用我打包的gradle版本:gradle-5.4.1.7z,将其解压到以下路径即可:
1 | C:\Users\lipengzha\.gradle\wrapper\dists\gradle-5.4.1-all\3221gyojl5jsh0helicew7rwx\gradle-5.4.1 |
然后创建一个环境变量GRADLE_HOME指向该路径即可。
在一些情况下,清理掉项目的Intermediate目录也可以解决问题,可以作为一个尝试方法。
还有一些相关的文章,可以更新Android Tools,操作方法为:
- run NVPACK/android-sdk-windows/tools/android.bat
- click on “Deselect All”
- update Extras/Android Support Repository
文章:
app:packagedebug报错
打包时有如下错误Log:
1 | execution failed for task ':app:packagedebug'. |
解决方案:删除工程中的Intermediate/Android和Intermediate/Build/Android即可。