在UE中开发编辑器插件时,通过USTRUCT的反射信息自动创建属性面板是非常方便提供配置化的方式,但经常会有一些特殊的属性面板定制需求,比如提供特殊的面板选项、根据参数的不同展示不同类型的值等。UE中的属性面板在HotPatcher 和ResScannerUE 中都有应用,能够非常方便地进行插件地配置与定制化。UE的官方文档:Details Panel Customization 。
本篇文章从创建独立的Details面板入手,通过ResScannerUE 中的具体案例,提供属性面板和属性条目的自定义的实现方法。
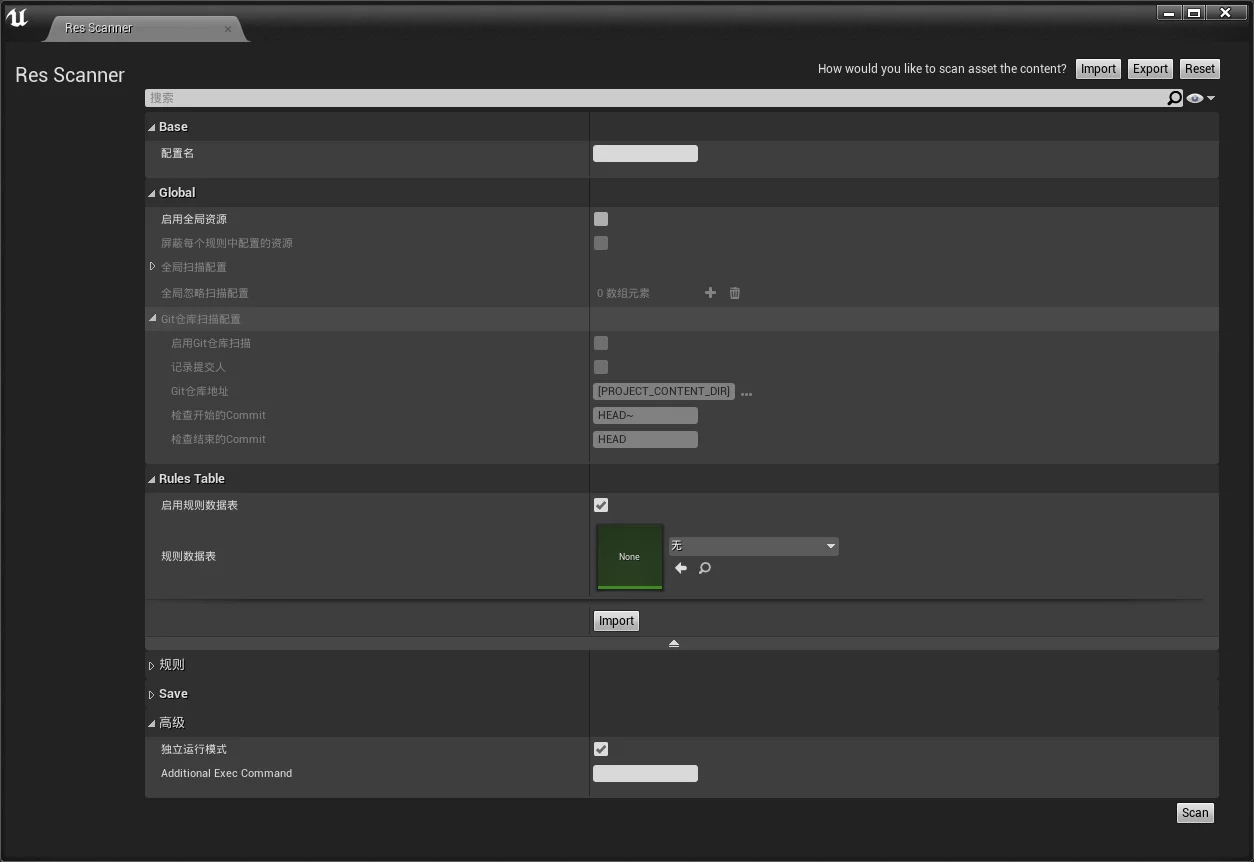
属性面板StructureDetailsView 以ResScannerUE 为例,启动插件就是创建了一个Dock,其中包含了一些基础操作的按钮和一个属性面板:
属性面板中展示的的元素,都是某一个USTRUCT结构的反射属性。以上述面板为例,他就是一个FScannerConfig的结构:
1
2
3
4
5
6
7
8
9
10
11
12
13
14
15
16
17
18
19
20
21
22
23
24
25
26
27
28
29
30
31
32
33
34
35
36
37
USTRUCT (BlueprintType)struct RESSCANNER_API FScannerConfig{ GENERATED_USTRUCT_BODY () public : UPROPERTY (EditAnywhere,BlueprintReadWrite,DisplayName="配置名" ,Category="Base" ) FString ConfigName; UPROPERTY (EditAnywhere,BlueprintReadWrite,DisplayName="启用全局资源" ,Category="Global" ) bool bByGlobalScanFilters = false ; UPROPERTY (EditAnywhere,BlueprintReadWrite,DisplayName="屏蔽每个规则中配置的资源" ,Category="Global" ,meta=(EditCondition="bByGlobalScanFilters" )) bool bBlockRuleFilter = false ; UPROPERTY (EditAnywhere,BlueprintReadWrite,DisplayName="全局扫描配置" ,Category="Global" ,meta=(EditCondition="bByGlobalScanFilters" )) FAssetFilters GlobalScanFilters; UPROPERTY (EditAnywhere,BlueprintReadWrite,DisplayName="全局忽略扫描配置" ,Category="Global" ,meta=(EditCondition="bByGlobalScanFilters" )) TArray<FAssetFilters> GlobalIgnoreFilters; UPROPERTY (EditAnywhere,BlueprintReadWrite,DisplayName="Git仓库扫描配置" ,Category="Global" ,meta=(EditCondition="bByGlobalScanFilters" )) FGitChecker GitChecker; UPROPERTY (EditAnywhere,BlueprintReadWrite,DisplayName="启用规则数据表" ,Category="RulesTable" ) bool bUseRulesTable = false ; UPROPERTY (EditAnywhere,BlueprintReadWrite,DisplayName="规则数据表" ,Category="RulesTable" , meta=(RequiredAssetDataTags = "RowStructure=ScannerMatchRule" ,EditCondition="bUseRulesTable" )) TSoftObjectPtr<class UDataTable > ImportRulesTable; UPROPERTY (EditAnywhere,BlueprintReadWrite,DisplayName="规则列表" ,Category="Rules" ) TArray<FScannerMatchRule> ScannerRules; UPROPERTY (EditAnywhere,BlueprintReadWrite,DisplayName="存储配置文件" ,Category="Save" ) bool bSaveConfig = true ; UPROPERTY (EditAnywhere,BlueprintReadWrite,DisplayName="存储扫描结果" ,Category="Save" ) bool bSaveResult = true ; UPROPERTY (EditAnywhere,BlueprintReadWrite,DisplayName="存储路径" ,Category="Save" ) FDirectoryPath SavePath; UPROPERTY (EditAnywhere,BlueprintReadWrite,DisplayName="独立运行模式" ,Category="Advanced" ) bool bStandaloneMode = true ; UPROPERTY (EditAnywhere,BlueprintReadWrite,Category="Advanced" ) FString AdditionalExecCommand; };
只需要这样定义一个结构,UE的属性面板就会把对应的类型、子结构成员都能创建出来,完全避免针对每个属性编写创建代码。创建方式也非常简单,只需要通过PropertyEditor模块在某个Slate类的Construct中创建一个SStructureDetailsView。
首先需要在build.cs中包含PropertyEditor模块,然后就能通过PropertyEditor进行创建了:
1 2 3 4 5 6 7 8 9 10 11 12 13 14 15 16 17 18 19 20 21 22 23 24 25 26 27 28 29 30 31 32 33 34 35 TSharedPtr<FScannerConfig> ScannerConfig; TSharedPtr<IStructureDetailsView> SettingsView; void SResScannerConfigPage::CreateScannerStructureDetailView () FPropertyEditorModule& EditModule = FModuleManager::Get ().GetModuleChecked <FPropertyEditorModule>("PropertyEditor" ); FDetailsViewArgs DetailsViewArgs; { DetailsViewArgs.bAllowSearch = true ; DetailsViewArgs.bHideSelectionTip = true ; DetailsViewArgs.bLockable = false ; DetailsViewArgs.bSearchInitialKeyFocus = true ; DetailsViewArgs.bUpdatesFromSelection = false ; DetailsViewArgs.NotifyHook = nullptr ; DetailsViewArgs.bShowModifiedPropertiesOption = false ; DetailsViewArgs.bShowScrollBar = false ; DetailsViewArgs.bShowOptions = true ; } FStructureDetailsViewArgs StructureViewArgs; { StructureViewArgs.bShowObjects = true ; StructureViewArgs.bShowAssets = true ; StructureViewArgs.bShowClasses = true ; StructureViewArgs.bShowInterfaces = true ; } SettingsView = EditModule.CreateStructureDetailView (DetailsViewArgs, StructureViewArgs, nullptr ); FStructOnScope* Struct = new FStructOnScope (FScannerConfig::StaticStruct (), (uint8*)ScannerConfig.Get ()); SettingsView->GetDetailsView ()->RegisterInstancedCustomPropertyLayout (FScannerConfig::StaticStruct (),FOnGetDetailCustomizationInstance::CreateStatic (&FScannerSettingsDetails::MakeInstance)); SettingsView->SetStructureData (MakeShareable (Struct)); }
创建的面板需要绑定一个UStruct,用于获取该结构的反射信息,以及绑定一个结构实例,用于获取展示值以及存储值。FDetailsViewArgs与FStructureDetailsViewArgs的参数来控制属性面板的功能,比如是否能搜索属性名、滑动条等。
创建SettingsView之后,显示在Slate控件中的方法:
1
2
3
4
5
6
7
8
9
10
11
12
13
14
15
16
17
18
19
20
21
22
23
24
25
26
27
void SResScannerConfigPage::Construct (const FArguments& InArgs) ScannerConfig = MakeShareable (new FScannerConfig); CreateScannerStructureDetailView (); ChildSlot [ SNew (SVerticalBox) + SVerticalBox::Slot () .AutoHeight () .HAlign (HAlign_Right) .Padding (4 , 4 , 10 , 4 ) [ ] + SVerticalBox::Slot () .AutoHeight () .Padding (FEditorStyle::GetMargin ("StandardDialog.ContentPadding" )) [ SNew (SHorizontalBox) + SHorizontalBox::Slot () .VAlign (VAlign_Center) [ SettingsView->GetWidget ()->AsShared () ] ] ];
其实就是把创建的SettingsView的Widget放入一个容器中显示,该Widget就包含了绑定UStruct的所有可编辑的反射属性,如前文ResScannerUE的面板显示。
属性面板自定义 在前面创建SettingView的代码中,有这么一行:
1 SettingsView->GetDetailsView ()->RegisterInstancedCustomPropertyLayout (FScannerConfig::StaticStruct (),FOnGetDetailCustomizationInstance::CreateStatic (&FScannerSettingsDetails::MakeInstance));
这里是指定一个当前SettingsView的DetailCustomization类实例,用于在创建SettingView控件的时候进行定制化的操作,该类的声明如下:
ScannerConfigDetails.h 1 2 3 4 5 6 7 8 9 10 11 12 13 14 #include "IDetailCustomization.h" class FScannerSettingsDetails : public IDetailCustomization{ public : static TSharedRef<IDetailCustomization> MakeInstance () { return MakeShareable (new FScannerSettingsDetails ()); } virtual void CustomizeDetails (IDetailLayoutBuilder& DetailBuilder) override };
在这个CustomizeDetails接口中,就可以做一些定制化的操作,比如在属性面板中创建一个新的slate控件,以ResScannerUE 中的Import按钮为例:
1 2 3 4 5 6 7 8 9 10 11 12 13 14 15 16 17 18 19 20 21 22 23 24 25 26 27 28 29 30 31 32 33 34 35 36 37 38 void FScannerSettingsDetails::CustomizeDetails (IDetailLayoutBuilder& DetailBuilder) TArray< TSharedPtr<FStructOnScope> > StructBeingCustomized; DetailBuilder.GetStructsBeingCustomized (StructBeingCustomized); check (StructBeingCustomized.Num () == 1 ); FScannerConfig* ScannerSettingsIns = (FScannerConfig*)StructBeingCustomized[0 ].Get ()->GetStructMemory (); IDetailCategoryBuilder* RulesCategory = DetailBuilder.EditCategory (TEXT ("RulesTable" ),FText::GetEmpty (),ECategoryPriority::Default); if (RulesCategory) { RulesCategory->SetShowAdvanced (true ); RulesCategory->AddCustomRow (LOCTEXT ("ImportRulesTable" , "Import Rules Table" ),true ) .ValueContent () [ SNew (SHorizontalBox) + SHorizontalBox::Slot () .Padding (0 ) .AutoWidth () [ SNew (SButton) .Text (LOCTEXT ("Import" , "Import" )) .ToolTipText (LOCTEXT ("ImportRulesTable_Tooltip" , "Import Rules Table to the Config" )) .IsEnabled_Lambda ([this ,ScannerSettingsIns]()->bool { return ScannerSettingsIns->bUseRulesTable; }) .OnClicked_Lambda ([this , ScannerSettingsIns]() { if (ScannerSettingsIns) { ScannerSettingsIns->HandleImportRulesTable (); } return (FReply::Handled ()); }) ] ]; } }
可以通过接口中的DetailBuilder获取到当前SettingView绑定的结构实例,能够从配置中获取数据、执行操作。
上述代码是获取到了属性的Caregory,在RulesTable下创建一个CustomRow元素,在ValueContent()可以直接写Slate代码来创建我们自定义的控件。Import按钮就能从Datatable导入到配置中的效果。
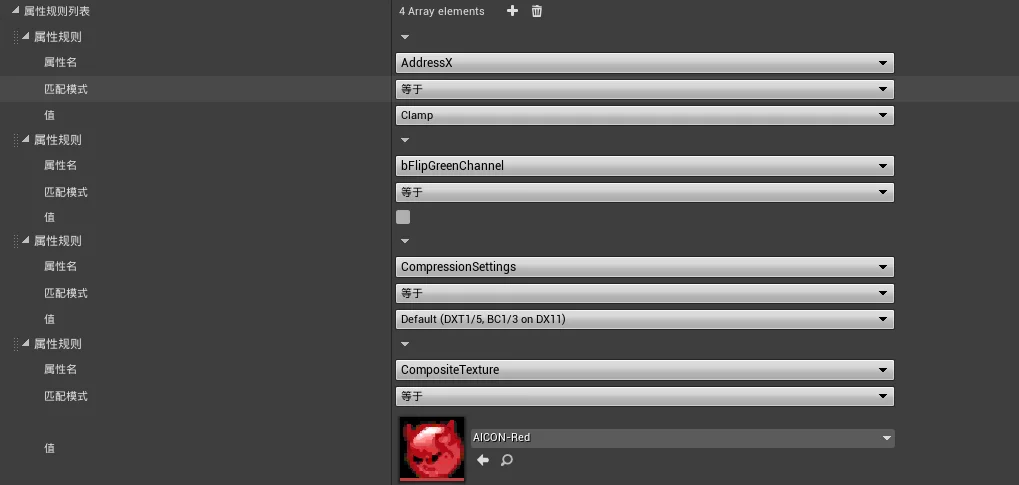
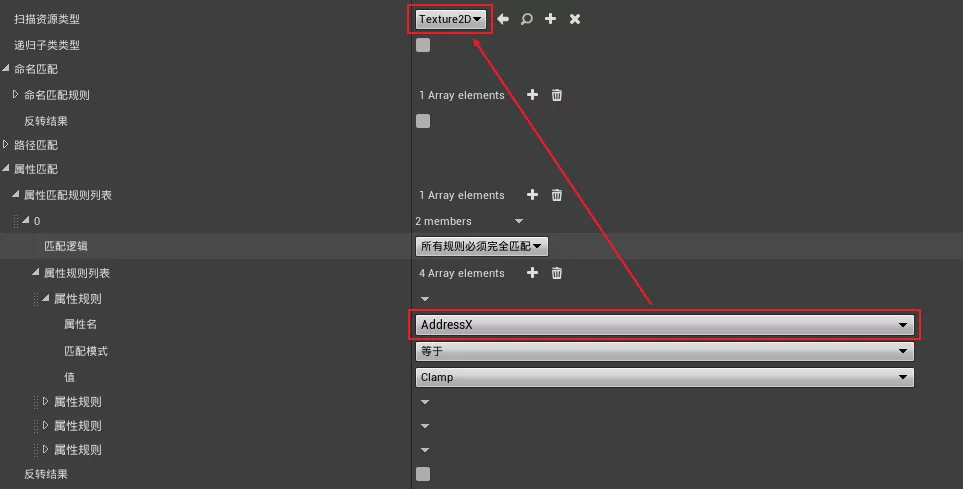
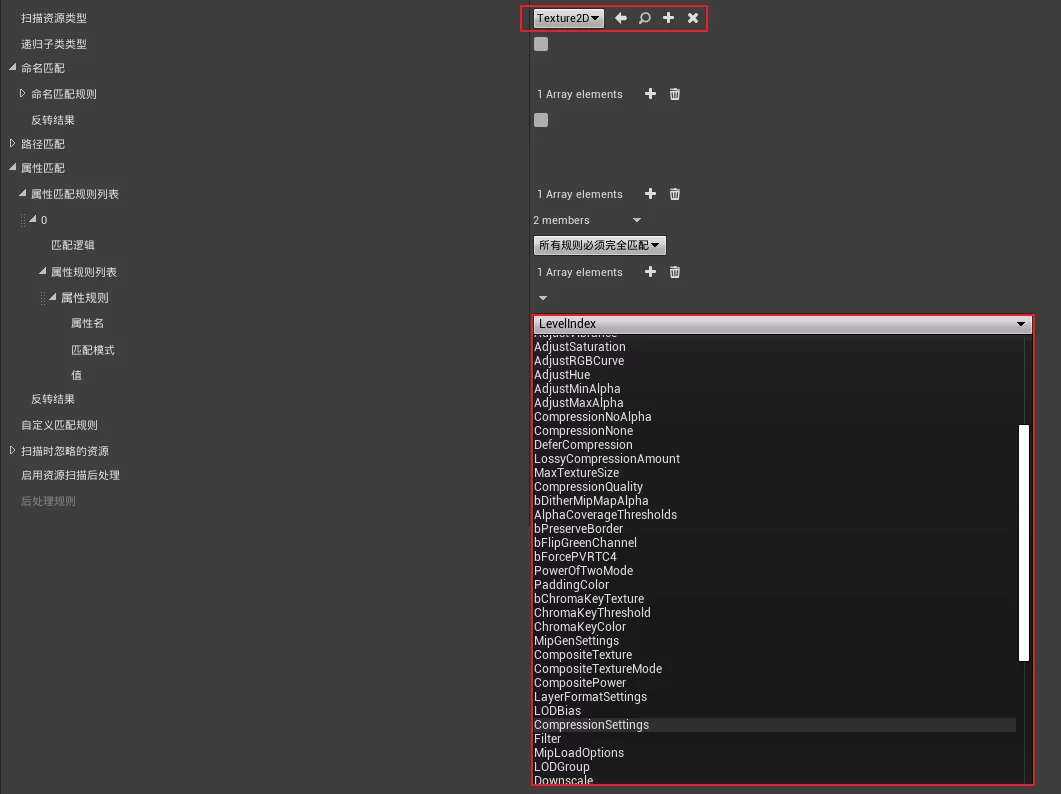
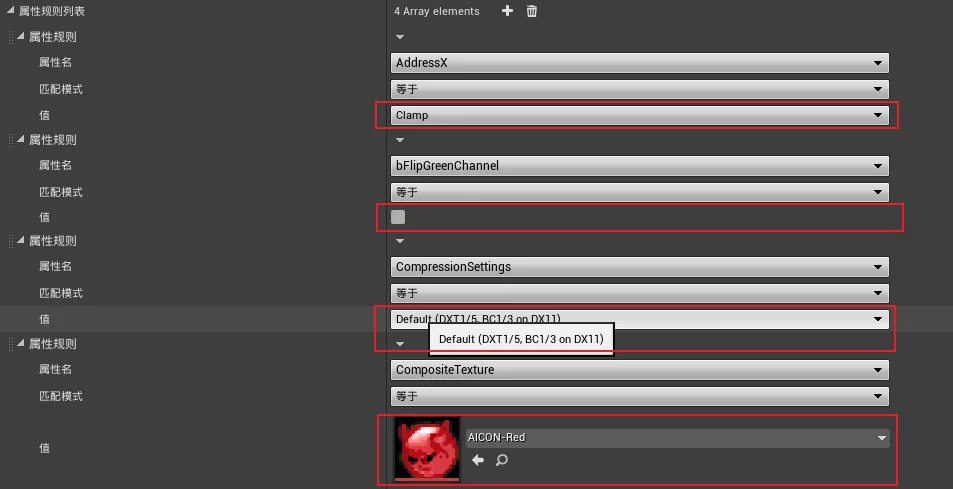
面板中的属性自定义 上节提到了在属性面板中可以创建自定义的slate控件,实现定制行为。但是有一些需求,需要在面板中修改属性展示。ResScannerUE 中属性匹配的一个需求:
可以选择UClass类型
根据选择的UClass类型,列出可选属性的列表,并能够动态创建所选属性的值类型在面板中显示
属性名-值是一个数组,每个元素可以指定不同的属性名,并且创建出不同的值类型
我已经实现了,效果如下:
下面从实现上做介绍,如果只是在反射数据获取上,其实没难度。但是在属性面板上显示就要复杂一些。
根据UClass遍历所有的属性
得到FProperty就得到了当前属性的类型
把不同的FProperty在属性面板上创建出来
因为前文也提到了,属性面板是会绑定一个USTRUCT然后创建出属性,最开始我的思路是动态修改UStruct,但是发现不太合理,UStruct其实也是固定的,没办法做到一个数组中的元素类型不同。
那么,还有什么方法呢?经过查阅引擎的代码,发现UE也可以对某种类型的属性在属性面板做自定义的操作,核心就是IPropertyTypeCustomization。
它的所用与IDetailCustomization接口类似,都是提供一个自定义属性面板控件的接口,但是在创建形式上略有不同:
DetailCustomization需要在创建SettingView时指定,而PropertyTypeCustomization不需要
DetailCustomization只能在自己创建的SettingView中生效,而PropertyTypeCustomization在所有创建该属性的地方都能生效。
PropertyTypeCustomization更灵活一些,在写完自定义事件之后,不管是在SettingView还是在DataTable创建出来的结构实例,都能正确地展示。
我在ResScannerUE中创建了一个结构FPropertyMatchMapping,来存储属性名和值:
1 2 3 4 5 6 7 8 9 10 11 12 USTRUCT (BlueprintType)struct FPropertyMatchMapping { GENERATED_USTRUCT_BODY () public : UPROPERTY (EditAnywhere,BlueprintReadWrite,DisplayName="匹配模式" ) EPropertyMatchRule MatchRule; UPROPERTY (EditAnywhere,BlueprintReadWrite,DisplayName="属性名" ) FString PropertyName; UPROPERTY (EditAnywhere,BlueprintReadWrite,DisplayName="值" ) FString MatchValue; };
PropertyName和MatchValue都是字符串,使用字符串的原因是,字符串可以存储任意类型的值。后续对属性自定义的操作,就是针对于FPropertyMatchMapping这个结构类型。
所以,属性自定义的实现思路为:
创建一个自定义的PropertyTypeCustomization
当属性面板创建时,替换掉原本的属性创建逻辑,使用PropertyTypeCustomization创建
先创建FPropertyMatchMapping类型的PropertyTypeCustomization类:
1 2 3 4 5 6 7 8 9 10 11 class FCustomPropertyMatchMappingDetails : public IPropertyTypeCustomization{ public : static TSharedRef<IPropertyTypeCustomization> MakeInstance () { return MakeShareable (new FCustomPropertyMatchMappingDetails); } virtual void CustomizeHeader (TSharedRef<class IPropertyHandle> StructPropertyHandle, class FDetailWidgetRow& HeaderRow, IPropertyTypeCustomizationUtils& StructCustomizationUtils) override virtual void CustomizeChildren (TSharedRef<class IPropertyHandle> StructPropertyHandle, class IDetailChildrenBuilder& StructBuilder, IPropertyTypeCustomizationUtils& StructCustomizationUtils) override }
然后需要在模块启动时把该类注册进去:
1 2 3 4 5 void FResScannerEditorModule::StartupModule () FPropertyEditorModule& PropertyEditorModule = FModuleManager::GetModuleChecked <FPropertyEditorModule>(TEXT ("PropertyEditor" )); PropertyEditorModule.RegisterCustomPropertyTypeLayout (TEXT ("PropertyMatchMapping" ), FOnGetPropertyTypeCustomizationInstance::CreateStatic (&FCustomPropertyMatchMappingDetails::MakeInstance)); }
该步骤,就是告诉PropertyEditor模块在属性面板中创建FPropertyMatchMapping类型时,会创建出一个FCustomPropertyMatchMappingDetails的实例来执行创建操作,这样就把我们想要指定的类的控件创建流程转移到了自己的代码中。
FCustomPropertyMatchMappingDetails的实现:CustomizeHeader函数中是可以直接创建Property-value的,但是我在CustomizeHeader传递进来的参数中,没找到方法获取到整个父结构实例,也就获取不到所选择的UClass是什么,如果在创建不依赖上下文关系的属性-值中,可以直接在这里创建。
但是我要实现的依赖于父级结构所选择的UClass值,所以我只在CustomizeHeader中创建了属性名,而值的控件没有创建:
1 2 3 4 5 6 7 8 9 10 11 12 13 14 15 void FCustomPropertyMatchMappingDetails::CustomizeHeader (TSharedRef<IPropertyHandle> StructPropertyHandle, FDetailWidgetRow& HeaderRow, IPropertyTypeCustomizationUtils& StructCustomizationUtils) MatchRuleHandle = StructPropertyHandle->GetChildHandle (GET_MEMBER_NAME_CHECKED (FPropertyMatchMapping, MatchRule)); MatchValueHandle = StructPropertyHandle->GetChildHandle (GET_MEMBER_NAME_CHECKED (FPropertyMatchMapping, MatchValue)); PropertyNameHandle = StructPropertyHandle->GetChildHandle (GET_MEMBER_NAME_CHECKED (FPropertyMatchMapping, PropertyName)); CurrentPropertyRow = NULL ; OldPropertyRow = NULL ; HeaderRow.NameContent () [ SNew (STextBlock) .Text (FText::FromString (TEXT ("属性规则" ))) ]; }
在CustomizeHeader中获取并存储了FPropertyMatchMapping实例的真实元素值(PropertyName/Value都是FString),该结构的元素都被放到了CustomizeChildren中创建,因为在CustomizeChildren传递进来的IDetailChildrenBuilder中可以访问到父级结构,也就能获取到所选择的UClass:
1 2 3 4 5 6 7 8 void FCustomPropertyMatchMappingDetails::CustomizeChildren (TSharedRef<IPropertyHandle> StructPropertyHandle, IDetailChildrenBuilder& StructBuilder, IPropertyTypeCustomizationUtils& StructCustomizationUtils) IDetailCategoryBuilder& ParentCategory = mStructBuilder->GetParentCategory (); IDetailLayoutBuilder& ParentLayout = ParentCategory.GetParentLayout (); auto ScanAssetType = ParentLayout.GetProperty (GET_MEMBER_NAME_CHECKED (FScannerMatchRule, ScanAssetType)); ScanAssetType->SetOnPropertyValueChanged (FSimpleDelegate::CreateSP (this , &FCustomPropertyMatchMappingDetails::OnClassValueChanged)); }
获取到UClass之后,就是获取所有的反射属性,并创建出一个SComboBox:
1 2 3 4 5 6 7 8 9 10 11 12 13 14 15 16 17 18 19 20 21 22 23 24 25 26 27 28 29 30 31 32 33 34 35 36 37 38 39 40 41 42 43 44 45 46 47 48 49 50 51 52 53 54 55 56 void FCustomPropertyMatchMappingDetails::OnClassValueChanged () UObject* ClassObject = NULL ; Class = NULL ; IDetailCategoryBuilder& ParentCategory = mStructBuilder->GetParentCategory (); IDetailLayoutBuilder& ParentLayout = ParentCategory.GetParentLayout (); auto ScanAssetType = ParentLayout.GetProperty (GET_MEMBER_NAME_CHECKED (FScannerMatchRule, ScanAssetType)); ScanAssetType->GetValue (ClassObject); if (ClassObject) { Class = Cast <UClass>(ClassObject); for (TFieldIterator<FProperty> PropertyIter (Class);PropertyIter;++PropertyIter) { FProperty* PropertyIns = *PropertyIter; AllPropertyNames.Add (MakeShareable (new FString (PropertyIns->GetName ()))); AllPropertyMap.Add (PropertyIns->GetName (),PropertyIns); } } TSharedPtr<SWidget> Widget; if (Class) { SAssignNew (AllPropertySelector,SComboBox<TSharedPtr<FString>>) .OptionsSource (&AllPropertyNames) .OnGenerateWidget (SComboBox<TSharedPtr<FString>>::FOnGenerateWidget::CreateRaw (this ,&FCustomPropertyMatchMappingDetails::HandleGenerateWidget_ForPropertyNamesComboBox)) .OnSelectionChanged (SComboBox< TSharedPtr<FString> >::FOnSelectionChanged::CreateRaw (this ,&FCustomPropertyMatchMappingDetails::HandleSelectionChanged_ForPropertyNamesComboBox)) [ SAssignNew (PropertyNameComboContent, SBox) ]; PropertyNameComboContent->SetContent (SNew (STextBlock).Text (FText::FromString (*AllPropertyNames[0 ].Get ()))); Widget = AllPropertySelector; } else { Widget = PropertyNameHandle->CreatePropertyValueWidget (); } AllPropertySelectorBox->SetContent (Widget.ToSharedRef ()); } void FCustomPropertyMatchMappingDetails::CustomizeChildren (TSharedRef<IPropertyHandle> StructPropertyHandle, IDetailChildrenBuilder& StructBuilder, IPropertyTypeCustomizationUtils& StructCustomizationUtils) StructBuilder.AddCustomRow (FText::FromString (TEXT ("PropertyName" ))) .NameContent () [ PropertyNameHandle->CreatePropertyNameWidget () ] .ValueContent () .MinDesiredWidth (500 ) [ SAssignNew (AllPropertySelectorBox, SBox) ]; OnClassValueChanged (); }
其实也是通过Slate创建出一个SWidget,然后塞到由StructBuilder.AddCustomRow创建的ValueContent容器中。
通过创建的SComboBox,可以在编辑器中获取到当前ComboBox中选择的属性名,通过UClass/属性名就能拿到该属性的FProperty,也就是属性的反射信息。所以,当ComboBox中选择的名字不一样,拿到的FProperty也不一样,其所代表的类型也不一样。
首先需要在CustomizeChildren中创建存储值控件的容器:
1 2 3 4 5 6 7 8 9 10 StructBuilder.AddCustomRow (FText::FromString (TEXT ("PropertyValue" ))) .NameContent () [ MatchValueHandle->CreatePropertyNameWidget () ] .ValueContent () .MinDesiredWidth (500 ) [ SAssignNew (PropertyContent,SBox) ];
PropertyContent是一个TSharedPtr<SBox>,后面创建出来的控件,要通过它来展示。
回来继续说到根据FProperty创建其类型的值控件,在IDetailChildrenBuilder中有一个函数AddExternalStructureProperty,可以将一个外部结构的某个属性添加到当前的Details中。
以UTexture2D的CompressionSettings属性为例:
1 2 UPROPERTY (EditAnywhere, BlueprintReadWrite, Category=Compression, AssetRegistrySearchable) TEnumAsByte<enum TextureCompressionSettings > CompressionSettings;
它是一个枚举,我想要在一个不包含它的UStruct的属性面板中创建出来,并把它放到前面创建的PropertyContent中显示:
1 2 3 4 5 6 7 8 9 10 11 12 13 IDetailPropertyRow* PropertyRow = mStructBuilder->AddExternalStructureProperty (MakeShareable (new FStructOnScope (Cast <UStruct>(Class))), TEXT ("CompressionSettings" )); if (PropertyRow){ PropertyRow->Visibility (EVisibility::Hidden); FString ExistValue; MatchValueHandle->GetValueAsFormattedString (ExistValue); PropertyRow->GetPropertyHandle ()->SetValueFromFormattedString (ExistValue); TSharedRef<SWidget> Widget = PropertyRow->GetPropertyHandle ()->CreatePropertyValueWidget (); PropertyContent->SetContent (Widget); }
mStructBuilder可以在CustomizeChildren的参数中拿到并存储起来。
其实上面的代码就是实现根据FProperty创建出对应值类型控件的关键部分,只需要通过UClass和属性名,就能创建出对应的SWidget,将其放入某个容器中即可显示出来!
根据ComboxBox获得选择的属性名,再根据属性名获取FProperty,再创建出Wiget的代码碍于篇幅这里就不完整贴出了,感兴趣的可以查看ResScannerUE 的DetailCustomization/CustomPropertyMatchMappingDetails.cpp 代码,具有完整的实现。
通用类型的数据存储 除了需要能够在面板中显示不同的属性,还需要用一种通用的方法把他们存储起来。Value Widget读取字符串值、从字符串设置值得方式:
1 2 3 FString Value; MatchValueHandle->GetValueAsFormattedString (Value); MatchValueHandle->SetValueFromFormattedString (Value);
通过这两个函数就能实现,所有类型的值都能通过字符串来存储和读取。