由于Github Pages不支持custom domain的HTTPS,今天折腾了一下搞定了在VPS上用Nginx到Github Pages的反向代理,使用的是Let’s Encrypt签发的证书,实现了全站HTTPS(资源外链也都换成了HTTPS),简单记录一下。
签发证书
首先,先将要签发证书的域名添加一个(或几个)A记录指向你的VPS。
然后从Github拉取certbot来签发证书,以及Certbot User Guide:
1
2
| $ git clone git@github.com:certbot/certbot.git
$ cd certbot
|
此时关掉Ngnix与使用80与443端口的程序:
接下来使用certbot来签发证书:
1
| $ ./certbot-auto certonly --standalone -d example.com -d www.example.com
|
将其中的example.com改成你的域名,然后在拉取下来的certbot的目录里执行,更多的参数请看certbot的用法介绍。
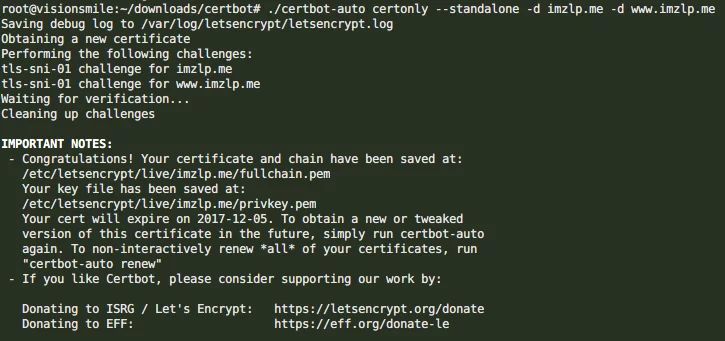
执行成功会有以下提示:
![let-successfuly]()
就是提示为你的域名已经签发了证书并存到了/etc/letsencrypt/live/imzlp.com/这个目录里面。
配置Nginx反向代理GithubPages
然后编辑一下Nginx配置(Nginx的配置文件在/etc/nginx/conf.d下):
在这里创建一个与你域名同名的配置文件,如imzlp.com.conf:
1
2
3
4
5
6
7
8
9
10
11
12
13
14
15
16
17
18
19
20
21
22
23
24
25
26
27
28
29
30
31
32
33
| server {
listen 80;
listen [::]:80;
server_name imzlp.com;
rewrite ^(.*) https://$server_name$1 permanent;
location / {
proxy_pass https://imzlp.com;
proxy_redirect off;
proxy_set_header Host $host;
proxy_set_header X-Real-IP $remote_addr;
proxy_set_header X-Forwarded-For $proxy_add_x_forwarded_for;
}
}
server {
listen 443 ssl;
ssl on;
server_name imzlp.com;
ssl_certificate /etc/letsencrypt/live/imzlp.com/fullchain.pem;
ssl_certificate_key /etc/letsencrypt/live/imzlp.com/privkey.pem;
location / {
proxy_pass https://151.101.73.147;
proxy_redirect off;
proxy_set_header Host imzlp.com;
proxy_set_header X-Real-IP $remote_addr;
proxy_set_header X-Forwarded-For $proxy_add_x_forwarded_for;
}
}
|
需要注意的是HTTPS的Server配置里proxy_pass不能直接填https://xxx.github.io,会有Github的404错误,需要先ping到xxx.github.io的IP,然后给Github Pages一个custom domain,最后在上面proxy_pass里填上面ping到的IP,proxy_set_header里改为设置的custom domain.
也可以将另外一个域名再反向代理到Github Pages已添加A记录,且证书也已签发),方法同上,但是proxy_set_header要填上你在Github Pages指定的custom domain不然会有Github的404错误:
同样的,也是在这里创建一个与你域名同名的配置文件,如zhalipeng.com.conf:
1
2
3
4
5
6
7
8
9
10
11
12
13
14
15
16
17
18
19
20
21
22
23
24
25
26
27
28
29
30
31
32
33
| server {
listen 80;
listen [::]:80;
server_name zhalipeng.com;
rewrite ^(.*) https://$server_name$1 permanent;
location / {
proxy_pass https://zhalipeng.com;
proxy_redirect off;
proxy_set_header Host $host;
proxy_set_header X-Real-IP $remote_addr;
proxy_set_header X-Forwarded-For $proxy_add_x_forwarded_for;
}
}
server {
listen 443 ssl;
ssl on;
server_name zhalipeng.com;
ssl_certificate /etc/letsencrypt/live/zhalipeng.com/fullchain.pem;
ssl_certificate_key /etc/letsencrypt/live/zhalipeng.com/privkey.pem;
location / {
proxy_pass https://151.101.73.147;
proxy_redirect off;
proxy_set_header Host imzlp.com;
proxy_set_header X-Real-IP $remote_addr;
proxy_set_header X-Forwarded-For $proxy_add_x_forwarded_for;
}
}
|
然后保存退出,Ngnix重载配置即可。
在Hexo中强制使用HTTPS
以Hexo-Next-Theme为例,将以下代码添加至next/themes/layout/_layout.swig的<head></head>之内:
因为上面我使用了两个域名,所以在这里要判断一下是否是两个中的一个:
1
2
3
4
5
6
| <script type="text/javascript">
var hostA = "imzlp.com";
var hostB = "zhalipeng.com";
if (((hostA == window.location.host)||(hostB == window.location.host)) && (window.location.protocol != "https:"))
window.location.protocol = "https";
</script>
|
注意要改成你自己的域名。
让多个域名从Gitment获取统一的评论内容
修改gitment.swig中的内容,将以下代码添加至var gitment = new Gitment({})中:
1
| id:window.location.pathname,
|
添加之后:
1
2
3
4
5
6
7
8
9
10
11
12
13
14
15
16
17
18
19
20
| {% if page.comments and theme.gitment.enable and theme.gitment.username and theme.gitment.repoName and theme.gitment.client_id and theme.gitment.client_secret %}
{% set username = theme.gitment.username %}
{% set repoName = theme.gitment.repoName %}
{% set client_id = theme.gitment.client_id %}
{% set client_secret = theme.gitment.client_secret %}
<link rel="stylesheet" href="https://imsun.github.io/gitment/style/default.css">
<script src="https://imsun.github.io/gitment/dist/gitment.browser.js"></script>
<script>
var gitment = new Gitment({
id:window.location.pathname,
owner: '{{username}}',
repo: '{{repoName}}',
oauth: {
client_id: '{{client_id}}',
client_secret: '{{client_secret}}'
}
});
gitment.render('gitment_container');
</script>
{% endif %}
|
自动续签证书
因为Let’s Encrypt的证书有效时间是90天,所以如果到期了还需要手动执行上面certbot的签发命令是很不爽的。
可以使用下面的方法来自动签发证书,其实也就是一个sh脚本,一行命令就可以实现,也是使用certbot来实现:
1
2
|
$ /root/certbot/certbot-auto renew --pre-hook "service nginx stop" --post-hook "service nginx reload" --quiet
|
注:--quiet参数的含义是不输出内容到控制台和生成日志。
然后就可以使用crontab来创建定时任务了。
将下面的代码填入其中(同样不要忘了把certbot改为你自己存放的路径):
1
| 0 0 1 * * /root/certbot/certbot-auto renew --pre-hook "service nginx stop" --post-hook "service nginx reload" --quiet
|
注意:只有续期命令检测到续期时间小于30天时,才会重新请求生成新证书。否则是不会重新生成的。
参考网站
更新日志
2018.02.05