工欲善其事,必先利其器!掌握好的工具会使开发效率上一个层次。notes 中关于UE工具链以及一些组合UE使用的工具配置和使用技巧的笔记整理,后续这方面的内容也会收录到这篇文章中。
使用Doxygen从UE代码生成文档 最近使用doxygen 从UnrealEngine源码生成了Runtime/Engine 模块文档,导出的chm都700M了(主要是各种grahp大),好大。doxygen 从UE源码生成文档之前,记得删除源码中所有的.h/.hpp中的UE的宏(我自己写了个简单的程序来处理这个事情),不然生成出来的会有问题(比如函数名不见了,显示出来的时UFUNCTION,或者成员变量不见了,显示出来的是UPROPERTY)。主要删除以下这几个MACRO就可以。
1
2
3
4
5
6
7
8
"UFUNCTION" ,"DEPRECATED" ,"UCLASS" ,"UINTERFACE" ,"UPROPERTY" ,"GENERATED_BODY()" ,"GENERATED_UCLASS_BODY()" ,"GENERATED_INTERFACE_BODY()"
使用sed就是如下的命令:
1 2 3 4 $ sed -i -e /UFUNCTION/d -e /DEPRECATED/d -e /UCLASS/d -e /UINTERFACE/d -e /UPROPERTY/d -e /GENERATED_BODY/d -e /GENERATED_UCLASS_BODY/d -e /GENERATED_INTERFACE_BODY/d ${filename} $ sed -i -e /UFUNCTION/d -e /DEPRECATED/d -e /UCLASS/d -e /UINTERFACE/d -e /UPROPERTY/d -e /GENERATED_BODY/d -e /GENERATED_UCLASS_BODY/d -e /GENERATED_INTERFACE_BODY/d Actor.h
UnrealVersionSelector的参数
-register:Add the current directory to the list of installations-fileassociations:Update all the settings.-switchversion:Associate with an engine label-switchversionsilent:Associate with a specific engine label-editor:Open a project with the editor-projectlist:Open the editor-game:Play a game using the editor executable-projectfiles:Generate Visual Studio project files
UnrealPak的参数 UE4.22.3UnrealPak支持的参数:
1
2
3
4
5
6
7
8
9
10
11
12
13
14
15
16
17
18
19
20
21
22
23
24
25
26
Usage: UnrealPak <PakFilename> -Test UnrealPak <PakFilename> -List [-ExcludeDeleted] UnrealPak <PakFilename> <GameUProjectName> <GameFolderName> -ExportDependencies=<OutputFileBase> -NoAssetRegistryCache -ForceDependsGathering UnrealPak <PakFilename> -Extract <ExtractDir> [-Filter=<filename>] UnrealPak <PakFilename> -Create=<ResponseFile> [Options] UnrealPak <PakFilename> -Dest=<MountPoint> UnrealPak <PakFilename> -Repack [-Output=Path] [-ExcludeDeleted] [Options] UnrealPak <PakFilename1> <PakFilename2> -diff UnrealPak <PakFolder> -AuditFiles [-OnlyDeleted] [-CSV=<filename>] [-order=<OrderingFile>] [-SortByOrdering] UnrealPak <PakFilename> -WhatsAtOffset [offset1] [offset2] [offset3] [...] UnrealPak <PakFolder> -GeneratePIXMappingFile -OutputPath=<Path> UnrealPak -TestEncryption Options: -blocksize=<BlockSize> -bitwindow=<BitWindow> -compress -encrypt -order=<OrderingFile> -diff (requires 2 filenames first) -enginedir (specify engine dir for when using ini encryption configs) -projectdir (specify project dir for when using ini encryption configs) -encryptionini (specify ini base name to gather encryption settings from) -extracttomountpoint (Extract to mount point path of pak file) -encryptindex (encrypt the pak file index, making it unusable in unrealpak without supplying the key) -compressionformat[s]=<Format[,format2,...]> (set the format(s) to compress with, falling back on failures)
直接在编辑器中执行打包的命令(UE4.22.3,这里在指定了加密):
1
2
3
4
5
6
7
8
9
"D:\UnrealEngine\UE_4.22\Engine\Binaries\Win64\UnrealPak.exe" "C:\Users\Administrator\Documents\Unreal Projects\Mobile422\Saved\StagedBuilds\WindowsNoEditor\Mobile422\Content\Paks\Mobile422-WindowsNoEditor.pak" -create="C:\Users\Administrator\AppData\Roaming\Unreal Engine\AutomationTool\Logs\C+Program+Files+Epic+Games+UE_4.22\PakList_Mobile422-WindowsNoEditor.txt" -cryptokeys="C:\Users\Administrator\Documents\Unreal Projects\Mobile422\Saved\Cooked\WindowsNoEditor\Mobile422\Metadata\Crypto.json" -order="C:\Users\Administrator\Documents\Unreal Projects\Mobile422\Build\WindowsNoEditor\FileOpenOrder\CookerOpenOrder.log" -encryptindex -patchpaddingalign=2048 -compressionformats= "C:\Users\Administrator\Documents\Unreal Projects\Mobile422\Mobile422.uproject" -multiprocess -abslog="C:\Users\Administrator\AppData\Roaming\Unreal Engine\AutomationTool\Logs\C+Program+Files+Epic+Games+UE_4.22\UnrealPak-Mobile422-WindowsNoEditor-2020.02.11-18.48.15.txt"
cryptokeys指定参数的结构:
1
2
3
4
5
6
7
8
9
10
11
12
13
14
15
16
17
18
19
20
21
22
23
24
25
26
27
28
29
30
31
32
33
34
35
36
37
38
39
40
41
42
43
44
{ "$types" : { "UnrealBuildTool.EncryptionAndSigning+CryptoSettings, UnrealBuildTool, Version=4.0.0.0, Culture=neutral, PublicKeyToken=null" : "1" , "UnrealBuildTool.EncryptionAndSigning+EncryptionKey, UnrealBuildTool, Version=4.0.0.0, Culture=neutral, PublicKeyToken=null" : "2" , "UnrealBuildTool.EncryptionAndSigning+SigningKeyPair, UnrealBuildTool, Version=4.0.0.0, Culture=neutral, PublicKeyToken=null" : "3" , "UnrealBuildTool.EncryptionAndSigning+SigningKey, UnrealBuildTool, Version=4.0.0.0, Culture=neutral, PublicKeyToken=null" : "4" } , "$type" : "1" , "EncryptionKey" : { "$type" : "2" , "Name" : "Embedded" , "Guid" : "00000000-0000-0000-0000-000000000000" , "Key" : "+c0unLTPVpJ8E2MAs3SrUh/bRHasFOvq1kKXnmZBZcw=" } , "SigningKey" : { "$type" : "3" , "PublicKey" : { "$type" : "4" , "Exponent" : "AQAB" , "Modulus" : "m48Hq1rQKqljGUBCVku+qxFoa1oVBXghOWKSPArwl9uixba6pxlgqyV/BINWRYQMzgcdKPvGgusRIlalPqEEQB9XibCqJahUpxszoNkhH33cWSpMKZ8XWNmnvAZvtebpqtJYVP1ebqNGvCEm+e54dsxvRJJGmcOB6Wi36/l4c9/+zgNF5BZQItOlDc8OCYlttAvDhgExDow4leNuU/nBh12rcKD4P0KmIYdPzFBYgTe18DyJ12GKf2rStFF9VDlTsp+Gl7ZejPzQ7/CsX0eSHHplsZjjCB6mlmBStFOY7OWMLS/pnYAQ6Ywnaf+tBNz4Fd9eBBxwD0Vn+dU4YDxEJYvZuVkOqyio581jHn5U7rjTofzTyHvy5tzWuYF52R2dGkcTBgjkbmE0Z6nkZ2TdPEog15eZClsHHMseyzhBa3LCC2nmnvZqppV4+Ijj5e1XKEobPOgVZMejXNukW1dzfX9gMf1NrOD2KX2cnyPT6IvP6zu5Cztiy3rVtBiDtQIaQnaCsix8t0+oh5aqzhj6GrblcYs1JX/uy0OYO+hO/yTLET378TehhRjYbnHQsS2PBqBVM6i7hK7xT1TxuUE5oJYJULDWmOn9AZKmnzkx+VyQgmqmNA/L0vJqOhsDvvA29UGNEn5junydqkQlLP4OovlZcoic2R/tYPFcwMKPp68=" } , "PrivateKey" : { "$type" : "4" , "Exponent" : "URhnOOSPQp7VG5FxGq2wLQ+k3FJUQEy+GWOYxbk8KKNwtbt/Fy+agBMtuZOuLKmhjWrIpU0+i78rM7cFur3qXI5TUFZ1Jj2eIhxrphoKnu99FmcLEIICtFp0Y/rbyv1RmBSvh9E+kMebvw2KGlVVl8JNhRnyZtdHEoWN7YV+zeSNuGDh8h6pJkN8b15PuXZhQw9RKa3WRsNy/3PCVkNILsOI7L+VZTQ3Zl0q3DghlaHNZlkeyLp/uSnArayUdWlTBq8H0ZtyaAlgBhFNnh/CkQFenpnz2EKSO4aMGo6NkIjbYEYoK5t119z0S56JbzGA71iDqW3VxK5KxZcDLItU8yGp7zi6SPAJXvUxg/8rnXRZ/nm+8KVLwi3Itog8DWYR7zx4weNd2Tx4JvHx+FatLnM3ut6yiUiaW6uL0Zg+yLg1PXy5bEwlAlke/9c/Z7gyY+cLQVMv525LgMQQDje/wNaQT2QosN5Cum+5jPq/0BYB4kXeotvASS2FLRJyo43JjmyfP6oQLOtSNDqbf1jl4JtjoCXBFAZKz6cR4RP1CWst4mMLUJqgOjQeSdd5ihdYZErKPzlLpghQixC/dx3W0ISzkp9b22Ee302bHQHwio+4Gc8B2e/Iabd8TQZuq8LY9BSrllHda8NsG3TFt3hEC+fjdhbz5ur4nd1xgtPtP00=" , "Modulus" : "m48Hq1rQKqljGUBCVku+qxFoa1oVBXghOWKSPArwl9uixba6pxlgqyV/BINWRYQMzgcdKPvGgusRIlalPqEEQB9XibCqJahUpxszoNkhH33cWSpMKZ8XWNmnvAZvtebpqtJYVP1ebqNGvCEm+e54dsxvRJJGmcOB6Wi36/l4c9/+zgNF5BZQItOlDc8OCYlttAvDhgExDow4leNuU/nBh12rcKD4P0KmIYdPzFBYgTe18DyJ12GKf2rStFF9VDlTsp+Gl7ZejPzQ7/CsX0eSHHplsZjjCB6mlmBStFOY7OWMLS/pnYAQ6Ywnaf+tBNz4Fd9eBBxwD0Vn+dU4YDxEJYvZuVkOqyio581jHn5U7rjTofzTyHvy5tzWuYF52R2dGkcTBgjkbmE0Z6nkZ2TdPEog15eZClsHHMseyzhBa3LCC2nmnvZqppV4+Ijj5e1XKEobPOgVZMejXNukW1dzfX9gMf1NrOD2KX2cnyPT6IvP6zu5Cztiy3rVtBiDtQIaQnaCsix8t0+oh5aqzhj6GrblcYs1JX/uy0OYO+hO/yTLET378TehhRjYbnHQsS2PBqBVM6i7hK7xT1TxuUE5oJYJULDWmOn9AZKmnzkx+VyQgmqmNA/L0vJqOhsDvvA29UGNEn5junydqkQlLP4OovlZcoic2R/tYPFcwMKPp68=" } } , "bEnablePakSigning" : true , "bEnablePakIndexEncryption" : true , "bEnablePakIniEncryption" : true , "bEnablePakUAssetEncryption" : true , "bEnablePakFullAssetEncryption" : true , "bDataCryptoRequired" : true , "PakEncryptionRequired" : true , "PakSigningRequired" : true , "SecondaryEncryptionKeys" : [ { "$type" : "2" , "Name" : "Key1" , "Guid" : "757096074E55F5FCA962949C55209CCB" , "Key" : "SsukCy4DShNsMi5e9jUpMWJi5qtTA+rLeIoTHRtjM0o=" } ] }
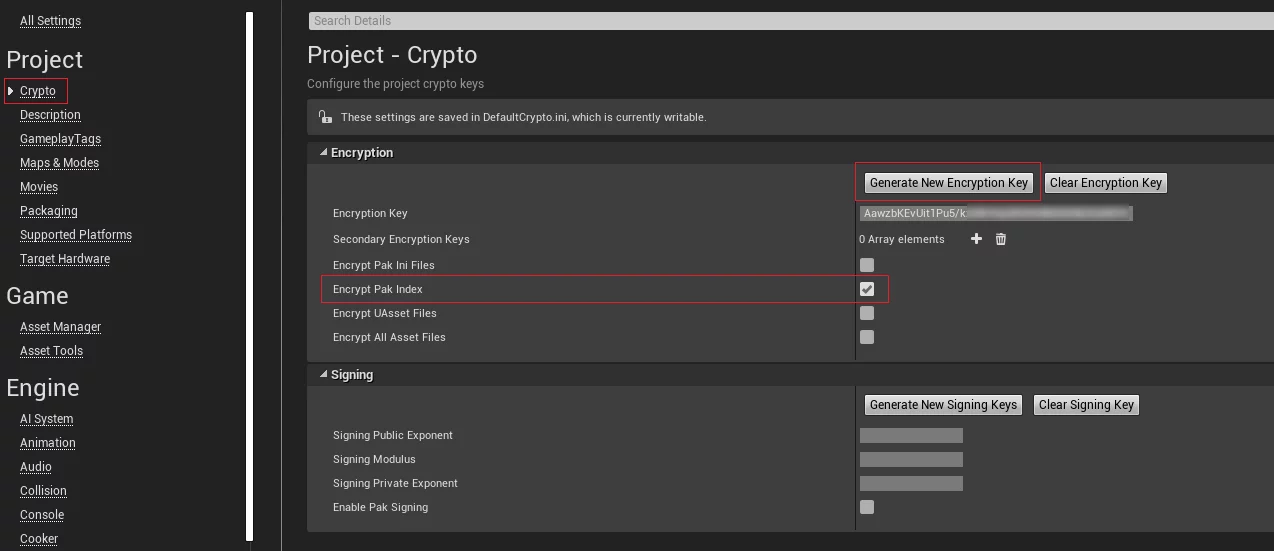
它是根据Project Setting-Crypto中的设置生成的。
UnrealPak比较常用的命令组合:
1
2
3
4
5
6
7
8
# 将COOCKED_ASSET_FOLDER路径下所有cookedd的资源打包到一个pak里面,并执行压缩 unrealpak.exe NEW_PAK_FILE_NAME.pak -create=COOCKED_ASSET_FOLDER -compress # 加密pak,需要指定32 位的AES key,要执行加密-encrypt/-encrtptindex/-aes缺一不可。 unrealpak.exe NEW_PAK_FILE_NAME.pak -create=COOCKED_ASSET_FOLDER -compress -encrypt -encryptindex -aes=32B IT_AES_KEY # 查看pak中的资源列表 unrealpak.exe PAK_FILE_NAME.pak -list # 查看加密的pak中的资源列表 unrealpak.exe NEW_PAK_FILE_NAME.pak -list -aes=32B IT_AES_KEY
相关工具:
在Project Setting-Project-Crypto中可以选择加密项目并且直接生成EncryptionKey:
UnrealPak是一个StandaloneApplication程序,它的启动代码在:Engine/Source/Programs/UnrealPak/Private/UnrealPak.cpp .ExecuteUnrealPak函数,其在引擎中的位置为Engine/Source/Developer/PakFileUtilities/Private/PakFileUtilities.cpp
UnrealPak为pak生成sig:
注意:在UE4.23+引擎版本中,在指定cryptokeys参数时,需要同时指定-sign。
1 $ UnrealPak.exe D:\TEST_SIG.pak -create="XXXXXXX.txt" -cryptokeys="Crypto.json"
其中Crypto.json文件在你使用编辑器打包的时候会生成,它是根据Project Setting-Crypto中的设置生成的,保存在路径:
1 PROJECT_DIRECTORY\Saved\Cooked\WindowsNoEditor\PROJECT_NAME\Metadata\Crypto.json
注意PROJECT_DIRECTORY和PROJECT_NAME都换成你自己的。
Crypto.json这个文件的生成是在AutomationTool这个工具里面的,相关的代码在:
1 2 3 4 5 6 7 8 9 10 11 12 13 14 15 16 17 18 19 20 21 22 23 24 25 26 27 28 29 30 31 32 33 34 35 36 37 38 39 40 41 42 43 44 45 private static void CreatePakUsingStagingManifest (ProjectParams Params, DeploymentContext SC ){ LogInformation("Creating pak using staging manifest." ); DumpManifest(SC, CombinePaths(CmdEnv.LogFolder, "PrePak" + (SC.DedicatedServer ? "_Server" : "" ))); var UnrealPakResponseFile = CreatePakResponseFileFromStagingManifest(SC, SC.FilesToStage.UFSFiles); List<PakFileRules> PakRulesList = GetPakFileRules(Params, SC); List<string > PakList = new List<string >(); List<string > FilesToRemove = new List<string >(); foreach (var StagingFile in UnrealPakResponseFile) { bool bExcludeFromPaks = false ; ApplyPakFileRules(PakRulesList, StagingFile, PakList, out bExcludeFromPaks); if (bExcludeFromPaks) { FilesToRemove.Add(StagingFile.Key); } } foreach (var FileToRemove in FilesToRemove) { UnrealPakResponseFile.Remove(FileToRemove); } EncryptionAndSigning.CryptoSettings PakCryptoSettings = EncryptionAndSigning.ParseCryptoSettings(DirectoryReference.FromFile(Params.RawProjectPath), SC.StageTargetPlatform.IniPlatformType); FileReference CryptoKeysCacheFilename = FileReference.Combine(SC.MetadataDir, "Crypto.json" ); PakCryptoSettings.Save(CryptoKeysCacheFilename); List<CreatePakParams> PakInputs = new List<CreatePakParams>(); PakInputs.Add(new CreatePakParams(SC.ShortProjectName, UnrealPakResponseFile, Params.Compressed, null )); CreatePaks(Params, SC, PakInputs, PakCryptoSettings, CryptoKeysCacheFilename); }
EncryptionAndSigning这个类是定义在UnrealBuildTool\System\EncryptionAndSigning,在里面可以看到对DefaultCrypto.ini文件的解析。
UE4:修改Setup.bat使用的线程数加速下载 在下载UE4的源码之后,需要先执行Setup.bat下载依赖才可以开始生成VS项目文件以及编译。
但是国内的网络环境又极差,默认的Setup.bat是没有指定线程数量的(Setup.bat只给GitDenpencies传递了--prompt参数)。
1 2 3 4 5 6 7 8 9 10 11 12 13 14 15 16 17 18 19 20 21 22 23 24 25 26 27 28 29 30 31 32 33 34 35 36 37 38 39 @echo off setlocal pushd %~dp0set PROMPT_ARGUMENT=for %%P in (%*) do if /I "%%P " == "--prompt" goto no_prompt_argumentfor %%P in (%*) do if /I "%%P " == "--force" goto no_prompt_argumentset PROMPT_ARGUMENT=--prompt:no_prompt_argument .\Engine\Binaries\DotNET\GitDependencies.exe %PROMPT_ARGUMENT% %* if ERRORLEVEL 1 goto errorif not exist .git\hooks goto no_git_hooks_directoryecho Registering git hooks...echo #!/bin/sh >.git\hooks\post-checkoutecho Engine/Binaries/DotNET/GitDependencies.exe %* >>.git\hooks\post-checkoutecho #!/bin/sh >.git\hooks\post-mergeecho Engine/Binaries/DotNET/GitDependencies.exe %* >>.git\hooks\post-merge:no_git_hooks_directory echo Installing prerequisites...start /wait Engine\Extras\Redist\en-us\UE4PrereqSetup_x64.exe /quietif not exist .\Engine\Binaries\Win64\UnrealVersionSelector-Win64-Shipping.exe goto :no_unreal_version_selector.\Engine\Binaries\Win64\UnrealVersionSelector-Win64-Shipping.exe /register :no_unreal_version_selector goto :EOF:error pause
GitDependencies.exe支持的参数为:
1
2
3
4
5
6
7
8
9
10
11
12
13
14
15
16
17
18
19
20
21
22
23
24
25
Usage: GitDependencies [options] Options: --all Sync all folders --include=<X> Include binaries in folders called <X> --exclude=<X> Exclude binaries in folders called <X> --prompt Prompt before overwriting modified files --force Always overwrite modified files --root=<PATH> Set the repository directory to be sync --threads=<N> Use N threads when downloading new files --dry-run Print a list of outdated files and exit --max-retries Override maximum number of retries per file --proxy=<user:password@url> Sets the HTTP proxy address and credentials --cache=<PATH> Specifies a custom path for the download cache --cache-size-multiplier=<N> Cache size as multiplier of current download --cache-days=<N> Number of days to keep entries in the cache --no-cache Disable caching of downloaded files Detected settings: Excluded folders: Mac, Android, Linux Proxy server: none Download cache: E:\UnrealEngine\EngineSource\UE_4.21 _Source\.git\ue4-gitdeps Default arguments can be set through the UE4_GITDEPS_ARGS environment variable.
所以我们可以将Setup.bat中的变量PROMPT_ARGUMENT增加上指定的线程数即可(N替换为数字):
1 set PROMPT_ARGUMENT=--prompt --threads=N
我一般开8个线程,基本可以跑2-3M/s…
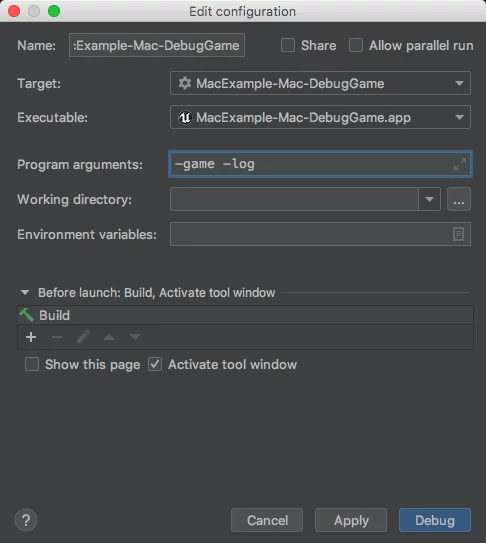
UE4:Clion debug project on MacOS 使用Clion打开项目之后设置debug(Run-Edit Configuration):Executable选择为项目目录下的Binaries中编译出来的可执行文件,然后加上参数-game -log即可。
使用VSC编写代码(UE_4.18+) 下面是UE的官方介绍:New: Visual Studio Code Supported on Windows, Mac and Linux
You can now use Visual Studio Code to write code on all UE4 host platforms. To use it, select “Visual Studio Code” as your preferred IDE from the editor preferences dialog, or add the -vscode argument when generating project files on the command line. All platforms are also required to have the .NET Core 2.0 runtimes installed, which can be obtained from the Microsoft .NET Core website .
On OS X: brew install mono
On Linux: sudo apt-get install mono-complete
UE蓝图的Paste工具 可以把蓝图的代码复制到blueprintue.com (在国内可以用陶任贤的国内站blueprintue.cn ,但不支持https),把网址发给别人,就能够让别人看到蓝图里的节点,就像在UE的编辑器里一样。
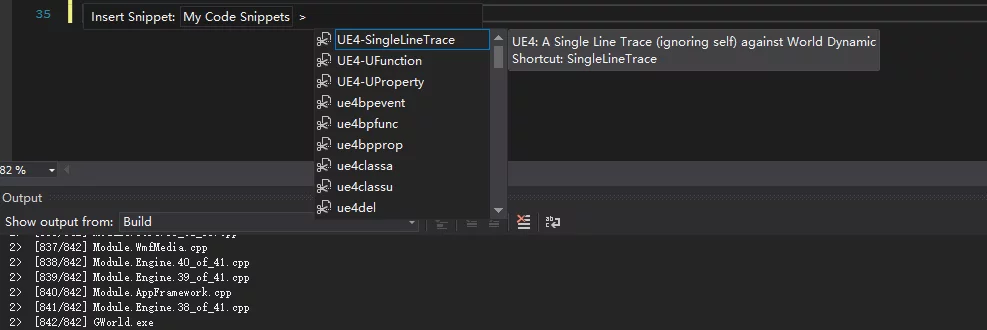
UE4:添加UE的Code Snippet到VS 首先,打开源码版UE以下目录(从EpicGameLauncher安装的没有,若没有源码版引擎可以点这里下载 ):
1 Engine\Extras\VisualStudioSnippets
这个目录下有很多的*.snippet文件,就是VS中的代码片段,主要是对UE的各种宏的封装,这样在VS中写UE的代码时就不用每次都敲一遍了。
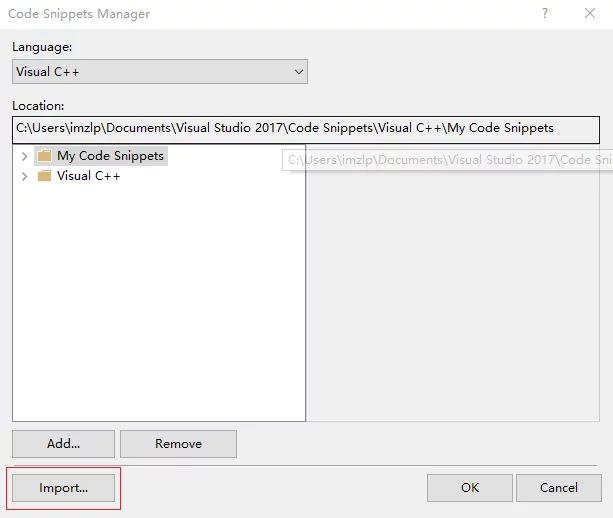
导入VS的方法为:在VS中打开Tools-Code Snippets Manager:
点击Import,选择上面找到的引擎中的目录Engine\Extras\VisualStudioSnippets,全选导入即可。
在VS里触发的方式为依此按下组合键Ctrl+K与Ctrl+X,然后选择My Code Snippets,就可以看到导入进来的所有UE的Code Snippets了。
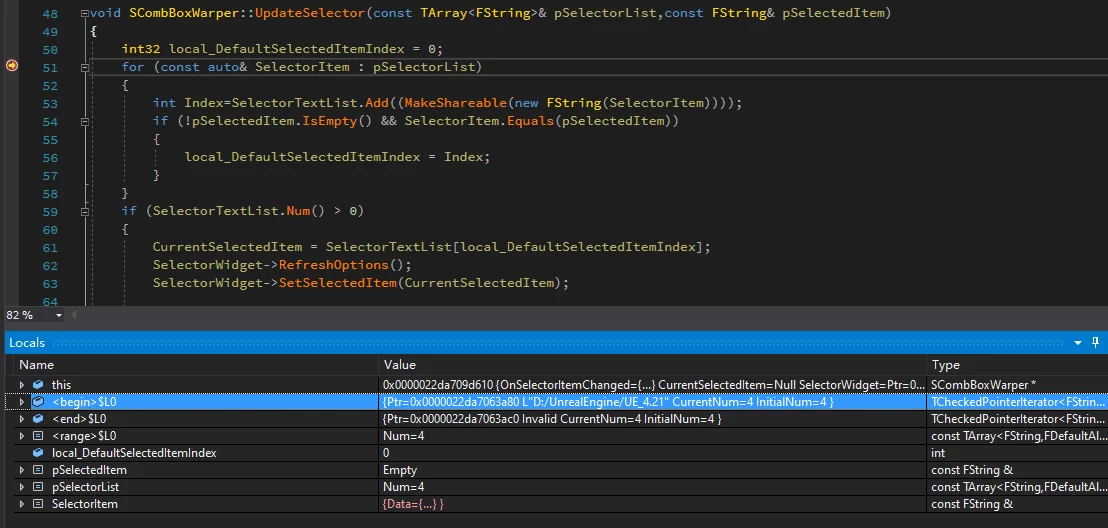
UE4:在VS中调试时显示对象值 打开引擎路径:
1 Engine\Extras\VisualStudioDebugging
该路径下会有一个UE4.natvis.zip 文件,将其拷贝到VS的下列路径中:
1 C:\Program Files (x86)\Microsoft Visual Studio\2017\Community\Common7\Packages\Debugger\Visualizers
然后重启启动调试,就可以在调试窗口看到对象值了。
VS调试独立运行的UE项目 在UE的编辑器模式下以Standalone方式运行,在VS中是没办法及时Attach to process上的。Attach to process是很不方便的,也没有那么及时(因为点完启动在等我们在VS中attach到进程上有可能引擎都已经启动完毕了)。UnrealVS ,该插件的VS安装程序在引擎的Engine\Extras\UnrealVS目录下,根据你的VS版本选择安装。View->Toolbars->UnrealVS启用,就会在VS的工具栏看到了。在这里选择你的项目:
后面的框是命令行框,填入的参数会在启动时传递给程序(具体介绍看UnrealVS 里面的描述),所以我们可以在后面填参数使其以独立模式启动(可以从Command-Line Arguments 查看支持的参数):
1 "$(SolutionDir) $(ProjectName) .uproject" -game -windowed -log -verbose
这样就会在VS中使用F5启动项目时自动attach的到进程上的。
UE Package:Create a patch
最需要注意的是下面三点:
Lock down the serialization code paths at the time of release.
Keep the released cooked content, as the UnrealPak tool uses this to determine which content should be in the patch package file.
At runtime, mount both pak files, with a higher priority for the patch file so any content within it is loaded first.
总结来说就是,要保证与上次打包的资源路径不变/保留上次打包版本的Saved/Cooked目录(因为创建的Patch是通过UnrealPak来检测当前项目里的资源与上次Cooked的差异),程序运行时优先加载Patch的文件*0_P.pak,其中数字越大加载的优先级越高。
蓝图的功能实现也是uasset的,所以也会打包在pak里面,而不会在.exe里。蓝图是运行在虚拟机上的(详见Blueprint FAQ and Tips ),并不是类似C++的直接编译成二进制文件,即蓝图也是资源,所以会打包在pak里面,这意味着如果纯用蓝图实现的项目可以不用变动.exe只增加patch就可以达到游戏更新。
注:UnrealFrontend创建的配置是存储在Engine/Programs/UnrealFrontend/Profiles下的*.ulp2文件。
UE4: 修改UnrealForntend的语言 编辑Engine/Programs/UnrealFrontend/Config/DefaultEngine.ini,加入以下配置:
1
2
[Internationalization] Culture =en
改成zh-CN是中文,不过不建议改成中文的,看着中文的词有歧义,都不知道是什么。
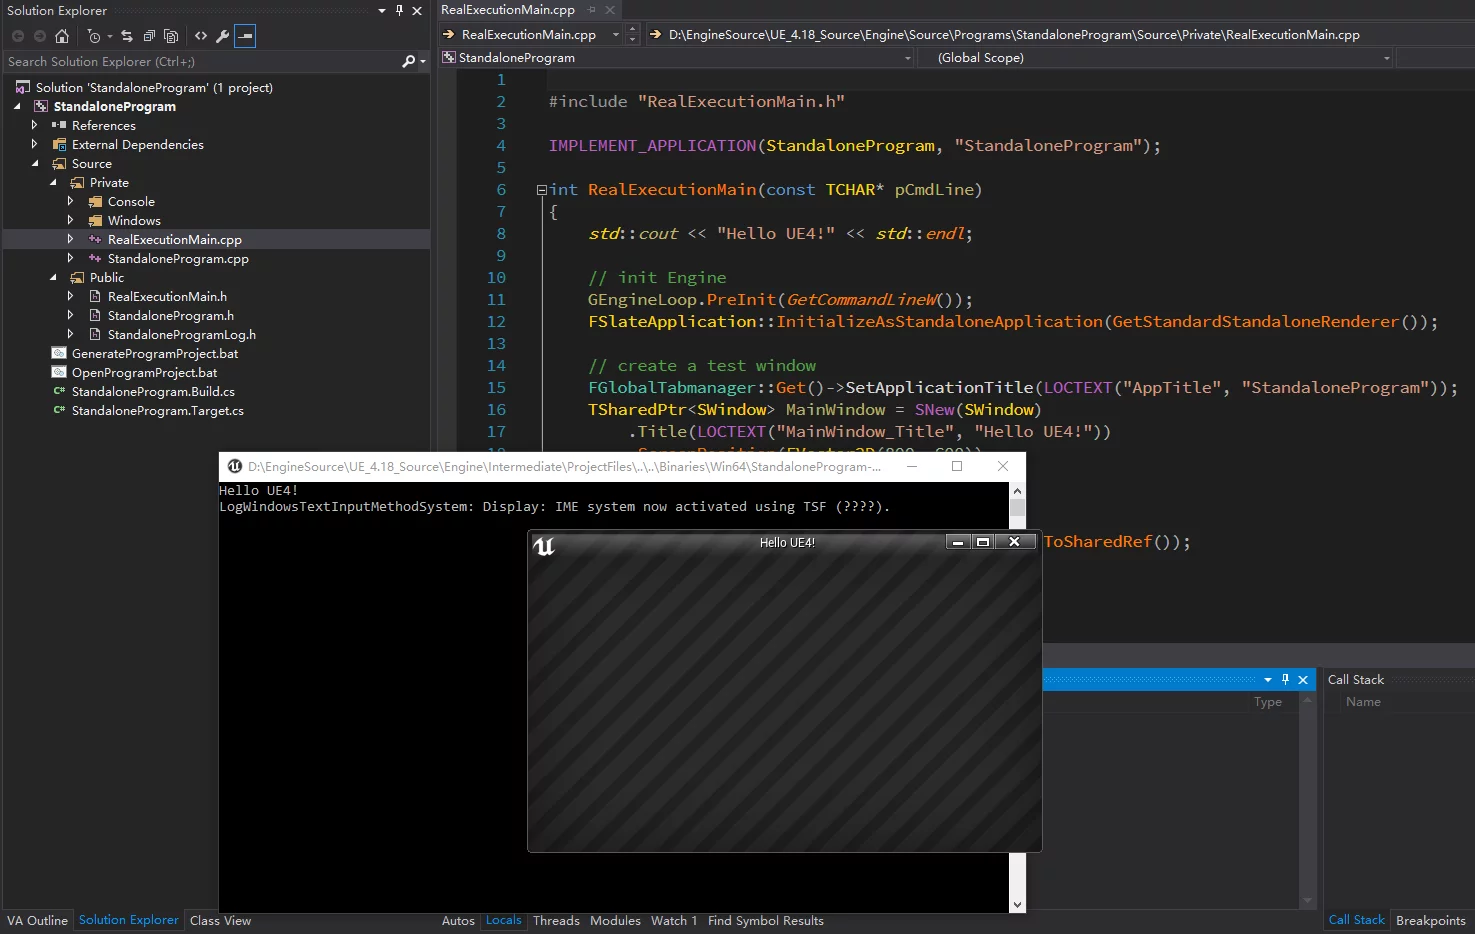
UE创建StandaloneApplication 使用UE也可以写应用程序(StandaloneApplication: Target is Program),可以把UE当作一个超大的ThridParty.hxhb/UEProgramTemplate .
但是想要创建新的StandaloneApplication太麻烦了,我写了一个小工具可以直接创建:hxhb/UECreateProgramTemplateTool .
1 2 3 $ create_program.exe $ProgramName Create Standalone Program Successed!
move $ProgramName Folder to Engine\Source\Programs (version of source code)
run GenerateProgramProject.bat
OpenProgramProject.bat
用起来相当酸爽。
注意 :
bBuildWithEditorOnlyData控制的是WITH_EDITORONLY_DATA。bCompileAgainstEngine控制的是WITH_ENGINE
开发Program类型的程序时需要注意这些配置。可以在UnrealBuildSystem/Targets 查看*.target.cs支持的全部参数。*.Target.cs里的配置在Programs\UnrealBuildTools\Configuration\URBuildTarget.cs的SetupGlobalEnvironment函数。
注册UnrealVersionSelector 如果遇到uproject没有文件关联的情况可以使用下列注册表修复文件关联。
保存为.reg,双击合并即可。
1
2
3
4
5
6
7
8
9
10
11
12
13
14
15
16
17
18
19
20
21
22
23
24
25
26
27
28
29
30
31
32
33
34
35
36
37
38
39
Windows Registry Editor Version 5.00 [HKEY_CLASSES_ROOT\.uproject] @="Unreal.ProjectFile" [HKEY_CLASSES_ROOT\Unreal.ProjectFile] @="Unreal Engine Project File" [HKEY_CLASSES_ROOT\Unreal.ProjectFile\DefaultIcon] @="\"C:\\Program Files (x86)\\Epic Games\\Launcher\\Engine\\Binaries\\Win64\\UnrealVersionSelector.exe\"" [HKEY_CLASSES_ROOT\Unreal.ProjectFile\shell] [HKEY_CLASSES_ROOT\Unreal.ProjectFile\shell\open] @="Open" [HKEY_CLASSES_ROOT\Unreal.ProjectFile\shell\open\command] @="\"C:\\Program Files (x86)\\Epic Games\\Launcher\\Engine\\Binaries\\Win64\\UnrealVersionSelector.exe\" /editor \"%1\"" [HKEY_CLASSES_ROOT\Unreal.ProjectFile\shell\run] @="Launch game" "Icon"="\"C:\\Program Files (x86)\\Epic Games\\Launcher\\Engine\\Binaries\\Win64\\UnrealVersionSelector.exe\"" [HKEY_CLASSES_ROOT\Unreal.ProjectFile\shell\run\command] @="\"C:\\Program Files (x86)\\Epic Games\\Launcher\\Engine\\Binaries\\Win64\\UnrealVersionSelector.exe\" /game \"%1\"" [HKEY_CLASSES_ROOT\Unreal.ProjectFile\shell\rungenproj] @="Generate Visual Studio project files" "Icon"="\"C:\\Program Files (x86)\\Epic Games\\Launcher\\Engine\\Binaries\\Win64\\UnrealVersionSelector.exe\"" [HKEY_CLASSES_ROOT\Unreal.ProjectFile\shell\rungenproj\command] @="\"C:\\Program Files (x86)\\Epic Games\\Launcher\\Engine\\Binaries\\Win64\\UnrealVersionSelector.exe\" /projectfiles \"%1\"" [HKEY_CLASSES_ROOT\Unreal.ProjectFile\shell\switchversion] @="Switch Unreal Engine version..." "Icon"="\"C:\\Program Files (x86)\\Epic Games\\Launcher\\Engine\\Binaries\\Win64\\UnrealVersionSelector.exe\"" [HKEY_CLASSES_ROOT\Unreal.ProjectFile\shell\switchversion\command] @="\"C:\\Program Files (x86)\\Epic Games\\Launcher\\Engine\\Binaries\\Win64\\UnrealVersionSelector.exe\" /switchversion \"%1\""